A. Why is this document needed?
-
Most pinball games from the late 1980s to present use plastic ramps.
With time, from the abuse of a 1 1/16" steel ball being driven at
them, these ramps will crack. And eventually, they will break.
This almost always happens at the entrance to the ramp, where the
pinball gets smashed into the ramp from the flippers.
There are three major problems with plastic ramps. First, they are game specific. There is no such thing as a 'generic' replacement ramp. Second, new replacement ramps are expensive. Price can be anywhere from $25 to $300, depending on the game. Lastly, there is a limited supply of replacement ramps. For some games, there are just no replacement ramps to be found anywhere.
|
A typical broken ramp on a Star Trek Next Generation. |
|
-
Because of these problems, it is in the game's best interest to keep
the plastic ramps in tip-top condition. If a ramp is already broken,
and a replacement can not be found (or afforded!), repair is the only solution.
This document describes how to make stainless steel entrances for plastic ramps easily and cheaply. This will repair most broken ramps, and protect them from further abuse. It can also be used to protect unbroken ramps.
There is another great article on plastic ramp repair at http://www.best.com/~bobhsc/Bopramp.htm. The only problem with this repair method is the amount of work involved! It uses fiberglass to reform to missing/broken ramp side walls. This was just too labor/time instensive for my tastes. Though replacing the missing plastic sections with new material is ideal, I personally was just not willing to spend that amount of time doing it. This web page was inspired by the above page.
B. Parts needed (which you already have!)
-
There are other techniques at fixing ramps. But this one tries to
use simple parts which are easily available. The main resource used
in this document for fixing ramps is stainless steel. There is probably
an infinite supply of stainless steel available, in the way of
bent pinball side rails!
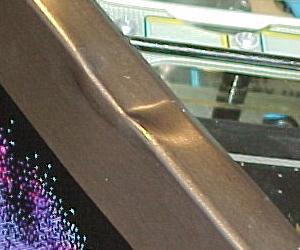
|
A typical bent pinball side rail on a 1993 Williams Star Trek Next Generation. This material can be perfectly recycled for ramp repair. |
|
-
Many late model Williams and Bally games seem to have bent side rails.
This happens because when the backbox is folded down, it rests
on the sides rails. If there is any pressure on the head,
the side rails can dent. Luckily they are easily replaced.
At about $30 each, new side rails can really make a game look
sharp (if the current rails are dented).
Steve Young at Pinball Resource (845-473-7114) has also remanufactured
the stainless steel side rail, so they are readily available.
But the really good news is now there is a use for the old, bent side rails; ramp repair! This material is perfect for this purpose. It is stainless steel, it is the right thickness, it is already bent to the right shape. All that is needed is for the metal to be cut to the right size.
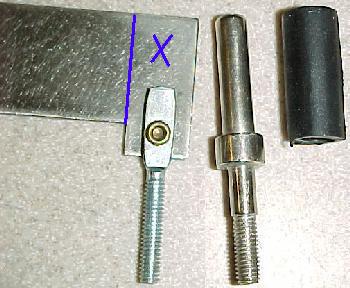
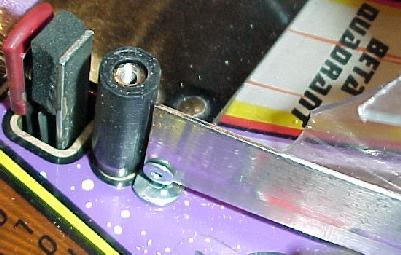
|
Metal playfield post and black rubber sleeve needed for ramp repair. This post has a threaded hole on the top for a screw. |
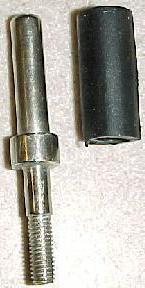
|
-
The only other part needed for ramp repair are some screws and maybe some
playfield posts. The playfield posts are the metal variety which hold
a black rubber sleeve. These are needed at the entrance of the ramps.
Most ramps already have these installed; they are excellent for defecting
balls and protecting the ramps' entrance. These are also needed
to bolt the new ramp protection/repair stainless steel in place (the post has
a threaded hole in the top to accomodate a screw).
These metal playfield posts are available from Pinball Resource, part number GTB-26531, $2.00 each (this is actually a Gottlieb part, but it works perfectly and Pinball Resource has lots of them). The original Williams post part number is 02-4036 or 02-4659. All these posts have a threaded top 6-32 hole, and a bottom stud that uses a 8-32 nylon locknut. A black rubber sleeve is also needed for these posts.
C. Necessary Tools.
-
To make the stainless steel ramp protectors, some tools are needed.
A way to cut metal is the most needed tool. I found using a band
saw with a metal cutting blade is best. If a band saw is not
available, a Dremel tool with a cutoff wheel will also work.
For finishing the metal pieces, a bench grinder or hand file will be needed. Finally, a drill and drill bits are also needed to drill the stainless steel. It is also a good idea to have a pop rivet gun handy.
Lastly, a "Sharpie" mark-all pen is needed for writing on the stainless steel.
D. Cleaning a Ramp before Repair.
-
Before embarking on ramp repair, the ramp in question will need to be cleaned.
The biggest tip on cleaning ramps is to 'dishwash' them. That's
right, just put the whole ramp assembly in the dishwasher.
Add dish soap, and put the dishwasher on a short cycle, with
NO heat drying.
Amazingly, decals and stickers will not delaminate from the ramp. Micro switches do not need to be removed either; they survive the wash cycle just fine. Using a dishwasher to clean a ramp will do the best cleaning job possible. Ball marks will still need to be removed, as will some really stubborn dirt. Use Novus2 (only!) for this chore. Ramps should not be cleaned with anything other than soap and water, and Novus2.
E. Fixing Ramp One.
-
The first ramp to fix in this document is the "Alpha" ramp
on Star Trek Next Generation. The ramp in question has taken
a severe beating, and broken a hole right through the side.
This needs to be fixed to hide the hole, and to prevent any
further damage (to an already weakened ramp).
|
A broken "Alpha" ramp on a Star Trek Next Generation. |
|
|
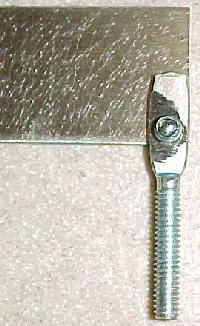
-
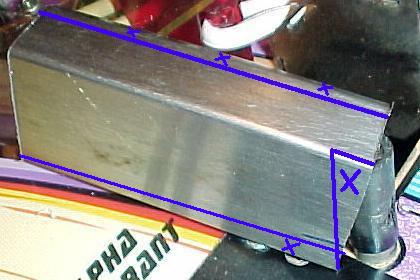
The first step is to cut a section off the bent side rail to the
approximate length needed. This section is layed on the ramp, and
marked with the Sharpie pen. The top section of the stainless steel
side rail will always be too wide. Also, a the section around the
post will need to be cut. This will leave a tab, which a hole will
be drilled. This mounts the stainless steel to the metal post in
front of the ramp.
|
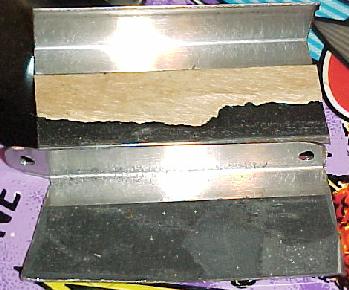
The rough-cut stainless steel is marked for further cutting. The "X" sections will be the cut discarded sections |
|
|
Top: The back side of a fresh-cut side rail, complete with some cabinet wood! (this side rail was taken off a junk cabinet, in hast). Bottom: The side rail after it has been cut, finished and drilled. |
|
-
After the metal is rough cut, it is fit and finished to the ramp.
The top side corners of the metal are rounded for a better look.
The black adhesive tape is left on the back side of the metal, as a cushion to
the plastic ramp.
A hole is drilled at the rear of the metal for a self-taping screwing. The
plastic ramp is also drilled for this same screw (but with a smaller
drill bit). Finally the ramp protector can be
sanded with 600 grit sandpaper for a shiney finish (remember, it's
stainless steel, so you can sand it), and installed.
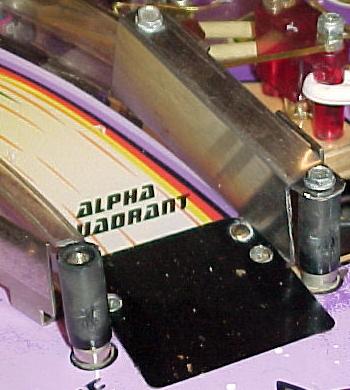
|
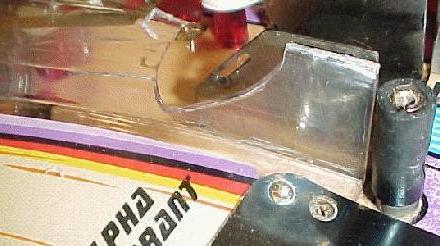
The freshly installed stainless steel ramp protector. |
|
-
The installed ramp protector hides the crack in the ramp, and protects
the ramp from any further ball damage.
F. Fixing Ramp Two.
-
Fixing ramp two is pretty much a repeat of ramp one.
The angle of the ramp is much greater, so the protector
is harder to fit, and harder to make it look good. But overall,
the results are pleasing.
|
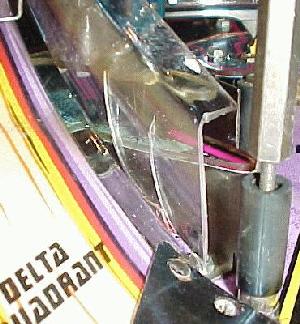
The virgin cracked "Delta" ramp. |
|
|
Fitting the cut metal side rail to the ramp. |
|
|
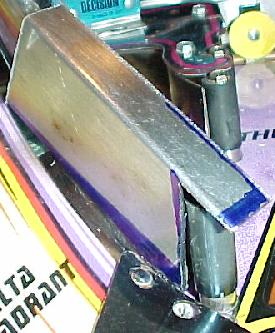
The final product installed. |
|
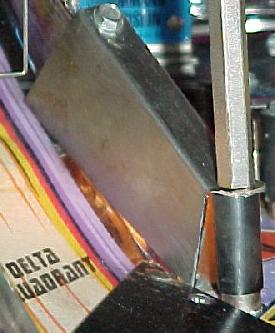
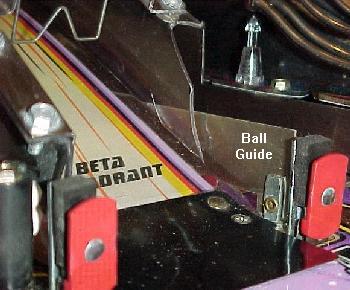
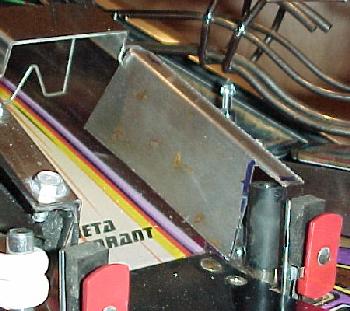
F. Fixing Ramp Three.
-
Ramp number three is a bit more difficult to fix. There is a target
in front of the side of the ramp with the break; there is no metal post to
attach the ramp protector. Because of this, a post will need to be added
to secure the metal ramp protector.
|
This ramp is really broken. The entire side wall is cracked and broken away. Notice the metal ball guide, just behind the target. |
|
-
In this situation, the metal ball guide was removed from the game. To
accomodate the added post, the ball guide is made shorter.
The rivet that holds the attaching screw to the ball guide
is ground off, and the screw removed (and saved). Then the ball guide is cut.
A new hole is drilled, and the ball guide screw is reattached with a pop rivet.
|
On the left is the ball guide, which will be shortened, and the attached post moved (the blue "X" area will be discarded). On the right is the added metal post and rubber sleeve. |
|
|
The ball guide after the excess is cut off, and the attaching screw is moved. |
|
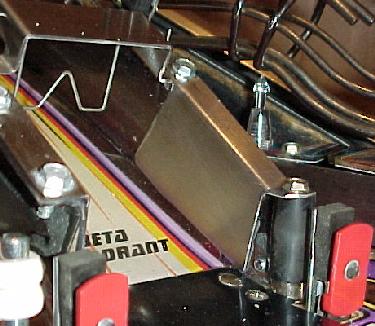
-
Directly behind the target, the new post is installed. The hole that
formerly accomodated the ball guide screws is used for the new post. Behind the
post, a hole is drilled for the relocated ball guide screw.
|
|
|
-
At this point, installation of the ramp protector is just like the
other two. The metal is rough cut, fitted, marked with a sharpie,
and then final cut. Then the metal is finished with a file, drilled
for two holes. Finally the metal is shined with some 600 grit
sand paper, and installed.
|
The rough cut metal is being fitted and measured for final cutting. |
|
|
The final installation of the ramp protector. |
|
End of Ramp Repair document.
* Go to the Pin Fix-It Index at http://www.pinrepair.com/fix.htm