cfh@provide.net, 07/24/09.
Copyright 1998-2009, all rights reserved.
Scope.
Roto-targets are a spinning target using on Gottlieb pinball machines from
the mid-1950's till the mid-1980's. Since the metal pinball hits these targets
on the playfield, the ball wears and scratches the painted number on the target.
This can make an otherwise nice looking machine look worn and tired.
This document will show how to repair this.
Note Gottlieb used many different styles of numbers and letters on their roto-targets. By far the most common is the "thick" number style that are 15/16" tall, and was used on Sittin' Pretty, Buckaroo, Flipper Parade, Flipper Cowboy, Cowpoke and others. These were used on many games from the late 1950's through the 1960's. I provide the graphics for this style of lettering. I also provide the graphics for the "thin" number style as used on Flipper Clown, and the style used on King of Diamonds and Diamond Jack. There are probably other styles on other games that aren't covered by these unfortunately.
|
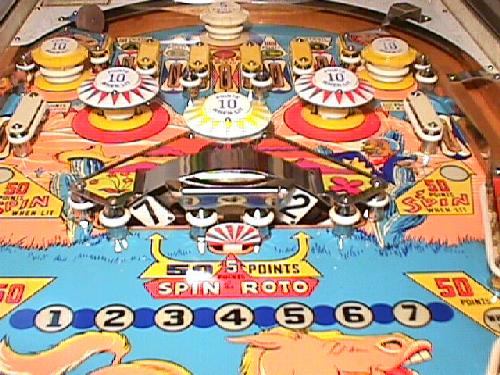
A newly repaired roto-target installed on Buckaroo. Also note the new reproduction center red and white sunburst target (available from Pinball Resource for $2.00). |
|
-
Games Included.
The game used in this document for restoration is a 1965 Gottlieb Buckaroo. This game used the "thick" 15/16" inch tall roto-target numbers. The same font style is also used on many other (but not all!) Gottlieb roto-target games. I have seen this font used on Gottlieb's 1958 Sitting Pretty, 1961 Flipper Parade, 1962 Flipper Cowboy, 1964 Seashore, 1965 Cowpoke, and several others. It also includes the "red dot" graphic for the add-a-ball games (Cowpoke, Flipper Cowboy).
|
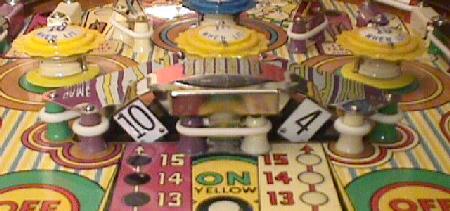
A newly repaired roto-target installed on Flipper Clown. Note the thinner font style used. |
|
-
I have also included the art for another style of thinner roto target numbers.
These were used on the 1962 Flipper Clown and maybe some others. The numbers are
thinner than the ones used on Buckaroo, and are 7/8" of an inch tall.
|
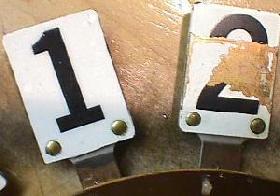
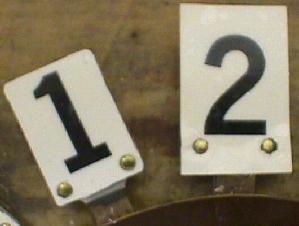
Left: A newly repaired roto-target number on the left, and an old beat-up original number on the right. This number style is the "thick" 15/16" tall type as used on Buckaroo, Flipper Parade and others. Right: Old "thin" 7/8" tall roto-target numbers as used on Flipper Clown. |
|
-
The last style of roto-target numbers included are the ones used on
King of Diamonds and Diamond Jack. These numbers 13/16" tall, with a
picture frame border around them that is 1 1/16" tall. Note these
numbers are printed in red.
|
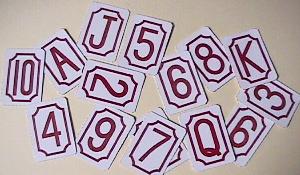
Left: New replacement King of Diamonds/Diamond Jack roto-target replacements. Right: Numbers as used on woodrail games such as Sittin' Pretty. |
|
-
The Short Run.
- 8.5" x 11" white adhesive backed paper. I got this at a local sign shop, but it did take some looking. The brand I got was "Kapjet Film" by Kapco Graphic Products (800-791-8963 or 216-678-1626). This is an adhesive backed white 3.2 mil vinyl with a 90# stayflat liner. The reason this stuff is good is it allows inkjet or laserjet printing. The real glossy bumper sticker material that most sign shops have on large rolls won't allow printer ink to stick. Another product is called "Starliner" by Mactac. I personally haven't tried this product, but you may be able to get a sample by calling 800-334-7310. It seems to be the same type of product.
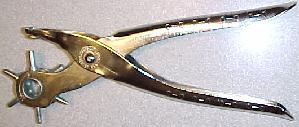
- A leather punch, available at any good leather repair shop or hardware store. I bought mine at the local hardware for $11.25.
- 8.5" x 11" mylar. You can get this from the Pinball Resource.
- A computer and printer. I used a pentium and a HP Laserjet series II printer. An inkjet printer would work too.
- Software to print the file. I used PaintShop Pro version 5.01 or the older PaintShop Pro 3.11 (16 bit). Either works fine for this job. Go to http://www.jasc.com/pspdl.html to get the latest version for a free 30 day trial. Or click psp311.zip for the older 3.11 version (1.9 meg) which is ZIP'ed (so you'll need PKUNZIP to extract it). Obviously you can use Photoshop too.
- Thicker number style as used on Buckaroo, Flipper Parade, Flipper Cowboy, Cowpoke, Seashore, Sittin' Pretty and others is at rotonum1.zip. This is a 20k ZIP'ed file in PCX graphic format, so you'll need PKUNZIP to extract it. The file contains the numbers 1 to 7, in seven rows, and two of the add-a-ball graphic "dots" (one in red, and one in black). You may not use all the numbers for your particular game. For example, some games (like Seashore) only use numbers 1 to 3.
- For thinner number style as used on Flipper Clown, it's at rotonum2.zip. This is a 78k ZIP'ed file in PCX graphic format. This includes numbers 1 to 15, in six rows (enough to do three games).
- 1957 Royal Flush numbers are available in photoshop and JPG format in the file 57royal_flush_targets.zip.zip (7meg.)
- King of Diamonds or Diamond Jack numbers are at kodnums.zip. This is a 240k ZIP'ed file in PCX graphic format. This includes the numbers 2 to 10, and the face card letters. I have these in three different colors: black, red, and the original scanned color (a darker red). Use what ever works best on your particular printer.
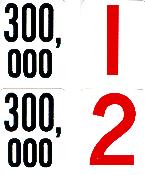
- Woodrail numbers as used on Sittin' Pretty are at woodnums.zip. This is a 170k ZIP'ed file in PCX graphic format. This includes red numbers 1 to 7, and stacked 300,000 point black numbers.
- Domino/Playmates style roto targets. This was only used on the 1968 Domino and 1968 Gottlieb Playmates (the add-a-ball version) and can be downloaded from domino.zip (56k ZIP'ed file).
Doing this fix is really a short run thing (hopefully!). Eventually, Steve Young at the Pinball Resource will reproduce these in a buy-and-apply format, like he has done with the metal center red and white "sunburst" target stickers. That would save a lot of work. I also scanned in the 100 point center target used in Flipper Fair, since Pinball Resource does not sell these. Download this graphic at 100targ.jpg.
Overall How It Works.
What I did was remove my roto-target numbers and scanned them on
a computer scanner. Using an art program, I "fixed" the worn
area of my numbers. Then I printed the fixed numbers on adhesive-backed
paper. To ensure the numbers didn't wear off, I cover the printed
numbers with a sheet of mylar. Lastly I adhere the new numbers
onto the roto-target number plate, and trim them with a razor blade.
What You Need.
You'll need to acquire the following:
Before you can fix your roto-target numbers, you'll need the graphic file of the new numbers.
Other Graphics Available.
I also scanned in the 100 point target used in Flipper Fair (which is
the same style of target as the red and white "sunburst" target). Though this
is not a roto-target, this target graphic can be repaired just as described
below. Download this graphic at
100targ.jpg.
This graphic should print 1 3/16" wide.
Printing the Numbers.
I used Paintshop Pro version 5.01 to load the number file and print
it. Note I had to print the file at 300% to get the correct size.
Use the "Page Setup" option, and set the size to 300% and unclick
the "fit to page" box. You may have to play with this percent,
depending on your printer.
I also used Paintshop Pro version 3.11. In this older 16 bit version, you need to change the Page Setup. Make sure "maintain aspect ratio", "use full page", and "center on page" are checked. This program works equally as well, even though it's an older 16 bit version. Click psp311.zip to download this version (1.9 meg) in ZIP format.
Finally Paintshop 4.1 is also a good free editor to use and is available in this file psp41.zip. This is supposed to be a 30 day trial but in reality the trail lasts forever. It's a nice shareware program.
The height of the larger numbers (as used on Buckaroo) is about 15/16 of an inch tall, and the distance from outside to outside of a number's rivet is 3/4 of an inch. The height of the thinner numbers (as used on Flipper Clown) is about 7/8 of an inch tall, and again the distance from outside to outside of a number's rivet is 3/4 of an inch. Compare the size of the printed numbers to the original numbers on your roto-target. Adjust the printing size percent till it's perfect.
Warning! When printing, make sure you do a "straight path" through your printer, especially on a laser printer! The heat from the laser printer drum will melt the vinyl onto the drum if the printer jams! It's an ugly mess and you'll have to completely disassemble your printer to clean it. The adhesive backed paper is much thicker than normal paper.
To minimize jams, use the non-collating back door feature of your laserjet printer. And also use the hand feed mechanism too. Practice with regular paper. The less turns the paper makes through the printer, the less likely the paper will jam and burn.
|
The printed numbers. Note the original rivet holes are preserved and printed (for a good reason). |
|
-
After you print the numbers on the adhesive backed paper,
laminate the number side with the mylar. You only have one
chance to put the mylar down right. It doesn't have to be
perfectly straight; you just don't want any air bubbles!
If you get a bubble, poke it with a pin and press it out.
When done laminating, cut the numbers into vertical strips; one strip for each number. Then cut the numbers individually. I used a paper cutter for this.
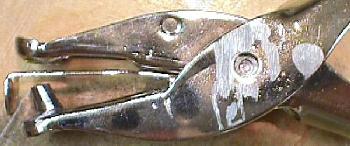
Using a Leather Punch.
A leather punch works perfectly to punch out the rivet holes
on the roto target numbers. You can get one at any good
leather repair shop and some hardware stores. This tool works
great for punching out the rivet holes!
|
A leather punch I bought at the hardware store for $11.25. |
|
-
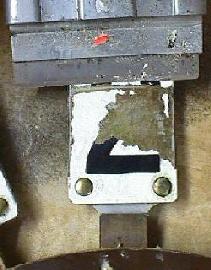
Modify a Paper Hole Punch.
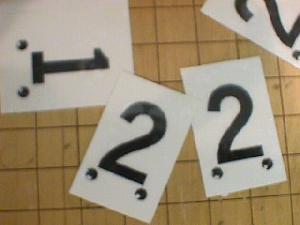
If you can't get a leather punch, you'll need to modify a regular paper hand hole punch. Grind the side rivet off the punch and knock the rivet out, and disassemble the punch. Grind the "cutter tip" on the punch to the same size as the roto-target rivet, as printed beneath each number. Practice punching holes in the scrap paper your did your test prints on.
|
The rivet's punch is ground off. The cutter has been ground to the size of the roto-target's rivets. |
|
-
Important! The better job you do of grinding your cutter
tip, the better results you'll get.
- Remove the lockdown bar (the metal or wood bar that holds the playfield glass in place).
- Slide out the playfield glass from the game.
- Lift the playfield, and suspend it with the prop-rod.
- Remove the three screws that hold the roto-target number plate to the flywheel. The numbered plate should lift easily out of the game from the bottom of the playfield. Don't lose the metal triangle plate that the screws pass through.
- After the number plate is removed, use a Sharpie (mark-all) pen and write each number on the brown disk (safety meassure).
Reassemble your hole punch, and put a bolt through the hole where the rivet once went (not shown in photo). Test your punch on some paper to make sure it cuts.
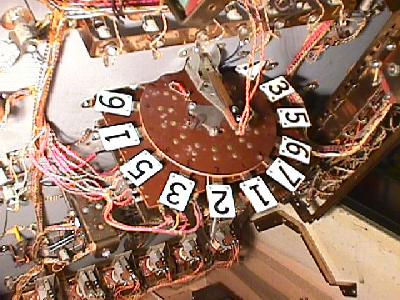
Removing the Number Plate.
Remove the roto-target spinning plate from your game. Here's how:
|
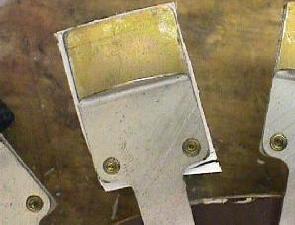
The roto-target from under the playfield (after the new numbers have been applied!). Note the small triangle metal plate with the three bolts (only two are visable). This is what holds the number plate in place. Also note I wrote each number on the brown disk before I applied the new numbers, to avoid confusion. |
|
-
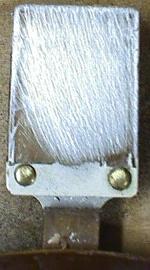
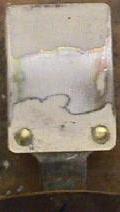
Scrap the Old Number.
After you have the roto-target number plate out, lay it on a flat table edge. Using a NEW razor blade, scrape the old number off. Don't scrape beyond the rivets! If the paint doesn't come off easy, that's fine. Don't force it. Just get as much flaking paint off as possible.
|
Left: scrap the old number off. Sometimes they just flake right off. If they don't want to scrape off, don't force them. Middle/Right: After sanding. The middle number came off completely, but the far right number didn't. Just sand it smooth. DO NOT sand below the rivets! |
|
-
When done with the razor blade, use some 400 grit sand paper to sand
and smooth the number area. DO NOT sand below the rivets! Leave that
white paint alone.
Punch the Rivet Holes.
Using your leather punch or modified paper hole punch,
punch in the rivet holes. If they don't cut
cleanly, use a razor blade and clean up the holes from the back.
Adhere the New Numbers.
Using the punched rivet holes in the new numbers as a guide,
stick the new numbers down. Press firmly and work out all air
bubbles. Note: Choose the best looking numbers first; you won't
use them all. Might as well use the best looking numbers first.
|
The freshly stuck number is on the right. Note the overhang of the decal and how the new number goes on right over the old rivets. |
|
-
Trim The Excess.
From the back of the roto-target, use a sharp razor blade and trim the sides of the freshly stuck number. If you angle the razor blade, you may get better results. It may be difficult to trim near the rivets as the material is not very thick there. If you have to trim off the sticker completely on the outside edges of the rivets, that's Ok. Trim from the front side to finish up.
|
Trim the excess... |
|
-
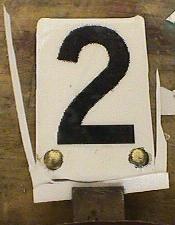
The Final Results.
Repeat for the other fourteen numbers. When re-installing the number plate in the game, you don't have to worry about alignment. It doesn't matter. Just install it, putting the triangle metal plate and three bolts back.
|
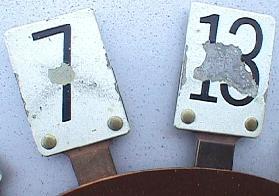
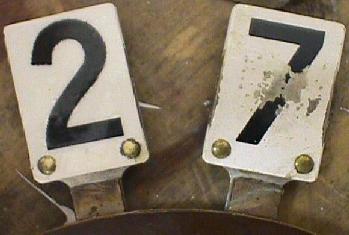
A new number two, and an original (and soon to be replaced) number seven. |
|
* Return to the Pin Fix-It Index