by cfh@provide.net, 05/10/08. Copyright all rights reserved. Update of this document are available free of charge at http://marvin3m.com/fix.htm.
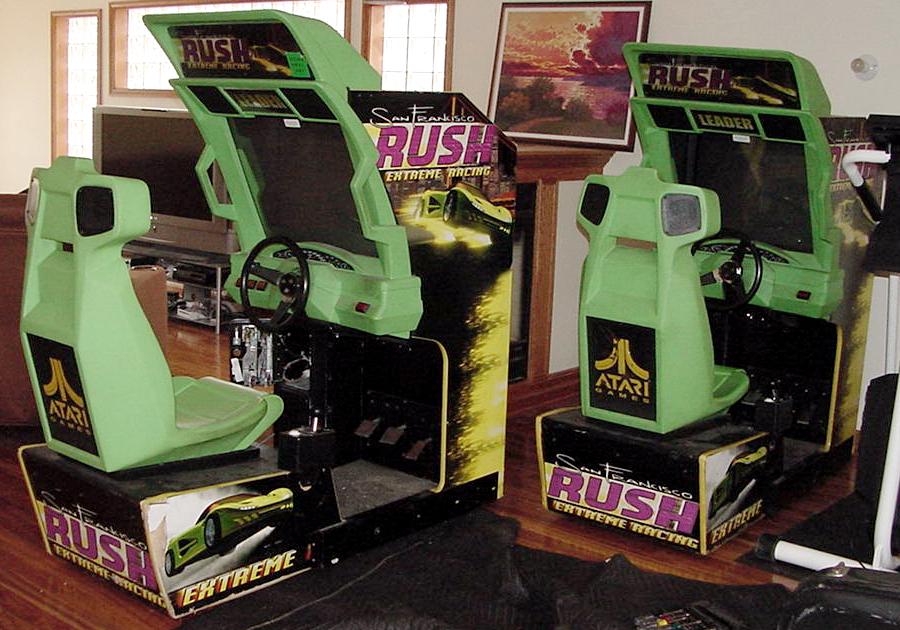
For 2006 and 2007 I provided pinball and arcade games for the SANP party at no charge. And for the years I have been involved in the SANP project, I always try and find games that fit the theme (different theme every year). Since they had some NASCAR theme ideas for 2008, I thought it would be good to find a driving game for the party. In my search I found someone in the local Detroit area with a pair of 1997 Atari San Francisco RUSH driving games. Perfect. Actually better than perfect. SF Rush is one of the best driving simulators ever made. I say "driving simulator", because that's exactly what it is. Aspects of SF Rush that makes it so good are: upgradable to Rush the Rock (a newer software version), and forced feedback steering. A little history on driving games is needed to understand where the Rush series falls. Prior to computers, there were of course EM (electro-mechanical) driving games. Classic examples include the 1954 Mutoscope Drive Yourself. I personally own this game, and think it's quite cool. But not very realistic. Another EM classic is the 1954 to 1959 Capitol Project Auto Test. Now Auto Test I acutally remember from my 1970s drivers Ed classes (yes it really was used that way). A projection style driver, it was all electro-mechanical (no computer). With the advent of video games in the late 1970s, drivers really took a turn for the better. The first driver that seems "good" was Atari Pole Position and Pole Position II in 1982/1983. Not a great driver, but certainly better. The next step up was Atari Hard Driving in 1989, considered the first real driving simulator. This game used forced feedback steering and provided a true driver's perspective. The next leap forward was the 1994 Sega Daytona USA. This game, at least to me, was one of the best driving games ever made, and again used (magnetic driven) active feedback steering (pretty mild feedback steering really). Now that brings us to late 1996 and the SF Rush game series. Again they used forced feedback (active) steering (using a large motor). The forced feedback active steering is very well done on Rush, as it used a BIG motor and tooth gear belt to give steering resistance to the driver. Unlike Daytona which was pretty serious, SF Rush had a mix of novelty to it, not taking itself too serious. Also the graphics are far better on Rush compared to Daytona (this figures because Rush is newer). Compare this to say the Midway's Cruisn USA/Cruisn World/Cruisn Exotica (1994, 1996, 1999 respectively), which have a more "circus-like" feeling (and limited feedback steering). Also Rush had more track options. The Rush series comprised three different games. First released in late 1996 was San Francisco Rush, then in 1997 came San Francisco Rush the Rock. Finally in 1998 there was San Francisco Rush 2049. Interestingly 2049 was so popular, that Betsons of California (a game distributor) re-released SF 2049 in 2003. Unfortunately 2049 used different hardware, so SF Rush and Rush the Rock can not be upgraded to 2049 (but SF Rush can be upgraded to Rush the Rock). The original SF Rush game had three tracks. Rush the Rock has seven player selectable tracks (the original three of SF Rush plus three new "extreme" tracks and the ROCK track). So the Rock upgrade is a good one to make, adding more depth to the orignal SF Rush game. A neat thing about the Rush games are hidden lanes, tracks, and cars. If you play the game enough, you find hidden "short cuts" in the courses. This is a pretty neat feature for the more experienced player. In Rock and 2049 there are some "hidden" tracks and features too. (I am still trying to figure this part out.) Interestingly the newest driving games (like the Fast & Furious and Nascar) really aren't any different than the Rush series (just slightly better graphics). This means Rush is an excellent price value compared to the new drivers (which are $8000 each new). |
I'll work on the steering issues first, as that was what bothered me the most about these two games. Last I will upgrade the games from SF Rush to SF Rush the Rock. |
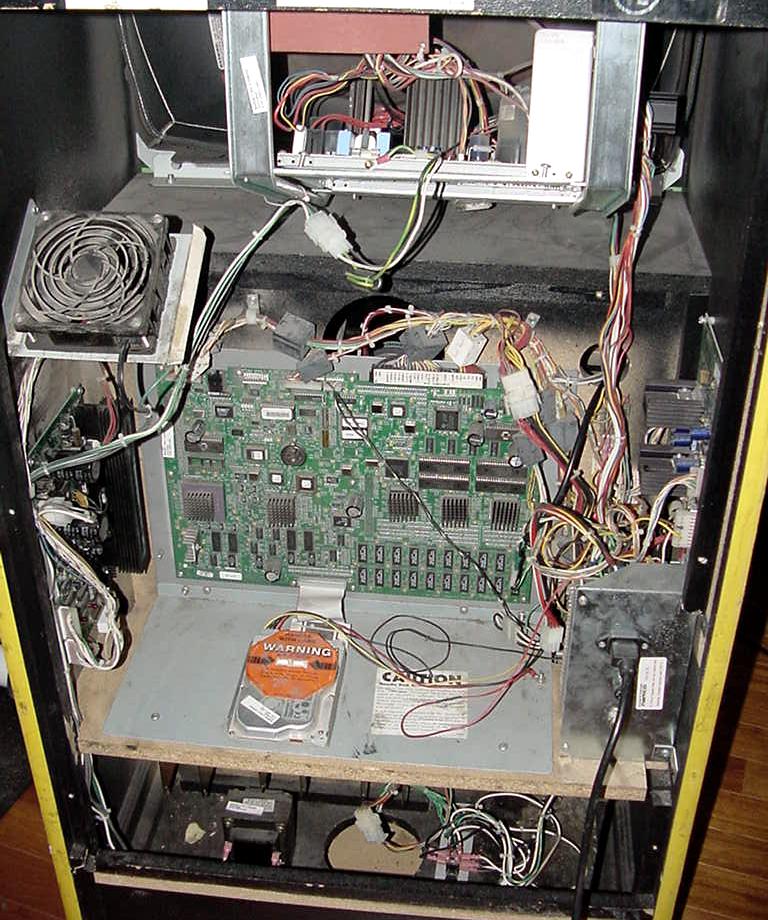
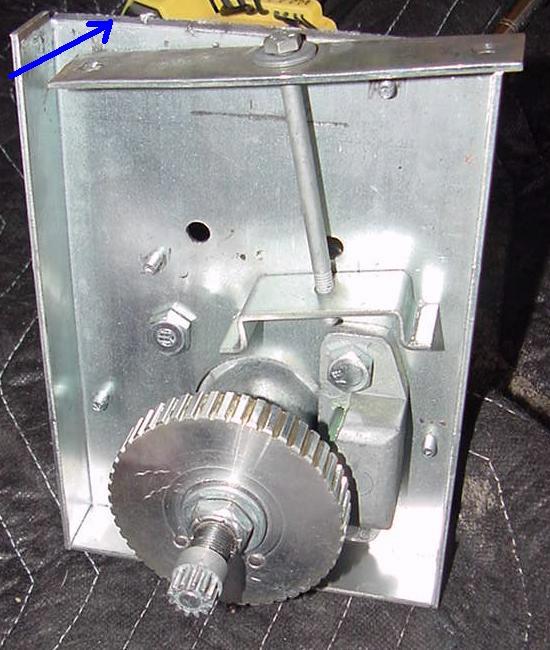
Identifying the Atari Rush Guts.
|
|
Atari Rush Steering Rebuild.
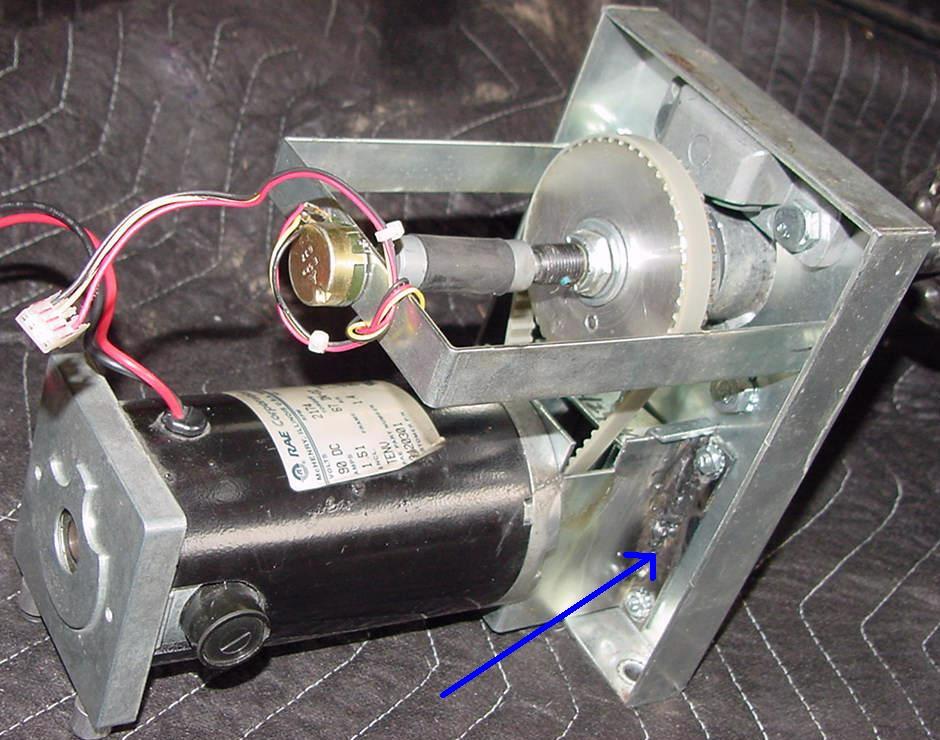
At first of course I thought there may be an electrical problem. So I pulled the active steering driver board and found a TIP120 that drives the motor. I replaced this with a TIP102. This fixed nothing. Duh. It's a mechanical problem. The first chore is getting at the steering assembly. This is actually pretty easy, just a couple bolts from the underside and the steering assembly rotates down. On the first Rush the problem was right away pretty obvious - the belt from the motor to the steering gear was broken! But it didn't end there. The adjustment for the belt tension was broken and needed to be welded. And the motor mount was also cracked and needed to be welded. Geez! Kids must just wail on these steering wheels, slamming them left and right to break welds and belts. I guess that's why there's a warning label that reads, "this is an arcade game - please do not play with the controls unless you are playing the game." These active steering modules were made by Happ for Atari/Midway. So all the parts are generally available. (This is better than say the Daytona games, where parts are harder to come by.) So in theory I should be able to rebuild the active steering modules.
|

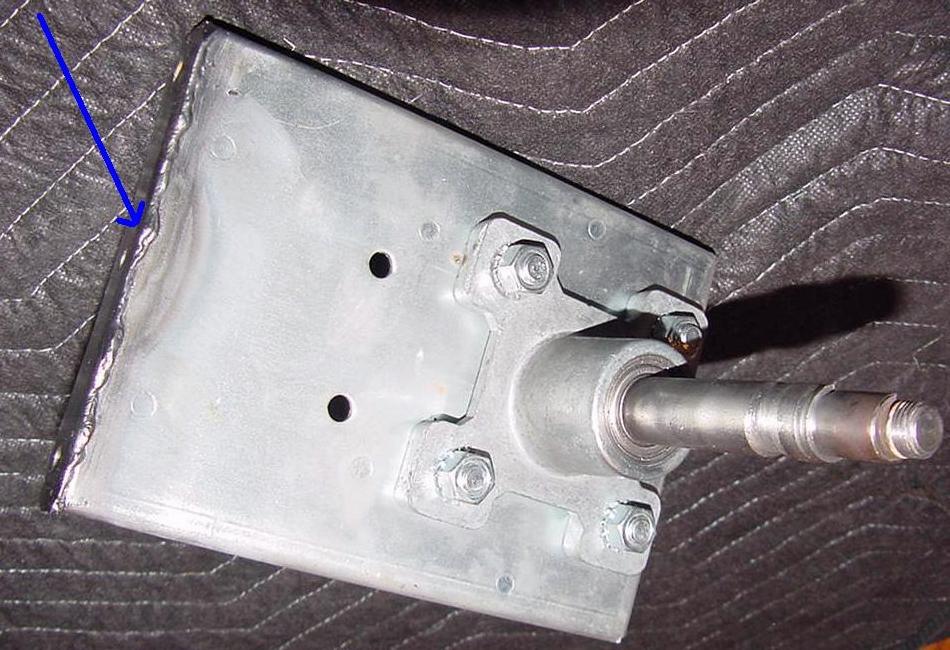
...This metal mounting bracket that allows for belt tensioning is completely broken!
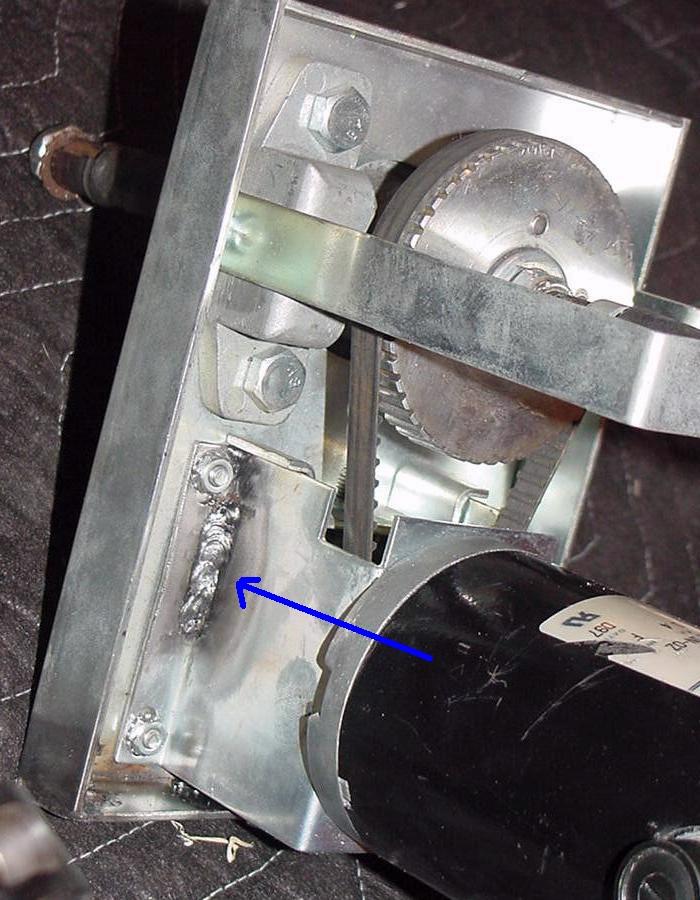
And the set screw that holds this toothed gear to the motor shaft fell out.
This allowed the aluminum gear to rotate on the shaft, boring out the gear hole!
There is no way this gear can be used, a new one is needed.

Another problem on *both* of the Rush games was the steering motor bracket
was cracked. The picture below is the lesser crack of the two (the other motor
bracket was completely broken!)
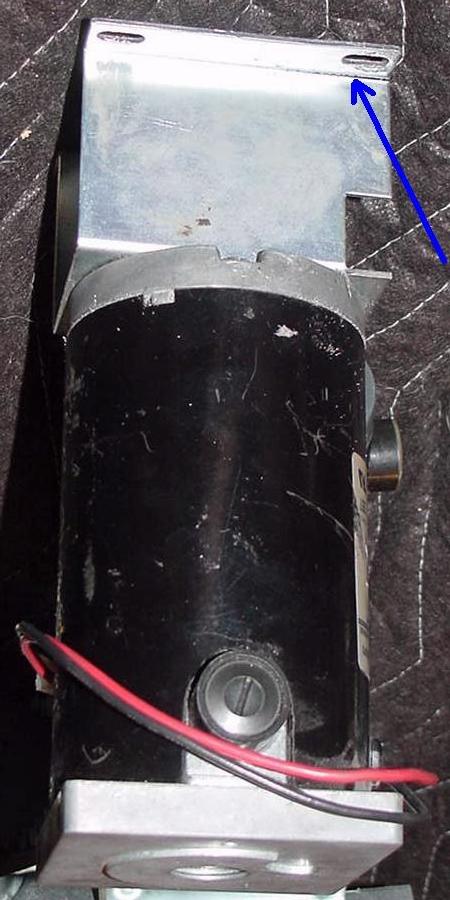
I got out my 120 volt arc welder that I bought when I was in High School and
welded the cracked/broken brackets. Came out pretty good! (Hey kids learn a trade,
be a welder, I actually really like it.)
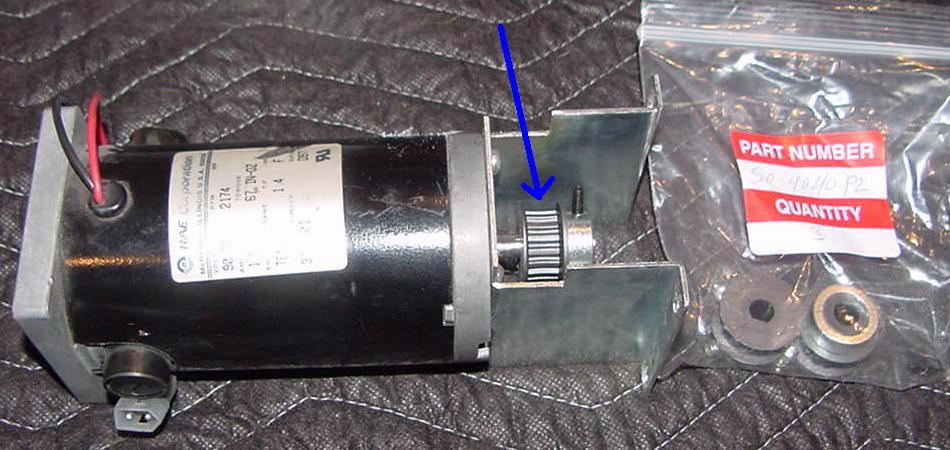
Here's the new gear for the motor. These are still available from HAPP.
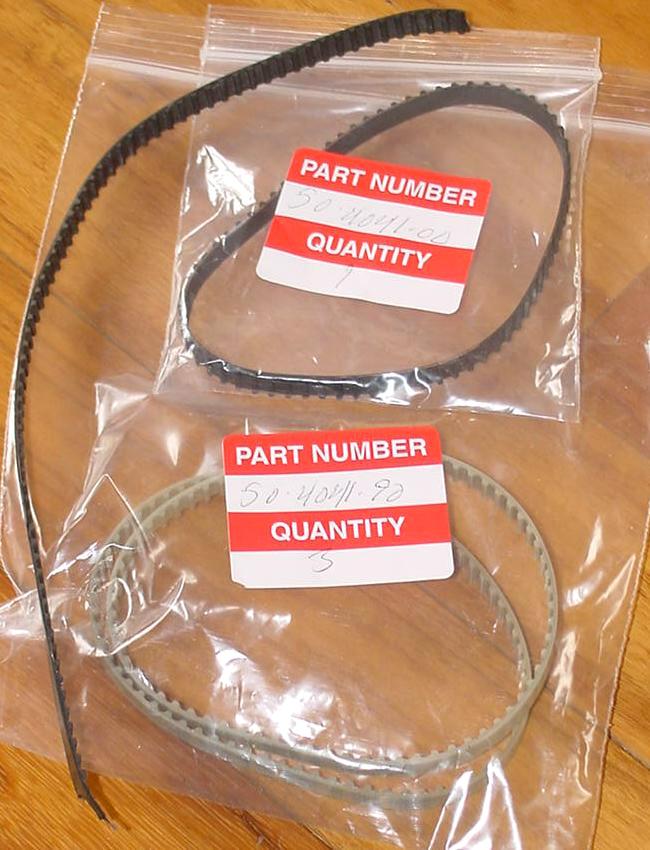
The broken belt from Rush#1 and two new replacement belts from HAPP. The black belt
is the original, and the gray belt is the heavy-duty steel reinforced version.
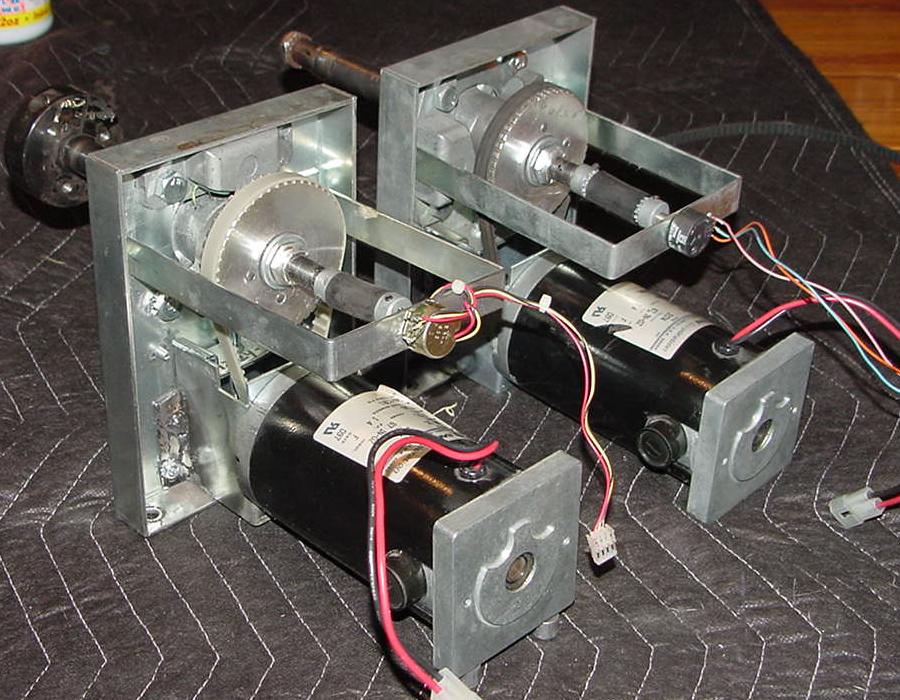
I also bought a couple new motor gears Happ #50-4040-PL ($10.15). Spent some time with a file cleaning up the metal shafts (they get wailed on for overzealous players). Used my arc welder and fixed all the broken/cracked mounting plates. The motors are made by RAE Corporation and are 90 volts DC, 1.51 amperes, 2174 RPM. Torque is 67 in/oz, enclosure "TENV" F.F. 1.4, insulation: "F". RAE part number for this motor is 3120301. Replacement motor brush is # 122-1141-000 and is sold individually at $11.30 each from raesales@raemotors.com, or telephone 800-323-7049. Had to replace one of the 5k ohm potentiometers for the steering. Happ wanted $31 for a new pot (#50-2670-00), which seems really crazy. Instead I used a 5k ohm pot from a Williams system11 volume control, which worked fine. I also had to re-thread the steering shaft (which holds the wheel yoke #50-2525-00) with a 1/2"-20 die because the threads were so battered, and buy a new 1/2-20 jam nut.
|
Two freshly rebuilt and tested Active Steering motors for the Rush games.
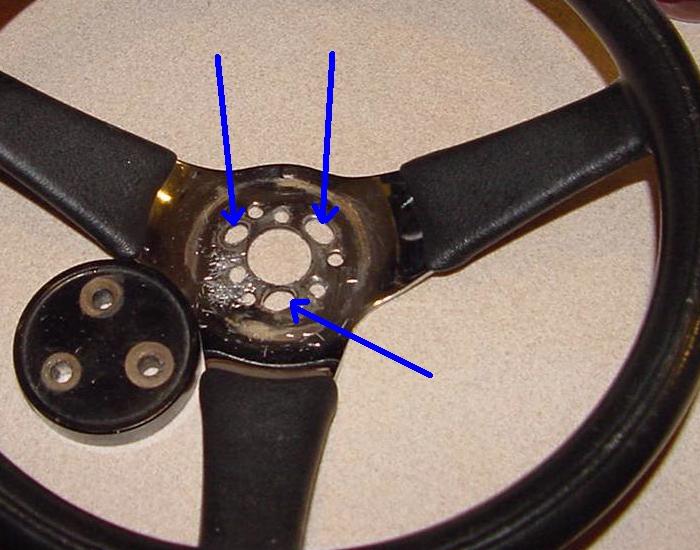
Another interesting thing was the steering wheels themselves. The mounting holes were WAY enlongated. I had to re-drill the holes so the steering would not be sloppy. Apparently this had been done before, as the mount area looked like swiss cheese.
|
Atari Rush Game Memory Retention.
Rush Video Monitor Rejuvenation & Re-Capping.
The monitor is a NeoTec model NT-2701 (medium resolution 27"). All Rush games seem to have this monitor. Not only do the tubes usually need rejuvenating, but the chassis needs a capacitor kit as well. K.Layton (KLayton888@aol.com) provided some great info on the NeoTec NT-2701 monitor. This is a medium (EGA) resolution monitor. Circuit boards are marked as follows: Main board is silkscreened with "PCB-002B" on the foil side. Pincushion board is marked "F-DPC-001". Remote adjustment board is marked "NT-002" on the solder side between connectors P901 and P302. Neck board is marked with both "NT-001A" and "Li Chin" on the parts side of the board.
Re-Cap on the Dynamic Pincushion Correction board: Re-Cap on the neck board: So in summary, here's all the caps needed for ordering purposes since pre-made cap kits are not available for this monitor.
CRT Information for the NeoTec model 2701. Yoke Information includes Yellow & Green wires are the vertical section with 8 ohms dc resistance. Red & Blue wires are the horizontal section with 0.5 ohms dc resistance. Part numbers on the yoke are 68Q2UBZ/00 and RXE55398152. No yoke part numbers are in the manual. Horizontal Output Information includes Transistor Q402 is the horizontal output transistor. It is a type 2SC5150 and you can use an NTE 2639 as a replacement. MCM Electronics stocks both of these at around $6 each.
Flyback Information for the NeoTec.
Monitor problems encountered and solutions.
Manual Errors found.
Main Board Adjustments for the NeoTec.
Pincushion Correction Board Adjustments for the NeoTec.
Remote Adjustment Board Adjustments & Parts Information:
Neckboard Adjustments: Manufacturer Contact Information:
2721 N. Towne Avenue Pomona, Calif. 91767 Phone: (909) 626-9889 Fax: (909) 626-0990 www.neotecgraphic.com My buddy Mike helped do a monitor Rejuvenation to both Rush games. The monitors were actually not that bad. They mostly needed brightness and focus adjustments on the high voltage flyback. The knobs to do these two adjustments are almost completely hidden in the back of the monitor, mounted on the flyback. We needed a mirror to see them! The only way to adjust the focus and brightness on the flyback was to use a TV Tuner plastic adjustment tool. It really did make a big difference in the picture though.
|
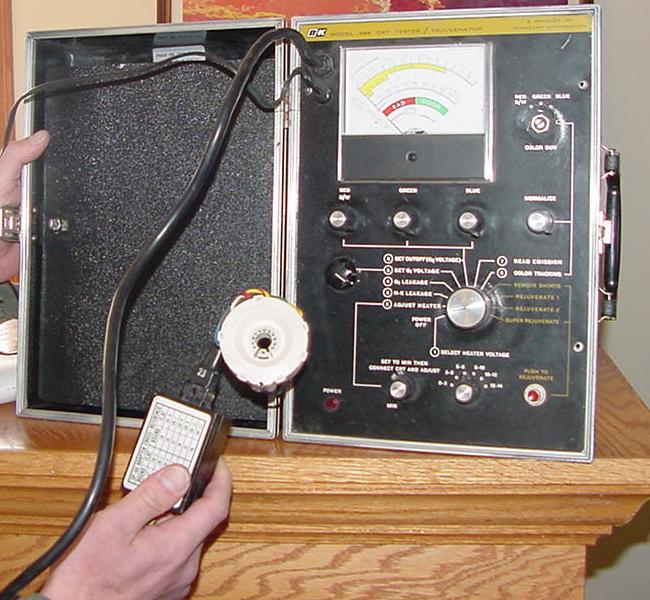
Mike doing the monitor rejuvenation. All he does is remove the neck board
from the monitor, replace it with the rejuvenator neck board, and dial the
box in. The actualy rejuvenation takes about 4 seconds, and you can see the
carbon spark off the monitor chasis neck tube.
|
Hard Drive Code Update from SF Rush to SF Rush the Rock.
To re-create the harddrive image, a DOS program called ChdMan.exe is used (in a DOS window) to read a CHD file which is the hard drive image (CHD means Compressed Hunks of Data). The ChdMan program then reconstructs the image file onto a new 8 gig or larger hard drive. Info on the CHD file can be seen by typing in the MS-DOS command:
chdman -info rock.chd

Input file:   rock.chd
Header size:  120 bytes
File version: 3
Flags:        NO_PARENT, READ_ONLY
Compression:  zlib+
Hunk size:    4096 bytes
Total hunks:  1833419
Logical size: 7,509,680,640 bytes
MD5:          425c83a4fd389d820aceabf2c72e6107
SHA1:         75aba7be869996ff522163466c97f88f78904fe0
Metadata:     Tag=47444444    Length=35
              CYLS:913,HEADS:255,SECS:63,BPS:512.
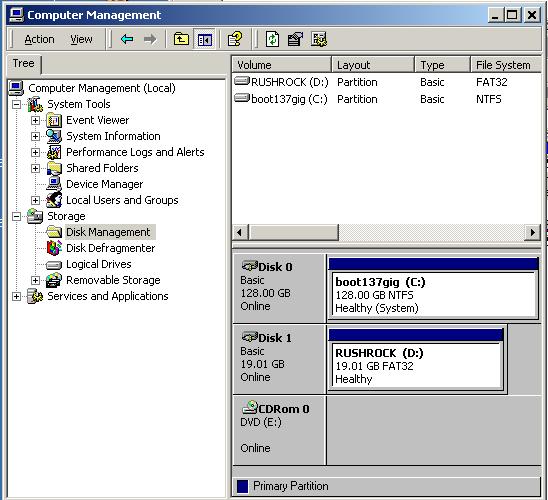
To create a new hard drive, first go to the Window's Control Panel, and click on "Administrative Tools", and then double click "Computer Management". Now click on "Disk Management", and all the hard drives listed on your computer will be shown. Notice in the example below that the freshly FAT32 formated 19gig hard drive called "RushRock (D:)" is known as "Disk1" (that is, Windows maps this drive as "disk1"). Using this mapping, CHDMAN.EXE can be run to recreate the Rush the Rock hard drive using this MS-DOS command. Note the PYSICALDRIVE portion of the command is followed by a number. This number MUST be the mapping drive number you found in the above "Disk Management" program. If you put in the wrong drive map number, you can accidentally overwrite that hard drive! So be careful and type the correct drive number. In the case shown below, drive Disk1 is the drive I want to overwrite with the Rush the Rock code. Note the size of the new hard drive does not matter. It just needs to be bigger than the .CHD file. I created a new Rush the Rock hard drive using a 20gig drive, and it worked fine. Now open an MS-DOS window and go to the directory that holds the Rush.Chd file and the ChdMan.exe program (both in the same directory). In my case, these are on my C: drive, and the hard drive I will be creating is the D: drive. I made sure the Rush.Chd and ChdMan.Exe files were in the same directory on C:, and that I was logged into that directory thru Ms-Dos. Here's the commands I typed on my Win2000 system's Ms-Dos window: c:chdman -extract c:Rock.chd \\.\PHYSICALDRIVE1
Note I was getting a "error opening output file \\.\physicaldrive1"
message. This happened because there is a bad version of CHDman out there that does not work (version .121).
I used version
CHDman 0.83
and the above command worked fine. Also after CHDman is done putting the Rush
the Rock image on the hard drive, this drive will no longer be accessible by Windows or MS-Dos.
Again this is because it's a raw data dump, and not a DOS partitioned drive.
To take a step back, a friend of mine had a professional hard disk copy program, and made me a copy
of his Rush the Rock hard drive onto a Fujitsu 8.5 gig (16383 cyl, 16 head, 64 sec) hard drive.
He could have used a different size hard drive, but that's what he had that was big enough
for the Rush the Rock data, but not too big to be wasting money.
I put this Fujitsu hard drive into my Windows 2000 system, and could see
the hard drive was mearly a "data dump" for the game. That is, the Fujitsu hard drive was not a recongized
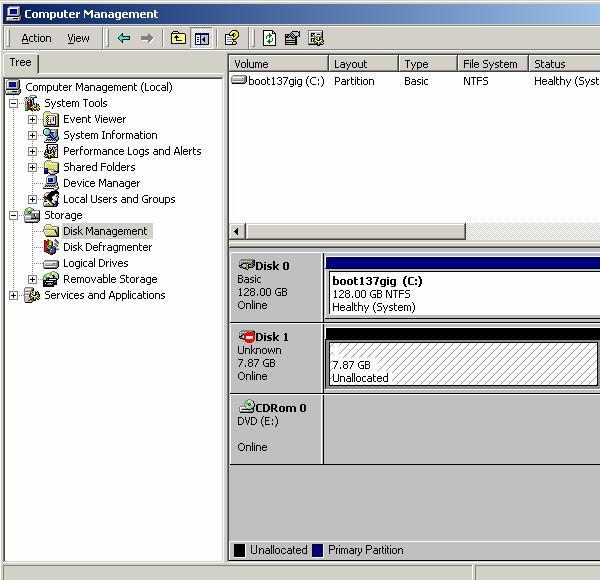
Windows partition. Here's what the Administrative Tools' Disk Management showed for the Rush to Rock
Fujitsu 8.5 gig hard drive:
I wanted to use CHDMan.exe to back up this drive, so I could always recreate the hard
drive if I needed (as shown above), saving the drive to a .CHD file.
I opened a MS-DOS window, went to the directory I wanted to save the new .CHD file, and typed
the following command:
chdman -createhd \\.\PHYSICALDRIVE1 rock.chd After the new hard drive is created, it is then transplanted from the host computer to the SF Rush game.
|
|
Chip Code Update from SF Rush to SF Rush the Rock.
The big issue is the security PIC chip at U96. This is a 28 pin PIC, which needs to be copied (unfortunately I don't have the image file for it). The PIC code can be copied onto a new PIC16c57 blank by the MicroChip company. This is a 8 bit micro-controller RISC CPU with 2k bytes program memory and 72 bytes of RAM data memory running at 20MHz clock input, and uses a low power, high speed CMOS EPROM technology. I just need the image file to do this, which unfortunately people are holding tight to (if you have this image file, please email me at cfh@provide.net as I would greatly appreciate the file.) This is the problem chip, and makes changing from SF Rush to Rush the Rock difficult. The chip is there to prevent an easy upgrade, as Atari/Midway obviously wanted operators to buy the upgrade. I ended up just buying the chip already programmed from www.arcade-service.com (Indianapolis, IN). For fun, I put the newly created Rush the Rock hard drive in the game with it running all the original SF Rush firmware chips. It actually works (kind of). The sound is quite confused, but the game does boot and run (you will lose all your settings/high scores and the steering/peddles will want to be recalibrated). With the Rush the Rock hard drive and the SF Rush firmware, you get the same three SF Rush tracks (Beginner, Immediate, Expert), plus the Rock track. This will give you an idea of what Rush the Rock is all about. The Rock track is pretty cool, with lots of hidden routes and gravity-defying loops and jumps. Next I tried the Rock HD and the 27040 Rock EPROMs at U32 and U69. The U69 sound boot EPROM works with the SF Rush 27C160 data EPROMs, but the sound is unbearable. Better to leave the SF Rush U69 installed until the four 27C160 Rock sound data EPROMs can be acquired. Unfortunately the U32 program boot EPROM would not work at all, the game just would not boot. I'm sure this has to do with the security PIC, which is no doubt different for Rush the Rock. The LEDs on the CPU board near U32 were going nuts (contant alternate flashing) compared to their normal boot behavior. In the end I just ordered the complete chip set from www.arcade-service.com and was done with it. At about $115 per kit (not including the hard drive) it wasn't cheap, but I was done with the upgrade from SF Rush to Rush the Rock.
|
|
More information on game repair can be found at "PinballHQ"
* Go to Pinball Restoration Guide, part two |