Making Your Own Custom Water-Slide Decals.
cfh@provide.net, 6/8/15 (original document created 09/01/07)
Vacuum Forming Plastic.
Though a lot of modern (late 1980s and newer) pinball machines have had
their plastic ramps re-made, there are some games that need ramps,
but none are available. In this case, our game is a 1987 Bally Heavy Metal Meltdown (HMM)
pinball. With only 1600 units made, and the game being almost 20 years old,
the five ball multi-ball game usually has its plastic ramp hammered and
broken. Often people try and fix it with figerglass or tape, but that's an
ugly mess and usually doesn't work well. For this reason, I decided to
re-make the ramp. This document shows how that was done.
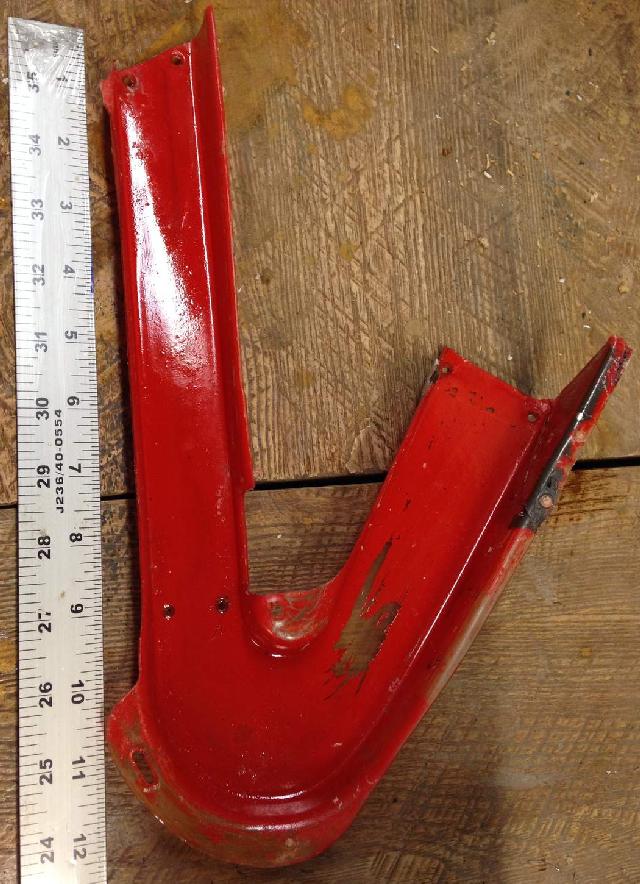
In my Bally Heavy Metal Meltdown, the original ramp had its left
wall blow out, and repaired with a body filler type material.
The right wall was also damaged and missing a chunk. Someone had
painted the entire ramp red to hide the patches. Unfortunately
this makes the "level" light inserts under the ramp impossible to
see. For this reason I tried to remove the red paint with some
limited success. I also added stainless steel ramp protectors
(made out of old WPC pinball side rails) to hide/protect the fragile
sides of the ramp. But really the answer was to get a new ramp.
Unfortunately these are not made by anyone I could find, and
NOS (new old stock) ramps seems to be non-existant.
The original HMM ramp, patched and painted red by a former owner.
The ramp after an attempt to remove the red paint.
Making the Form.
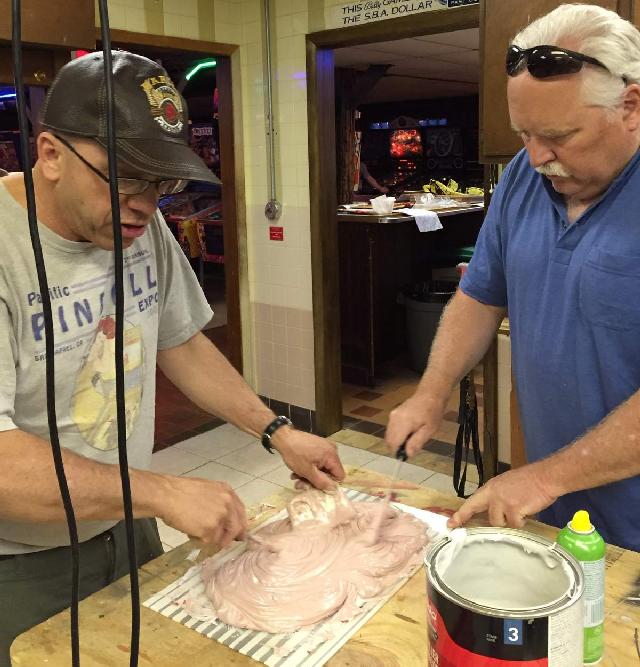
Mixing a large amount of Bondo with the hardner.
You don't have a lot of time to work with the Bondo before it dries,
so don't waste time. I had a big mass of it on a disposible surface,
and pre-fixed the ramp with it too. Then put the ramp upside down
into the gob of Bondo. Now only let it dry to the "rubber"
stage (about 5 minutes), and you can
get the ramp out of the body filler without damage. This leaves
you with a very rough "first draft" of your mold.
Spraying the ramp with PAM helps too, but frankly I
did not do that for fear that the PAM spray would react with
the body filler. The first version of the mold will be terrible.
You will have to re-apply body filler, sand, sand more, and
add more filler, and sand again. All imperfections need to be
filled, or they will echo to the new ramp. In the end, this is
what I ended up with (after much work and sanding.) Note I did all
my sanding outside, which meant carrying a belt sander outside.
Otherwise I would be dealing with Bondo dust inside, and that's
something you really don't want.
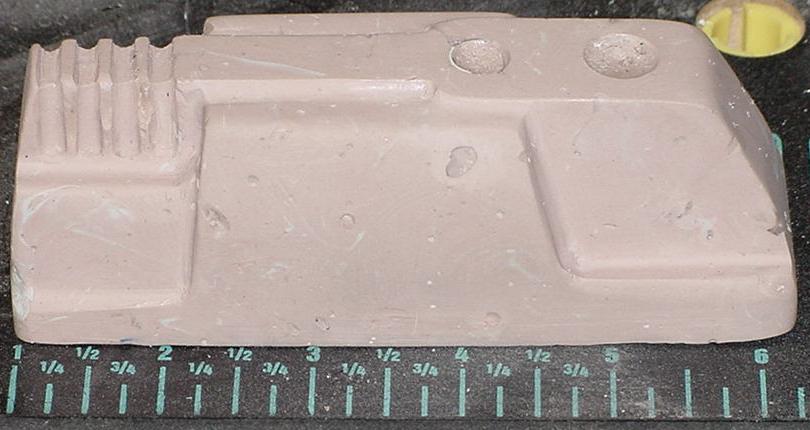
The Bondo formed mold, after numerious sands and re-fills, to get it just right.
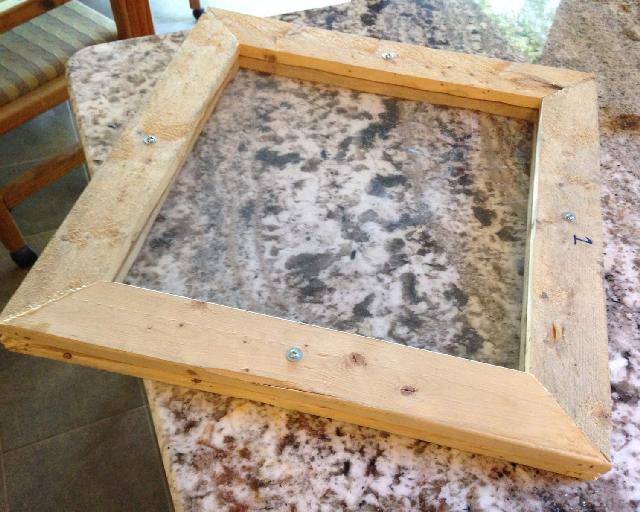
Make the Vacuum Form box.
I used Home Depot 1/2" thick MDF board as it is smooth and cheap and easy
to cut. The thickness of the box should be as thin as possible (the is,
the overall thickness of the box.)
The thickness I used was dictated by the shop vacuum's hose diameter.
My box ended up having 4" tall side walls. The top dimension was 19" x 19" was
(outside diameter.)
Your size will vary depending on what you're trying to vacuum form.
I used the foaming Gorilla glue to glue it all together, and dry wall
screws for added strength. Gorilla glue works well since it expands and
seals the box to air tight. (You don't want the box to air leak because
that just decreases vacuum power.)
For the top platen I used 1/4" thick MDF board and drilled holes using a
3/16" drill bit. A lot of people use peg board, but the holes are
just too big. It's better to have more holes which are smaller.
I ended up adding more holes in the end, all about 1/2" apart.
The top is screwed (not glued) in place, and is removeable, just
in case some modification down the road would be needed.
On the side of the box I drilled a 2" hole to accomodate the shop vac
hose. On the top side I used rubber window gasket to seal the plastic
to the top of the vacuum box.
A guy named Freeplay40 sent me a message with a couple other vacuum
suggestions (he does commercial vacuum forming.)
He recommended using some 1/4" metal mesh screen on top of
the MDF platen, and place the mold on top of the mesh. The little bit of mesh
allows the vacuum to get everywhere. Without the mesh the vacuum sucks
the plastic into the holes drilled in the top MDF platen, inhibiting
the suction. So the mech distributes the vacuum more evenly around the mold.
Another idea he had was to drill very small 1/16" holes
into the mold itself in tight corners. Again this will help the suction.
With the holes being small (1/16"), it shouldn't leave much (or any) of a mark
in the plastic.
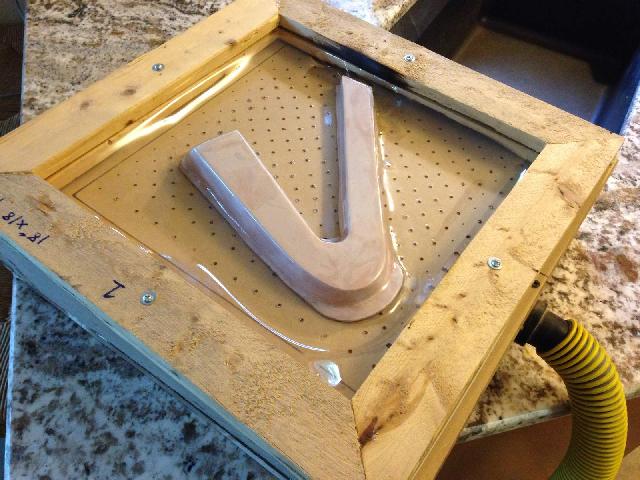
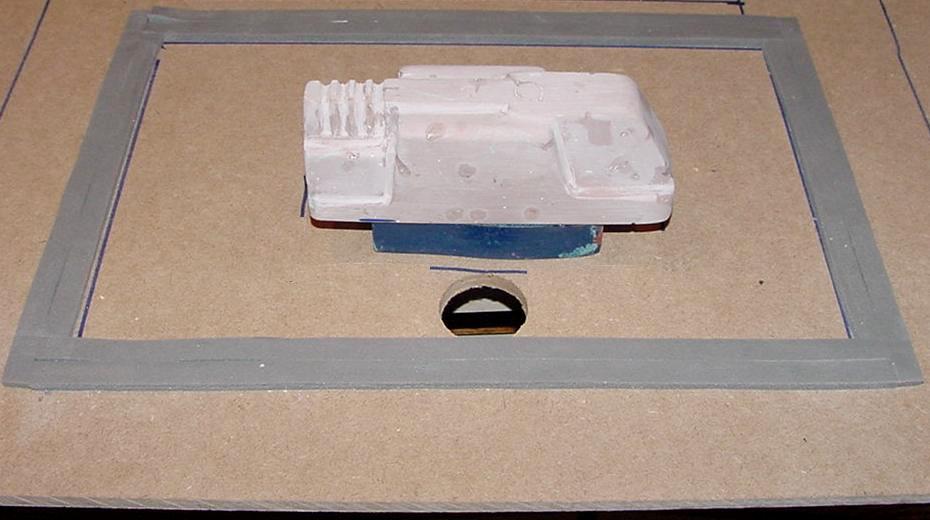
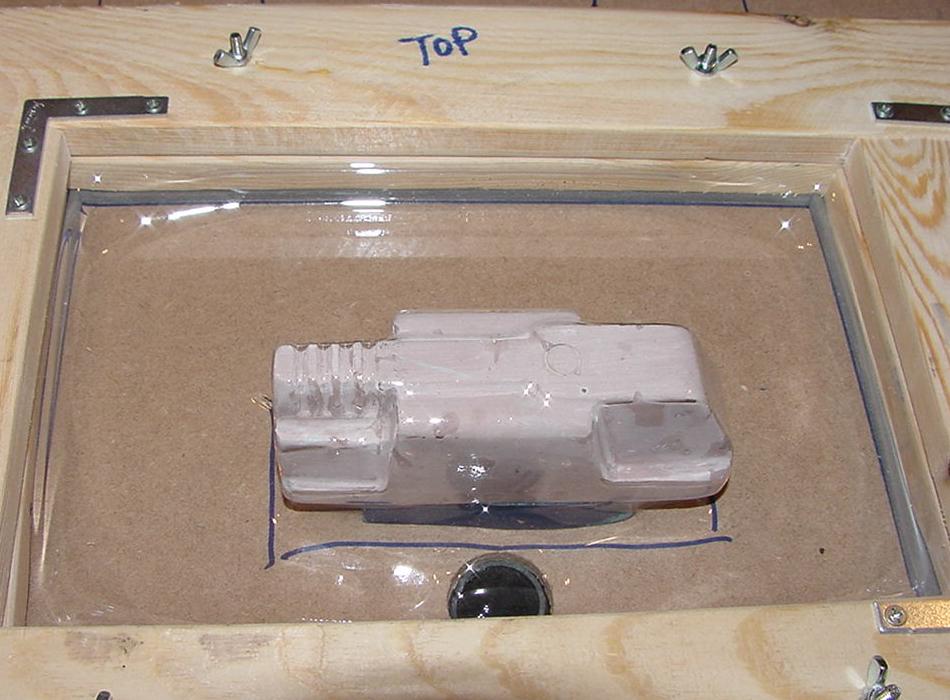
Here's my box, with the Bondo mold on top. Notice the white rubber seal around the edges.
You also have to make two frames to hold the plastic while it is
vacuum formed. I used 1x3 wood. You can use nearly anything even
MDF to do this. Also used #8 screws and T-nuts to hold the two frames together.
My frame's outside diameter is 19" x 19", and is designed to hold a
piece of plastic 18" x 18" square.
Get the Plastic.
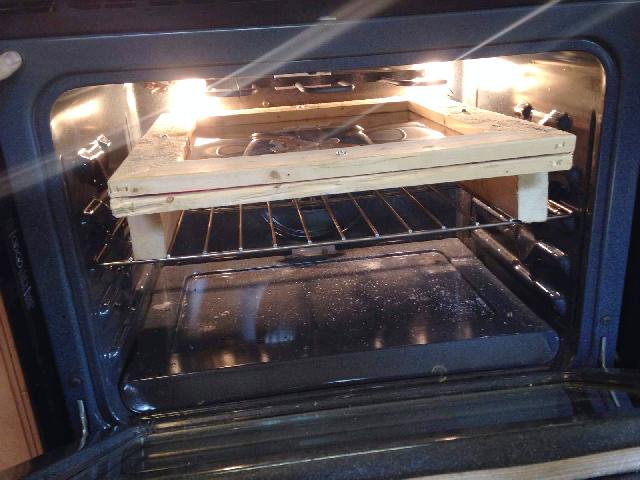
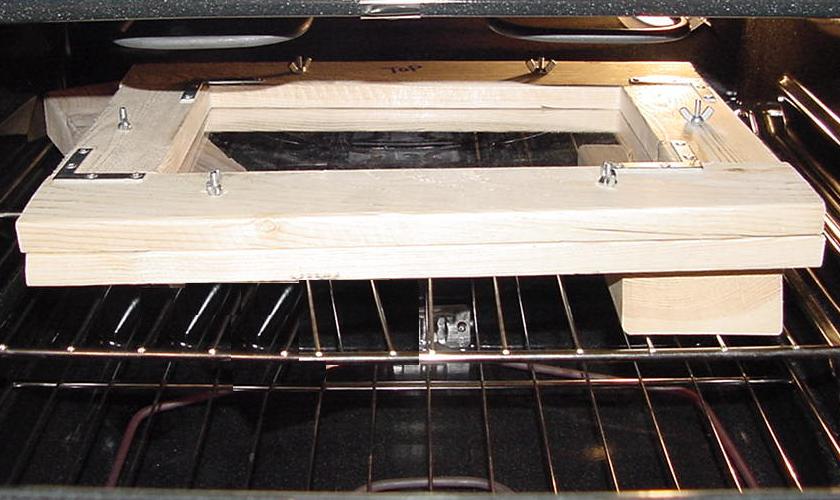
Here's the frame and plastic in the oven. Notice the 2x4 wood "stilts" to
elevate the frame. You need this because the plastic will droop (sag) down
when it's heated, and you don't want it to touch the oven rack.
Heat the Plastic, form the part.
Now comes the tricky part. You have to get the plastic soft,
but not too soft. This takes a bit of practice. I let the plastic
sag downward about 3" to 4". At this point immediately remove the
frame from the oven! Don't let the plastic sag too much, or it
will "fall" and your frame will have a big hole with the plastic
once was. Also cleaning that melted off the oven rack won't be fun.
With the shop vacuum powered on, put the frame right now on the
vacuum box, in one swift motion. Push it down and the vacuum
should suck the plastic down over the mold.
This all happens very quickly! Also the plastic cools very quickly
too. The whole process takes about 5 seconds.
After a few seconds the plastic will be hard enough that the
vacuum won't do anything. But hold on... I found that areas of
my ramp didn't have the plastic molded around the edges very well.
Sharp corners are the most difficult to get right. To help, I used
a hand held propane torch to gently re-heat the plastic. This
really helped on tight edges, and the vacuum sucked the plastic
down more. I even used a fork to help push the plastic down on
the really tight edges.
After a few minutes you can turn off the vacuum and unscrews
the two frames to release the plastic. In my case the mold came
out without too much trouble. Some gentle pushing and bending of
the plastic got the mold released.
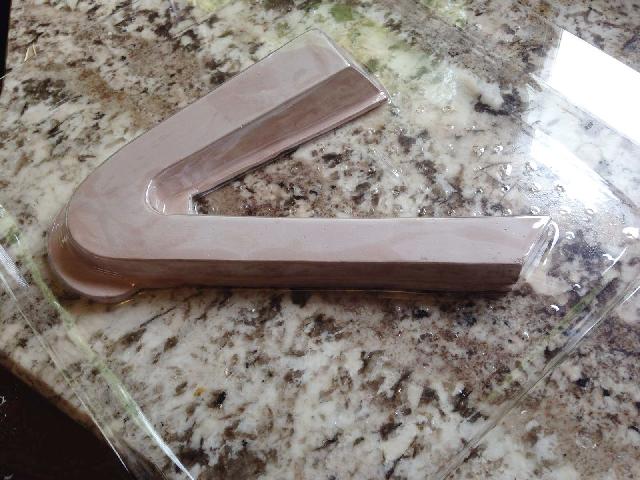
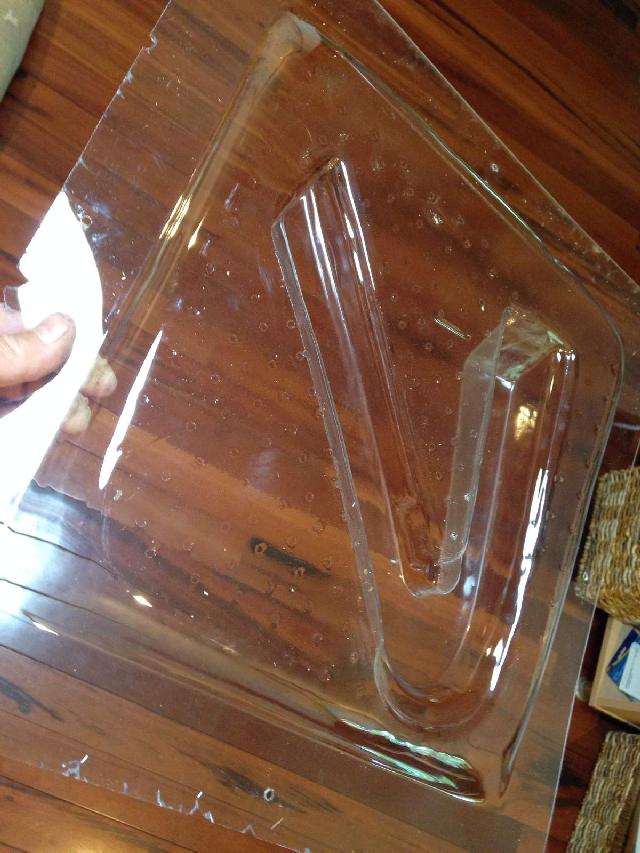
Now comes the fun part of triming the ramp out of the big 18" x 18"
square of PETG plastic. I used a band saw to do the rough cut. Then
a belt sander on the edges. And a razor blade to get into tight spots.
It definitely took some time to trim out the ramp so it was usable.
Also holes had to be drilled to accomodate the switch and mounting
brackets.
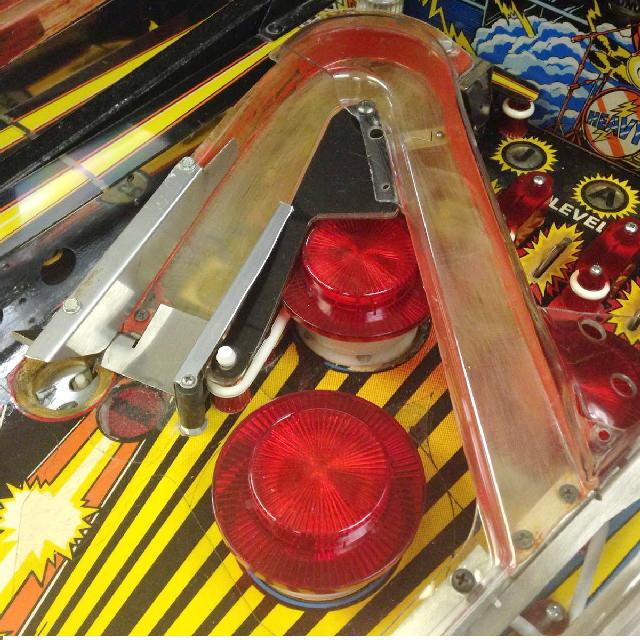
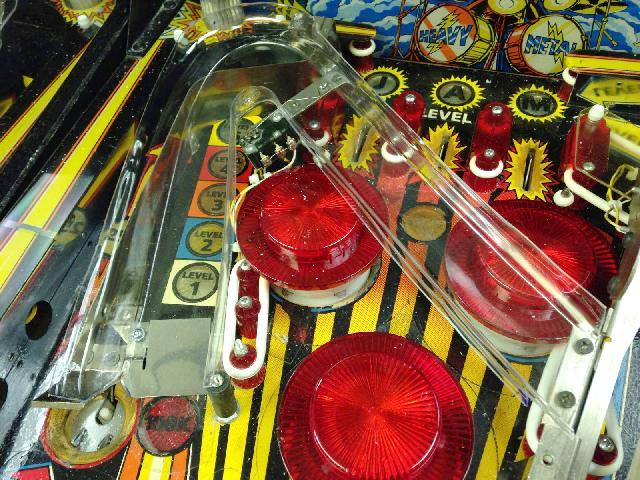
Below is a picture of the new ramp installed. Wow is it clear!
I can see the "level" lighted playfield inserts now!
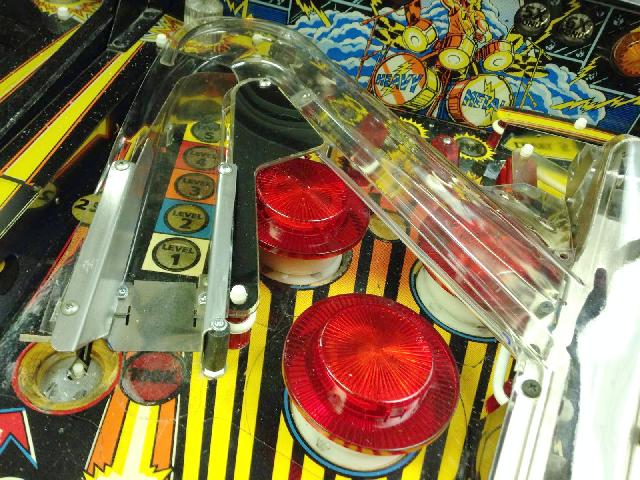
Below is the ramp with the ramp protectors installed. I really felt
these are needed, or the ramp would eventually suffer the same
fate as the original ramp. The three ounce steel balls (five of them
in multi-ball!) will eventually break the new ramp too.
These ramp protectors were made from old Williams WPC pinball side rails,
cut on the bandsaw.
Video of the Ramp Vacuum Forming.
What follows is the original document created in 2007 where
I vacuum formed a part for the 1968 Williams Space Pilot EM arcade game.
I have a 1968 Williams "Space Pilot" coin operated arcade game
which I bought, and it did not have the plastic space craft
body for the helicopter ship. So
I asked around and found a fine gentlemen
by the name of Jim Stahlecker who also has a Space
Pilot. Good thing I found him, because he was the
*only* guy I found with this game! It turns out
he has an original body on his space craft, but it's
really beat up and damaged. So I make him an offer:
lend me his original craft body, and I'll return it in the
same condition along with a *new* body. Jim falls
for my offer, not realizing that infact I don't
have a clue how I will reproduce his original (and
that the chances of his original body coming back
in the same condition are next to none!)
So I have his original space craft body and I notice a few things.
First, it is really flimsy. It seems to be made of
.020" thick polystyrene plastic, which easily rips and
tears. And that's exact what has happened to this one,
and what probably happened to my original missing craft body.
I do a bit of web surfacing and talking to some friends,
and get the idea I can maybe make my own craft body using
a home-made vacuum form rig.
Making a Prototype Mold.
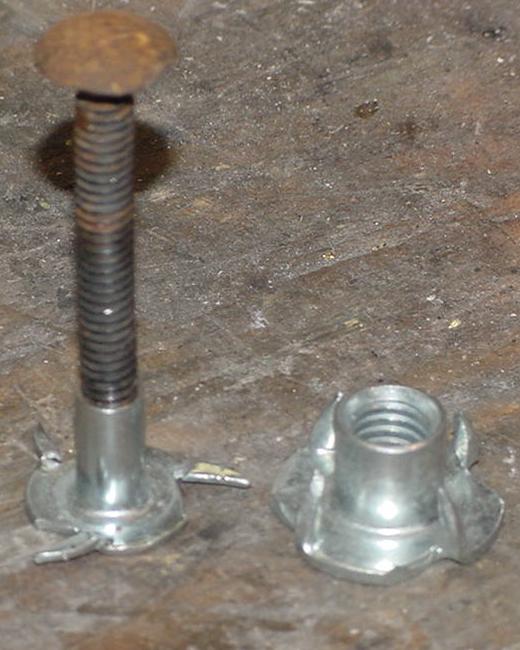
The next thing to prepare is a 1/4 inch "T" nut.
The "T" nut will be embedded inside the mold I am
about to make, providing a "handle" to easily hold
the mold.
Use the type of "T" nut with the "prongs", and bend the prongs
outward to extend the footprint of the "T" nut.
Screw a 1/4"-20 bolt which is 2" long into the "T" nut.
To make a mold of the
original body. Mix up a batch of Bondo auto body filler
(adding the pink hardener),
and fill the inside of the craft's shell, right
to the top of the masking paper. Using a screwdriver,
push the body filler into the cracks and corners
of the mold, trying to release any air bubbles trapped
between the mold and the body filler. This is an important
step, because air will get trapped between the body filler
and the plastic shell, leaving gaps in the newly created mold.
After this is done, in the middle of
the not-yet-dry body filler, push the "T" nut deep
into the mold's body filler. Make sure the "T" nut is
completely covered with body filler.
The body filler takes about 30 minutes to fully dry,
and the Bondo gets very hot while it cures. After
about 5 or 10 minutes, while the body filler has firmed
up but is still hot, I removed the original space craft
body shell (it is much easier to remove the mold while the
body filler is still hot and before it has fully cured),
using the embedded bolt as a handle.
This is where I put most of the wear
and tear ("shop wear") on Jim's original body, because
sometimes it is difficult to get the shell off the body filler,
especially if you waited too long and the body filler fully cures.
The embedded bolt which is screwed into the embedded "T" nut really
helps ease the removal of the shell. After the shell
is removed, let the body filler fully cure and cool,
and then unscrew the "T" nut bolt from the mold.
Update: "Ease Release 200" mold release spray from Eager Plastics
http://www.eagerplastics.com
can be used to get the bondo out of the original plastic mold.
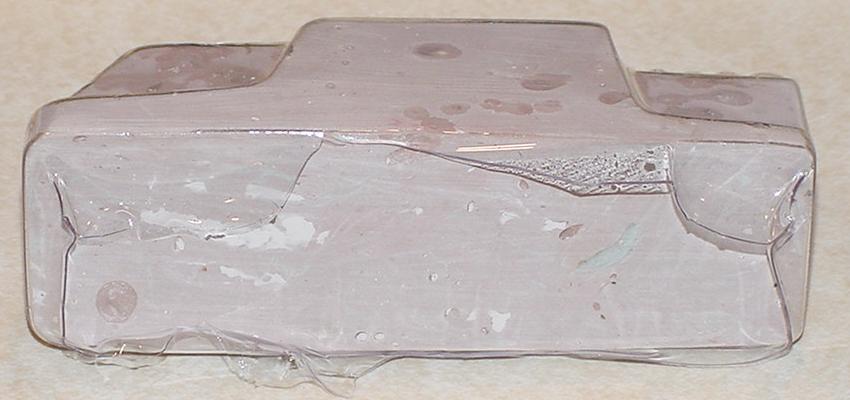
Now I had a positive mold of the space craft's shell.
Next I had to remove any imperfections in the mold,
caused mostly by air bubbles between the body filler
and the original shell
(remember how I told you about trying to minimize those?)
Body filler sands easily, so that's no problem.
I sanded the bottom of the mold flat on a
belt sander. Since I used the masking tape to build
up the bottom of the mold, there should be plenty
of sanding room to make the bottom flat. But don't
over-sand; the extra bottom height is needed later
on, so try and make the mold "taller" than the
original (note I failed to do this with my mold,
and this made things more difficult later).
There were also a number of air holes and gaps in the
body filler, which I filled with Super Glue,
and then sanded flat. I also had to angle all four
sides of the craft just slightly, so the overall
shape was like a slight pyramid (you'll see why
I had to do that in a moment, but the original space craft
already had a slight pyramid shape anyway). When I was all done, I
had a pretty good solid model of the space craft's body.
Doing the Jig.
The idea behind vacuum forming is simple. Get a
sheet of plastic hot and soft, put it on top of
a mold, then suck it down over top of the mold
using vacuumed air. Then remove the mold, and you
have a copy of all the hills and valleys of the
positive mold. This is probably how the original
Space Pilot craft shell was made.
So how do you make this? I mean it sounds
kind of wild, can it be done at home? Well yes
it can. And it's really pretty easy, once the
mold is made (that is, we have already done the hard part).
Here's the parts needed to make the
vacuum form jig, all available at Home Depot for under $25:
To build the vacuum form, first two "picture frames" are
needed. These are constructed out of 1x4 wood. I cut
out four pieces 16" long, and four pieces 7" long (size can vary;
a bigger frame will allow bigger parts to be made, but if the
part is smaller, there will be a lot of plastic waste). I then
made two crude picture frames (both the same size), using the metal "L" brackets
to hold the frame's four pieces of wood together (the outside
dimensions were 16" by 11.75").
Attach the "L" brackets towards
the outside edges of the picture frame (you'll see why
in a moment). After it was done, I put the non-metal
sides of the picture frame on a belt sander to make them
as flat as possible.
Keep in mind that most household 30" ovens have an inside
dimension of 18" by 21". So don't make your jig bigger than that.
Now that the two picture frames are made, lay them on top
of each other, with the metal brackets on the "outside"
(the bare wood faces touching each other).
Then drill six 3/16" holes through both frames (one in the
middle of each short side, and two evenly spaced on the
long sides). Now six 2" bolts and wing nuts can be put through the
frames to keep them clamped together.
Now place the clamped together pictures frames on the two foot
square, 1/4" thick fiberboard, at the edge of one side (the outside
edge of the picture frame aligns with the outside edge of the
fiberboard).
Take a Sharpie pen and trace the inside of the picture
frame on the fiberboard. Remove the picture frames and
set them aside. Next drill a hole the same size as the
shop vac hose through the fiber board (my shop vac hose
was 1 1/4" outside diameter). Position the
hole just inside the blue sharpie picture frame
tracing, on the side closest to the edge of the board.
Finally put two layers of the foam adhesive weather stripping
on the outside of the drawn blue line on the fiberboard. Put
one layer right on the outside of the line, and put the
second layer around the first layer (not on top of the first layer!)
You have now made a vacuum form jig!
Have a (Plastic) Drink on Me.
PETG is the same material Williams and Pinball Inc. uses
on 1990s pinball ramps and flat plastics (though sometimes
Pinball Inc uses CAB, see below for details on that).
Now I know, you're gonna tell me about your Star Trek
Next Generation pinball where the ramps are all blown out, and
how that plastic flat slignshot plastics are all chipped. But think about it.
You're constantly beating this material with a 1 1/16" steel ball,
and it's basically holding up pretty good.
PETG is extruded Polyethleneterephtalate Glycol copolyester sheet.
It has close to the durability and impact resistance of polycarbonates (Lexan)
with lower cost, and is easier to work with. PETG, like acrylic plexiglass,
offers a visually clear product that compares
to optical glass. Yet PETG has greater impact resistance than acrylic.
Minor surface scratches can be removed with heat (have you ever
seen the blow torch trick used to remove scratches in pinball ramps
in the "This Old Pinball" videos?) When
fabricating with PETG, it can be bent with heat and the edges can
be flame polished.
PETG is also part of the PET family of plastics.
There is considerable similarity between the three PET products
(PET, PETF, and PETG).
Plain polyethylene terephthalate (PET) or polyester is most commonly
associated with a material from which cloth and high-performance clothing
are produced (e.g., DuPont Dacron polyester fiber). PET is also the material
used for soft drink bottles (recyle symbol number 1) and many other
molded consumer product containers.
Increasingly over the last ten years PET has gained acceptance as a
material of choice for beverage bottles. Cleaned, recycled PET flakes
and pellets are in great demand for spinning fiber for carpet yarns
and producing fiberfill and geotextiles.
PETG, where the "G" represents
glycol modifiers, which are incorporated to minimize brittleness and
premature aging. This polymer is used in applications where thermoformability
(heat forming) is required.
Polyester film (PETF), is another PET derivative, and is
a semi-crystalline film.
PETF is used in many applications such as videotape, high
quality packaging, professional photographic printing, X-ray film,
floppy disks, etc. The film's primary advantages are high thermal
stability and mechanical strength. In fact, PETF
has one-third the tensile strength of steel (have you ever seen
the Tom Hanks movie "Cast Away", and what he does with video tape?)
Features of PETG:
So PETG is the plastic to use.
The only downside to PETG is the fact it is not UV resistant
(which means it can yellow from UV light).
Note the last two bullets.
It vacuum forms at only 14 PSI (Pounds per Square Inch).
That's good, because just about any decent shop vac can
suck that hard. But the last point is an important one.
The "draft angle" is the overall angle of the mold. That is,
the top of the mold must be narrower than the bottom (a
somewhat pyramid shape). This is required, otherwise the
newly formed part can be difficult to remove from the mold! This
is no problem with the Space Pilot craft though, as the
sides are slightly angled like a pyramid.
The only other plastic I could have used was
Cellulose Acetate Butyrate (CAB, or A.K.A. "Butyrate").
Unlike other common synthetic plastics, the cellulosic plastics like CAB are
not manufactured by polymerizing a monomer. Instead, they are produced
by the chemical modification of cellulose, a natural polymer.
CAB is characterized by good strength,
toughness, and high surface gloss. In addition, it has good
clarity, sparkle, and will take paint or screen printing readily.
Pinball Inc. explains they use CAB in ramp parts that they have
difficult details like lips and small crevasses, or
in ramps that are tinted (like Addams Family and Twilight Zone, as
PETG requires a special color order and would be cost
prohibitive). CAB is slightly more flexible than PETG, and
the mold distribution is better with
CAB, as it forms to the mold with less "stretching."
Although CAB is adversely affected by
alcohol, alkalis, paint removers, and acetones,
it is resistant to most household
chemicals. Additionally, CAB is resistant to
ultra-violet radiation (that is, it won't yellow easily).
CAB applications include
cellophane, Rayon (carpet fibers),
tool handles, panels for illuminated signs, steering wheels,
goggles, bathroom fittings, decorative trim for cars and
consumer durables, drawing stencils, pens, and blister packaging amoung others.
Cost is about 30% more than PETG, and because of this, I did
not use or try CAB. Expense is probably the main reason Williams
did not use it either for its plastics.
So I went to the local plastics store and bought a 4 foot by 4 foot
sheet of .060" thick clear PETG. Cost was about $25.
I cut the large sheet into smaller 13"x9" pieces, and
put a cut piece between my newly made picture frames,
and clamped it down with the bolts and wing nuts.
The Coin-Op Cook: Baking Plastic (Yummy).
Now moved everything to the kitchen, close to the oven.
Put the fiberboard jig on the edge of the counter top,
with the 1 1/4" hole hanging over
the edge of the counter. Put the shop vac hose into
the 1 1/4" hole, and secure it with a piece of duct tape.
Test the weather stripping seal by putting
the picture frame with installed flat PETG on the weather stripping, and turning
the vacuum on. The PETG should suck down tightly
against the press board, and should not leak.
Cleaned the mold (space craft) of any dust (compressed air
or the shop vac works well for this), as any dirt or particles
could get imbedded into the PETG plastic. Also clean the flat
PETG plastic itself, and make sure the blue protective film
on the new PETG plastic is removed.
Now put a 1/2" high wood block in the middle of the Sharpied picture frame
area on the fiber board (this is an important step and it
can not be skipped!)
Put some double sided tape on the bottom
of my mold, and placed it
on top of the wood block (note the wood block should have a smaller
footprint than the space craft mold) in the center of the
picture frame. Note this step can not be skipped; the mold
must be raised up with a block. Also
the mold should not obstruct the shop
vac hole in the fiberboard.
Just incase there is a 'plastic accident' and
you warm the plastic too long, it's not a
bad idea to put a layer of tin foil over the oven
rack. Makes cleanup a lot easier if the plastics
gets on anything, and the wife won't yell at you.
The oven can then be warmed up to 325 degrees
(again use the "bake" cycle in the oven, so only the lower
burner turns on).
Open the oven and put two 8" long pieces of 2x4
wood in the oven, and put the picture frame with the
PETG plastic installed on the 2x4s.
Turn the oven light on, and close the oven door,
watching the plastic through the oven door window.
Hopefully when you do this you didn't make
your picture frame larger than the oven!
As the plastic starts to warm up, it can warp and
get a slightly wavy shape. Don't worry about this,
it means the plastic isn't consistently soft yet.
As the plastic warms up it will flatten.
It took about two minutes, and then the plastic started
to sag in the middle (the 2x4 blocks allowed the plastic
to sag without touching the metal oven rack below it).
I let it sag until it was about
3" beneath the picture frames. Be careful, don't let it
sag too much! Because once it hits a certain sag point, it
will sag really fast until there is a big hole in the plastic where
the sag once was, and a gooey mess all over your oven!
Also if the plastic gets too hot,
it will develop small air bubbles. Experience is the
best teacher here, so have enough PETG plastic to
play with.
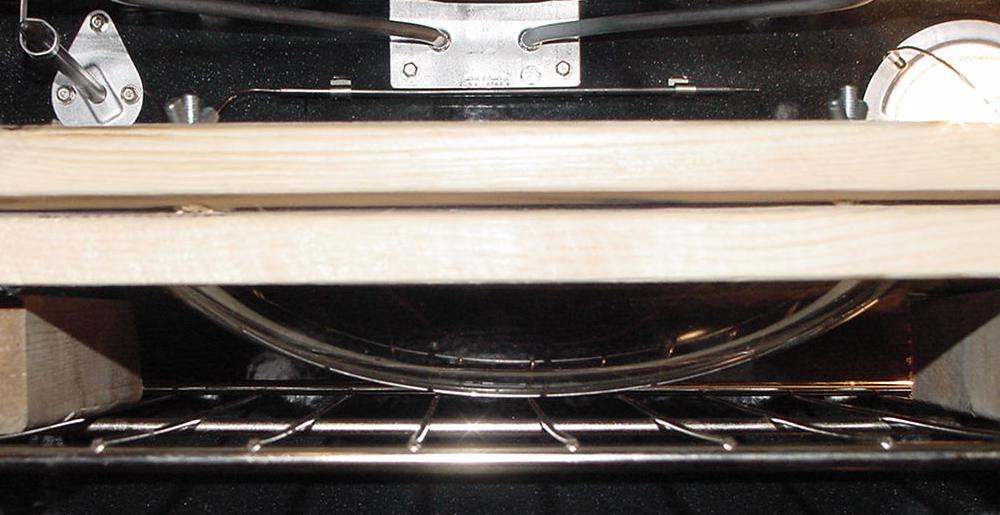
Notice how the plastic has "drooped" below the wood frame
due to the oven's heat. Now is the time to remove the frame
from the oven, and get it quickly to the vacuum form.
Using gloves, open
the oven and quickly move the picture frame to the
vacuum form jig. Press
the picture frame squarely over the mold and
on top of the weather stripping. Make sure you
push the picture frame straight down squarely on the mold,
otherwise you'll stretch one side of the plastic more
than the other, making the plastic thinner on one side.
Once the frame is squarely down, immediately turn
the shop vacuum on!
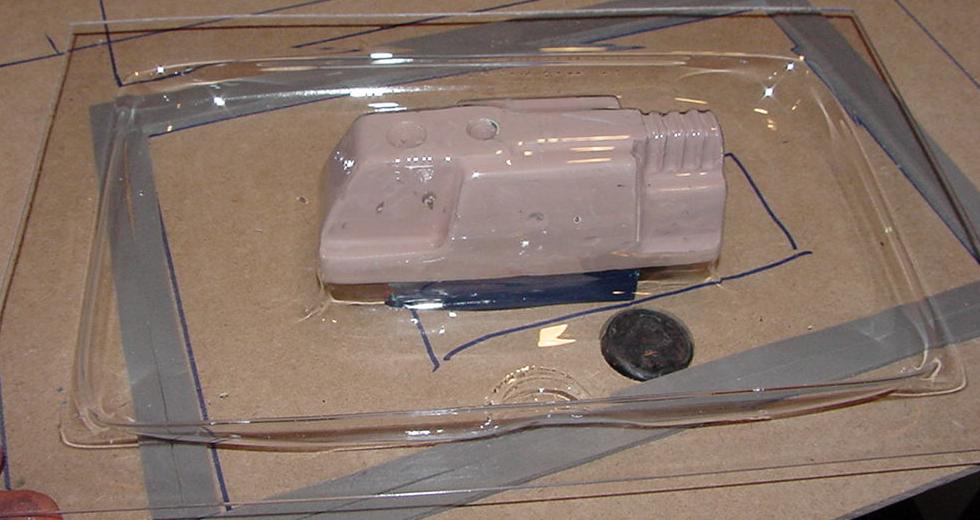
Here the warm soft PETG is placed over the vacuum form
with the space craft mold. The vacuum is turned on, and the
soft warm plastic is sucked down all around the mold.
If everything has gone fast and good,
as soon as the shop vac comes on, the soft PETG
plastic will suck down over the space craft mold.
If one side didn't lay down right, I used a plastic pen
to gently push the plastic down. While the vacuum was sucking,
I used a heat gun to warm up any sections
of the PETG that didn't form well over the mold. This kept the PETG
soft and easier for the vac to suck down, especially
after the PETG had cooled from the vacuum (just turning the
shop vac on cools the plastic fast, so the heat gun
helps a lot).
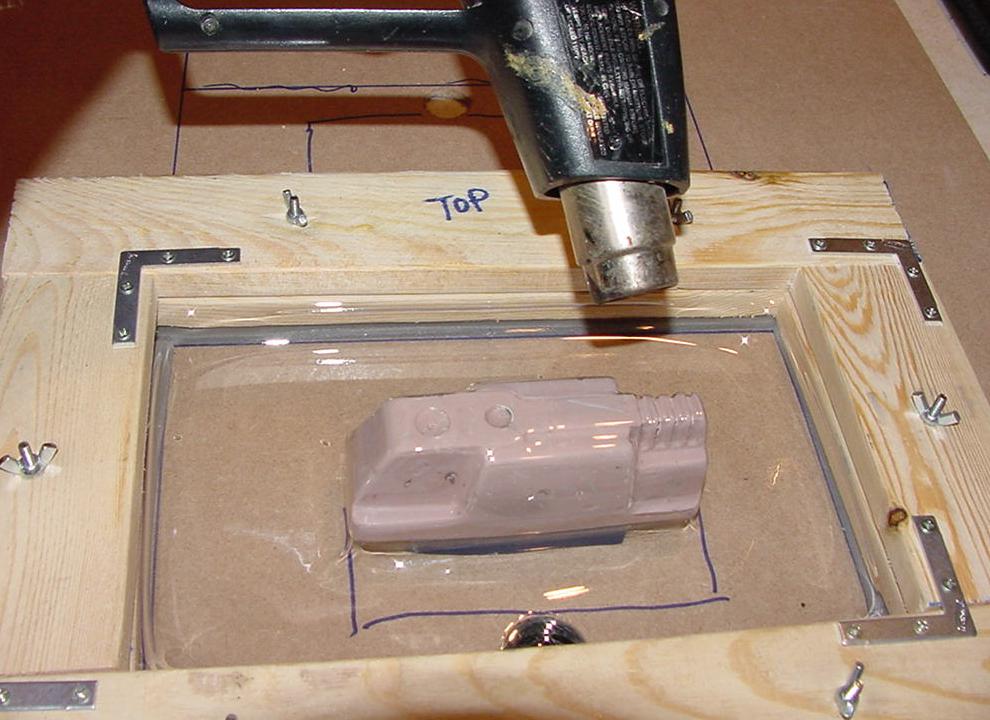
Right after turning on the vacuum, I also take a heat gun and
warm stubborn areas of the plastic that don't want to "sit down"
easily on top of the mold.
After about 60 seconds turn off the shop vac.
The PETG plastic should have formed nicely over the mold.
On two occassions I was unhappy with the results
of my vacuum form (I had not cleaned out the shop
vac before starting, so there wasn't enough "suck").
Instead of throwing away the already used plastic,
I just reheated it in to the oven and tried again
(this assumes you can get the mold cleanly out of the
newly formed plastic without any cutting).
This actually worked quite nice, allowing me to
not waste plastic that didn't form right over the mold.
After you're happy with the newly formed plastic,
undo the wing nuts and remove the PETG from
the wood picture frames. Also remove the double sided taped
wood from under the mold. Now the excess plastic around
the mold can be trimmed with a new razor blade.
Any plastic that hooked underneath the mold needs to be
cut away, so the mold can be easily removed.
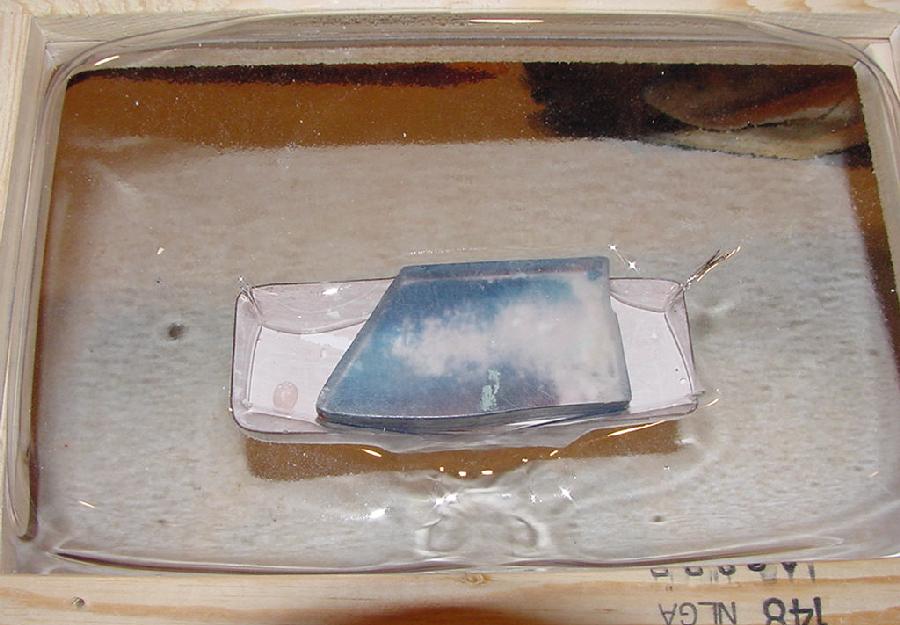
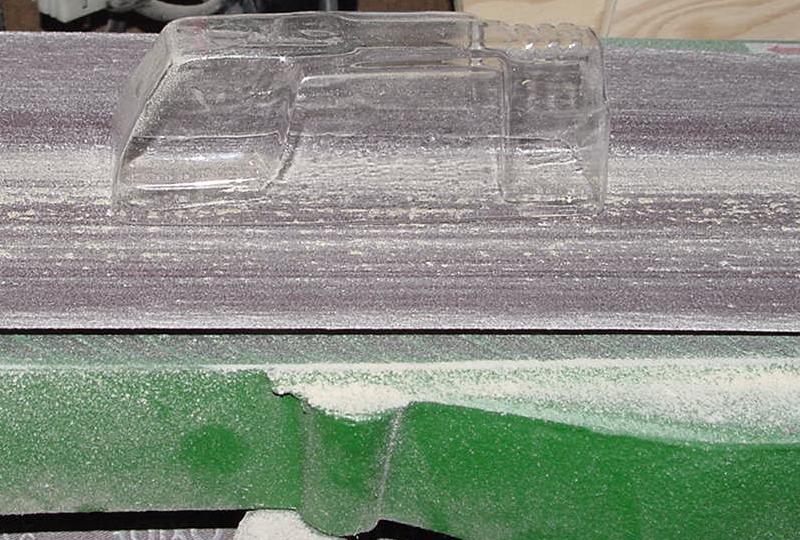
The underside of the PETG after it is vacuum formed
and before the mold has been removed.
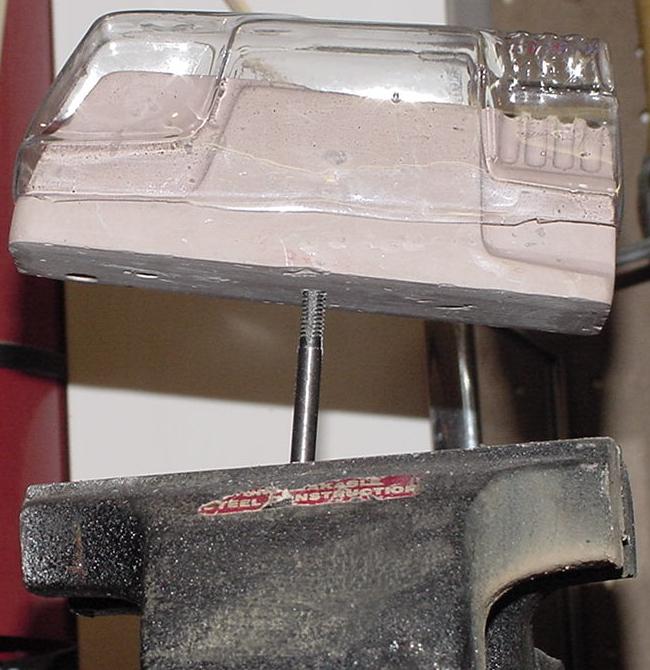
The next task was to remove the body filler mold from the
PETG. This is why we embedded the "T" nut inside the
mold. Just screw a bolt into the bottom of the mold's
"T" nut, put the
bolt in a vice, and pull the PETG off the mold. This is
difficult to do without the bolt, because there is
no way to hold the mold while pulling off the newly formed
PETG. After the PETG was released from the mold,
a belt sander was used to make the bottom of the
new space craft perfectly flat. A Dremel tool was also used to
cut any holes or slots in the space craft's body.
Once you have the rhythm down, you can make one plastic part
about every 10 minutes, mass-production style. Make thousands of
them and give them away at parties. Seriously you'll find
making parts is actually very fun and rewarding, even if you
don't know what to do with all the PETG parts you're making!
I forgot to put the T-nut in this mold, so a 1/4-20 tap was used instead.
Sanding the bottom of the new part flat on a belt sander.
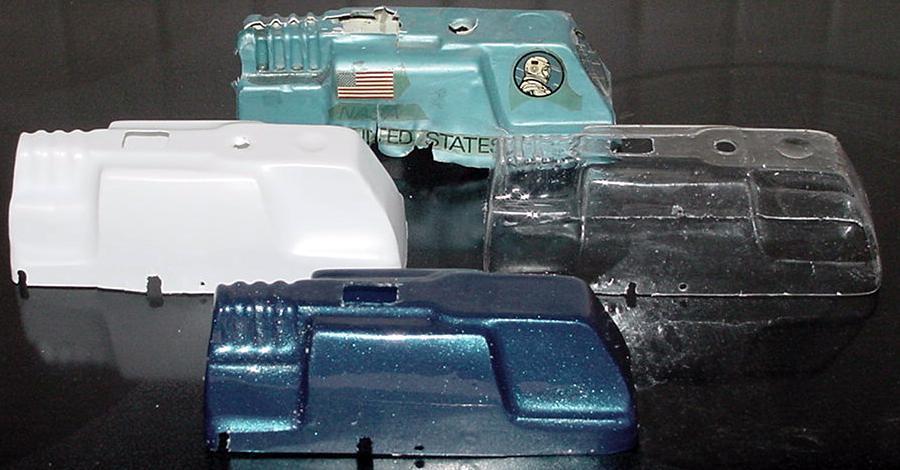
Painted Me White.
The original Space Pilot body is at the top center.
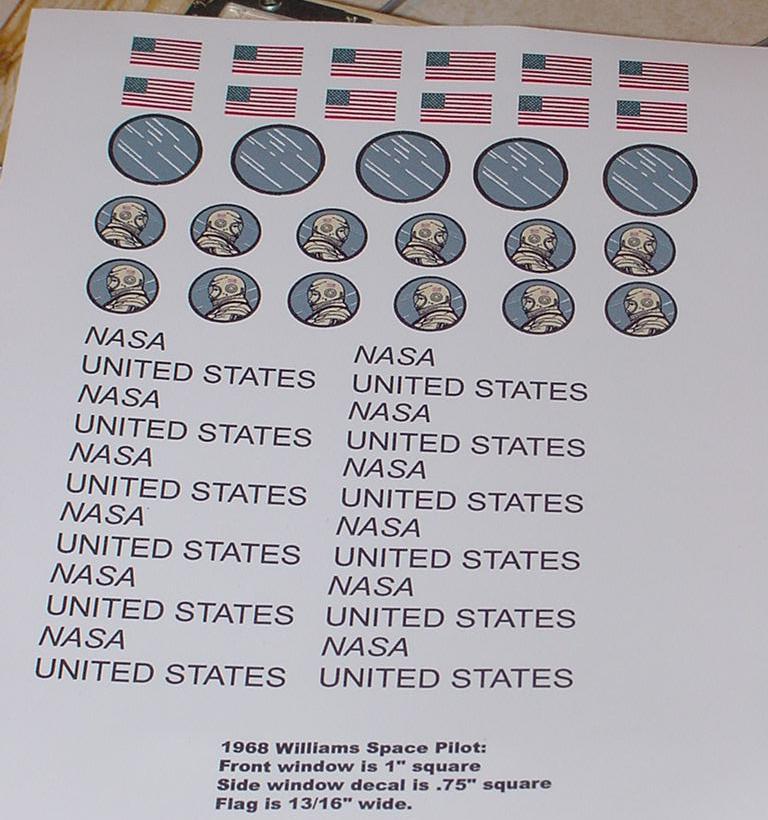
Decals.
Now that the decals were printed and the body was dry,
I put some warm water in a small bowl, and added a couple of drops
of white Elmers glue to the water (this will help the decals
stick better). Then
I cut the decals out and placed them one at a time in
the small bowl of water. After about 15 seconds in the water the decals
easily slide off their paper backing, and were put on
the new space craft. Tap dry them slightly with a paper towel
to remove excess water. They looked great! I let the decals
dry for an hour.
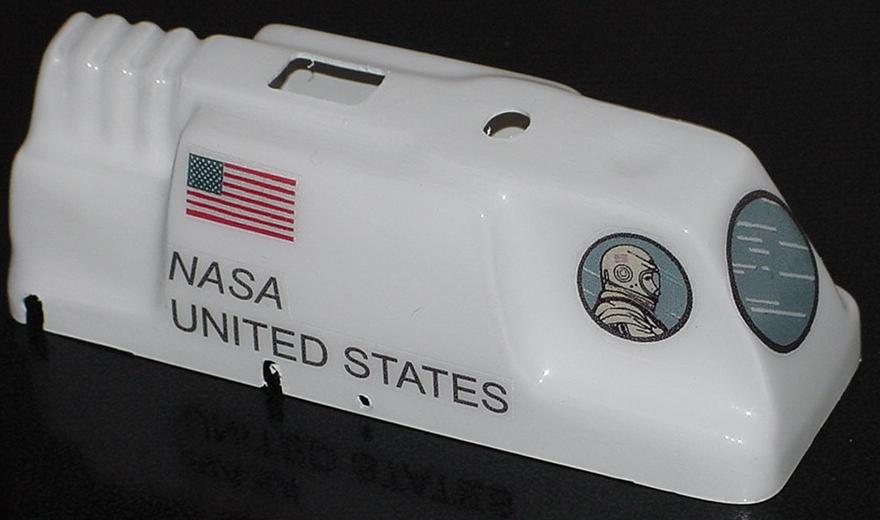
Now the new space craft body was complete. I installed
it in the game, and it worked like a champ! I was rather
impressed with myself. The new PETG body will be way
more durable than the original thin polystyrene body. And
frankly, it looked way better than the original too!
Conclusion.
Sidebar: Vacuum Forming 1990s Parts.
Ok so you like the neato vacuum forming technique used on
the 1968 Space Pilot. But you're not into these old EM
machines (you're a 1990s pingeek). So how does this apply
to you?
There are number of parts that can be vacuumed formed
for 1990s machines. Several that really come to mind are
the "Boulder Dash" mountain in White Water, the
"Hover Ship" in Terminator 2, and the lower ball arch
guns for Cactus Canyon. All of these plastics are
easily damaged, and none are readily available.
Here's how I remade the hover ship for T2. The original
plastic is .020" styrene, and rips and breaks very
easily. So it was an ideal canidate for recreation.
Just like the Space Pilot's craft, I put masking tape
all around the edge of an unbroken T2 hover craft, and filled it
with Bondo body filler. I also made sure I embedded a
1/4" T-nut into the wet body filler. After the body
filler was partially dry, I removed the original hover
craft body.
Next I sanded the bottom of the hover craft mold smooth,
and fixed any imperfections in the body filler using
Super Glue. When I was happy with the mold, I put it on
my vacuum form fixture, and made some PETG impressions.
Overall the new hover craft body came out pretty good.
Though my recreation doesn't have all the detail of the
original (not enough vacuum "suck"), the new body
is way more durable than the original. Another problem I
had was making my body "chrome". The original chrome finish
on the T2 hover craft is hard to duplicate. I tried Krylon
Chrome metal spray paints, but that didn't look quite right.
I mean it worked, but it was not a perfect color match.
But overall the finished hover craft came out pretty good,
especially if you don't have one!
(Reproducing the plastic space craft for the 1968 Space Pilot EM arcade game.)
Add: Making a pinball ramp for 1987 Bally Heavy Metal Meltdown pinball machine.
That didn't work out so well, but at least it's better than it was.
As shown in the original document below, I used Bondo two part
body filler to make the form of the original ramp. The nice
thing about Bondo is it's cheap and readily available (Home Depot.)
Also it's pretty easy to work with, though very messing (in liquid
form before it hardens, and when sanded after it hardens too.)
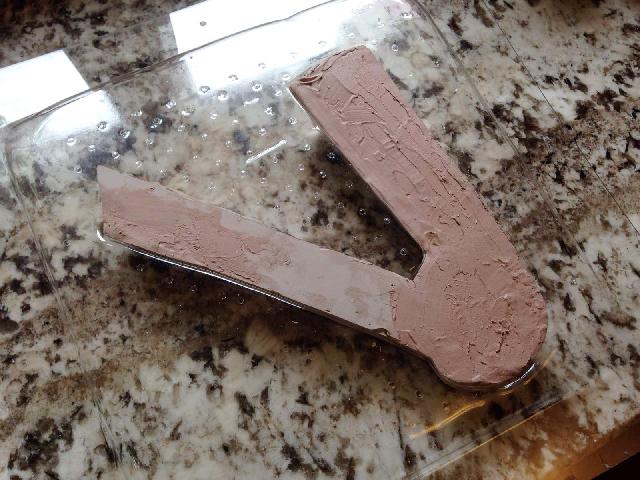
After mixing the gray material with the red hardner per the directions,
I filled the original ramp with the body filler.

In the original document I didn't make a vacuum form box.
But for this ramp, which is much bigger than the Space Pilot
part, a more "official" vacuum form box needed to be constructed.

Since this is a pinball ramp, clear PETG in 1/16" thickness (.060")
is the plastic of choice. I bought a 4x8 sheet of it at a local plastic
supply house for about $80. Then used a circular saw to make 18" x 18" squares, which go
into my newly made frame. The Screws are tightened to hold the plastic in the
frame. Note I drill four holes through the plastic, which the screws for the
frame go through. This helps hold the plastic in the frame better.
Next was to actually form the part. To do this you'll need an oven.
I used the household baking oven, to my wife's dismay. Warm up the
oven to 350 degrees. Then use 2x4 blocks to elevate your frame.
You need to do this because the plastic will get soft and bow
downward. You don't want it to touch the oven rake, or that will make
a huge mess! The picture below shows the frame with plastic in the
oven. Note you DO close the oven door and watch the plastic warm
through the window. But on my oven the door would not close all the
way (which is OK, it still gets the plastic warm enough.)
I did a YouTube video of the vacuum forming process.
This should help. Note I did not use the 1/4" metal mesh
under the mold in this video.
Original Document.

So the first thing I do is make a positive mold of the
space craft body. First I surrounded the
open edge of the craft with 3/4" wide masking tape.
The tape allows me to extend the bottom of the
space craft, and also prevents my mold material
from getting all over the original space craft.
Ok great, I have a prototype mold of the space craft.
Now it is time to do something called
"vacuum forming". My friend Bone actually
turned me on to this. He's a dentist, and makes
custom mouth retainers using this method (well he
doesn't use body filler in a patient's mouth!) Also there are
some Star Wars nuts out there using this technique
to make their own Storm trooper masks.

The next trick is to find a plastic that can be used
for vacuum forming. It needs to come in sheets, and to
be somewhat flexible. The original space craft was made
with polystyrene. I tried that material, and it's just
not durable enough, as it rips and tears easily.
I tried ABS plastic. Though tough as nails, it doesn't
vacuum form very well, and it's hard to keep it at the
right temperature without self-destructing.
Can't use plexiglass, as it shatters to easily. Can't use Lexan,
as it bubbles too easily when heated.
The last plastic I tried was PETG. This was the ideal
plastic!
Put the kitchen oven on "bake", and set the temperature to 325 degrees.
As the oven warmed up, cleaned out the shop vacuum,
dumping it's dusty junk into a large plastic bag.
Also clean the internal vacuum filter. These are important
steps, as the "suck" on the shop vac will be dramatically
increased if the vacuum is clean.
Moral: don't forget the T-nut!
Since the PETG was clear, this gave an ideal painting
situation. I could paint the *inside* of the body, instead
of the outside.
The color will shine through the clear plastic and look
great. Also the paint would be nearly impossible to scratch
during game play since it's on the inside.
And finally you don't have to be a perfect painter to make
the body look great (runs won't show).
Any overspray on the outside of the
body can be removed with alcohol. I used Krylon paint and
it worked great. I decided to go with white, as the space
craft in the game's flyer was white. This also makes the
craft's decals stand out better (I tried blue like the
body I borrowed, but it just didn't look as good).
Speaking of decals, they also needed to be reproduced.
The space craft's body had two American flags, two "USA NASA"
decals, two side pilot decals, and a front windshield decal.
Surprisingly, this was really pretty
easy to make. Using the computer, I just scanned the original decals off
the original space craft body. I imported them to PhotoShop,
and cleaned up the graphics (these edited graphics are available
at pinrepair.com/arcade/spacpil.htm). Next I went to www.decalpaper.com
and bought some clear water-transfer inkjet printer paper, and
printed the decals on this paper (white is also available, which
would have been good if I used a blue space craft).
After printing I clear coated
the decal paper with a wet coat of Krylon Crystal Clear (otherwise
the inkjet ink would bleed from the decals when wet) and let it dry overnight.
They also make decal paper for laser printers, and that
does not require the clearcoating step.
So was all this work worth it? Well sure! I mean I mastered some
new skills (vacuum forming plastic and making decals).