Oct 2, 2000
by cfh@provide.net
This document covers the following hacks:
- Before Starting ANY of these...
- Converting a PacMan board to run 4 different Pacman games.
- Converting a Pacman to Ms.PacMan using two EPROMs, and converting PacMan board to run 2 different Pacman games.
- Converting a PacMan board to Ms.PacMan using 2532's.
- Pacman/Ms.Pacman PCB Pinout.
EPROM Files Needed.
-
Click here
for a 230k ZIP file of all the ROM images needed for the following
conversions. This include Ms.Pacman and Pacman ROM images.
Click here for a 109k ZIP file of all the ROM images needed for the following conversions using Ms.Pac Attack ROM files. Ms.Pac Attack is basically Ms.Pacman with new and different mazes. And to be technically correct, this is really Miss Pac Plus and not Ms.Pac Attack (the only difference being the order of the new mazes is different; in Miss Pac Plus the first maze is last in Ms.Pac Attack). Anyway, this ZIP file includes all the Miss Pac Plus (Ms.Pac Attack) files needed for the MAME emulator too, in case you want to test the new mazes before burning them into EPROMs. The Mowerman did a nice job on this adaptation.
I have also incorporated the "CHEAT" versions of Pacman and Ms.Pacman into the above 172k ROM set. This allows the "select Player 1" button during game play to make you invisible to the colored pacmen, passing right thru them! Also, in slow mode, the "select Player 2" button during game play speeds up your yellow pacman on-the-fly.
Note the combination ROM files were created by concatenating the original ROM files using the following MSDOS copy command with the "/b" parameter:
copy /b rom1+rom2+rom3+rom4+rom5 allroms
Asumptions:
-
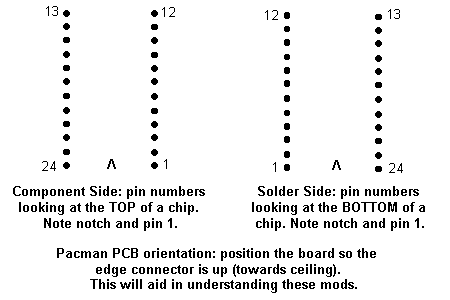
I am assuming you know how to solder. And I'm assuming you have a
general idea of chip orientation in regards to pin numbers. For example,
here are how chip pins are numbered:
-
Before starting any of these modification, a fully
working PACMAN game board is needed. If the boardset to be modified is
an original Ms.Pacman board with the ribbon cabled extension (daughter) board,
I would highly suggest dumping that and just converting the board to a
regular Pacman format. Here are the steps to convert an original Ms.pacman
board to a "regular" pacman board:
- Remove the 40 pin chip from the ribbon cabled daughter board.
- Remove the ribbon cable plug from the main pacman PCB.
- Plug the 40 pin chip into the socket on the main pacman PCB (where the ribbon cable was just removed).
- Discard the ribbon cabled daughter board.
- Install 2532 Pacman EPROMs into the sockets at positions 5E, 5F, and 6E, 6F, 6H, 6J.
PacMan 4 Game Modification.
Based on the hack by Chris Cope (some minor changes to Chris' hack, mostly to
make things more understandable for me).
This document describes how to take a Pac-Man or Ms. Pac-Man game and make it play both games. In addition, the multi-game will also play at either normal speed or fast (4x) speed. This allows you to choose between 4 different versions of PacMan/Ms.Pacman.
Necessary equipment:
- wire wrap wire
- (1) 28 pin socket.
- (1) 32 pin socket.
- (2) SPDT (single pole, double throw) switches
- (1) 27128 EPROM
- (1) 27010 EPROM
- EPROM images
4PACRW6.010 is the row 6 27010 ROM file. This contains four different versions of the PacMan row 6 ROM code (Pacman, Pacman speedup, Ms. Pacman, Ms.Pacman speedup).
4PACRW6C.010 is the row 6 27010 ROM file. This contains four different versions of the PacMan row 6 ROM code (Pacman, Pacman speedup, Ms. Pacman, Ms.Pacman speedup). This version includes the CHEATS.
2PACROW5.128 for the row 5 27128 ROM file. This contains both Pacman and Ms. Pacman row 5 ROM images and should only be used with 4PACROW6.010.
4MSATKR6.010 is the row 6 27010 ROM file for Ms.Pac Attack (Miss Pac Plus). This contains four different versions of the Ms.Pacman row 6 ROM code (Ms.Pac, Ms.Pac speedup, Ms.Pac Attack, Ms.Pac Attack speedup).
2MSATKR5.128 for the row five 27128 ROM file. This contains Ms. Pacman row 5 ROM images and should only be used with 4MSATKR6.010.
- Return your board to the original Pac-Man state.
- If it plays Ms. Pac-Man and has a daughterboard pulled into the
main pcb at location 6B:
- Remove the daughterboard from location 6B.
- Pull the big chip off of the daughterboard. This is a Z80, but the labeling may not indicate that. Put this chip in the socket that the daughterboard used to be in at location 6B. The Z80 is the only chip on the daughterboard that will fit in this socket. The others are smaller.
- If it plays Ms. Pac-Man but has six 2532's or 2732's on row 6, it's the bootleg 2x32 hack (which follows). You can remove all wires that are soldered between the Row 6 ROMs and other chips, but you don't have to. Since the bootleg hack modifies the 6L and 6K ROMs only, it shouldn't effect this 4-game hack. BUT if there are wires from the 6E, 6F, 6H or 6J ROMs, you should remove those. These wires may be on the backside of the pcb.
- If it's a Pac-Man, you're okay.
- If it plays Ms. Pac-Man and has a daughterboard pulled into the
main pcb at location 6B:
- Remove the old ROMs.
Regardless of what it plays, we'll be using new and bigger ROMs. Remove all 2532s or 2716s from rows 5 and 6. If your board uses 2532s and is original, you should remove two 2532s from 5E and 5F and four 2532s from 6E, 6F,6H, and 6J. If it's the bootleg Ms. Pac-Man, you should remove two 2532sfrom row 5 and six 2532s from row 6, the additional locations being 6Kand 6L. If your board uses 2716s, there will be four on row 5 and eighton row 6. I've never seen a bootleg Ms. Pac-Man done with 2716s, so I don't know about that possibility.It's also possible that someone did the Ms. Pac-Man mod using one ROM on row 5 and one ROM on row 6, as per Mowerman's instructions (see hack#2 below). If that's the case, we'll be using the same wires but bigger ROMs. So you may not want to tear all that up because much of it will be repeated.
- Get your ROMs ready.
- In the 6x ROM, you need to burn images of the Pac-Man 6x ROMs and
Ms. Pac-Man 6x ROMs. My multigame also includes a speed select switch,
so I burn in versions of each with the 4x ROM and the normal version.
For Ms. Pac-Man, you must use the bootleg ROMs. "I don't want to use
the bootleg ROMs", you say. Tough luck. To run with out the
daughterboard, you ain't got no choice. On RGVAC, someone posted once
saying that they had made a multigame using the daughterboard, so it
is possible. If you own Ms. Pac-Man, it's perfectly legal to alter the
board and run without the daughterboard. The purpose of the
daughterboard was to prevent people from upgrading their Pac-Mans to
Ms. Pacs for free. At any rate, I don't think Midway cares anymore.
Pac-Man uses 16k. Ms Pac-Man uses 24k. Without resorting to fancy address decoding, I put each game in a 32k block of memory. That's pretty wasteful, but I'm lazy and ROMs are cheap. Here's the map of the 6x ROM:
00000 - 00FFF Pac-Man 6e
01000 - 01FFF Pac-Man 6f cheat
02000 - 02FFF Pac-Man 6h
03000 - 03FFF Pac-Man 6j
04000 - 04FFF Pac-Man 6e (filler)
05000 - 05FFF Pac-Man 6f (filler)
06000 - 06FFF Pac-Man 6h (filler)
07000 - 07FFF Pac-Man 6j (filler)

08000 - 08FFF Pac-Man 6e
09000 - 09FFF Pac-Man 6f speedup cheat
0A000 - 0AFFF Pac-Man 6h
0B000 - 0BFFF Pac-Man 6j
0C000 - 0CFFF Pac-Man 6e (filler)
0D000 - 0DFFF Pac-Man 6f speedup (filler)
0E000 - 0EFFF Pac-Man 6h (filler)
0F000 - 0FFFF Pac-Man 6j (filler)

10000 - 10FFF Ms. Pac-Man boot1
11000 - 11FFF Ms. Pac-Man boot2 cheat
12000 - 12FFF Ms. Pac-Man boot3
13000 - 13FFF Ms. Pac-Man boot4
14000 - 14FFF Ms. Pac-Man boot5
15000 - 15FFF Ms. Pac-Man boot6
16000 - 16FFF Ms. Pac-Man boot5 (filler)
17000 - 17FFF Ms. Pac-Man boot6 (filler)

18000 - 18FFF Ms. Pac-Man boot1
19000 - 19FFF Ms. Pac-Man boot2 speedup cheat
1A000 - 1AFFF Ms. Pac-Man boot3
1B000 - 1BFFF Ms. Pac-Man boot4
1C000 - 1CFFF Ms. Pac-Man boot5
1D000 - 1DFFF Ms. Pac-Man boot6
1E000 - 1EFFF Ms. Pac-Man boot5 (filler)
1F000 - 1FFFF Ms. Pac-Man boot6 (filler)
This is 131072 bytes, or 128K. You need a 27010 EPROM for this. You'll notice that I've duplicated certain ROMs in some blocks of memory, like Boot 6 in 1F000 - 1FFFF. This isn't necessary, but I figured I should fill the unused blocks with something. 4PACROW6.010 contains the row 6 27010 ROM images.
- Fortunately, ROM 5 is a bit easier to deal with. Here's the map:
0000 - 0FFF Pac-Man 5e
1000 - 1FFF Pac-Man 5f
2000 - 2FFF Ms. Pac-Man 5e
3000 - 3FFF Ms. Pac-Man 5f
This is 16K. You need a 27128 EPROM for this. 2PACROW5.128 contains the row 5 27128 ROM images
- Burn the above ROM images into the EPROMs.
- In the 6x ROM, you need to burn images of the Pac-Man 6x ROMs and
Ms. Pac-Man 6x ROMs. My multigame also includes a speed select switch,
so I burn in versions of each with the 4x ROM and the normal version.
For Ms. Pac-Man, you must use the bootleg ROMs. "I don't want to use
the bootleg ROMs", you say. Tough luck. To run with out the
daughterboard, you ain't got no choice. On RGVAC, someone posted once
saying that they had made a multigame using the daughterboard, so it
is possible. If you own Ms. Pac-Man, it's perfectly legal to alter the
board and run without the daughterboard. The purpose of the
daughterboard was to prevent people from upgrading their Pac-Mans to
Ms. Pacs for free. At any rate, I don't think Midway cares anymore.
- Modify the board.
You can be as fancy or sloppy as you want. You can stack sockets or make a daughterboard or whatever. I simply pluged 28 and 32 pin sockets into the motherboard and bend the legs of the sockets and solder right to them. Then I insert the EPROMs into the sockets.Also, I did all wire jumps on the component side of the pcb. It's a lot easier to do it on this side of the board, as everything is labeled. Working on the solder side is much more difficult.
- Row 6 mod.
The 27010 is a 32 pin DIP. The socket I used was 6J and is 24 pins. Bend up pins 1, 2, 3, 4, 22, 24, 25, 28, 29, 30,31, and 32. Place the new ROM socket in the pcb socket so that the bottom of the chip (opposite side from the notch) lines up with the bottom of the socket. This means that pin 16 of the chip should go into pin 12 of the socket. If you had not bent up pins 1 through 4 and pins 29 through 32, they'de be hanging off. The actual pcb socket you use isn't important (as long as it's not 6K or 6L). We could use 6E, 6F, or 6H, but the daughterboard in 6D gets in the way.- Connect pins 24 (OE\) and 22 (CE\) to 7N pin 12.
- Connect pin 25 (A11) to 7L pin 9.
- Connect pin 28 (A13) to 7N pin 14.
- Connect pin 29 (A14) to 6B pin 5 (test connector 8th "finger" from the bottom component side). I tapped into it at this side edge connector.
- Connect pin 4 (A12) to 7J pin 6.
- Solder the wire between pins 1 (Vpp), 31 (PGM\), and 32 (Vcc) to +5 volts. You can tap into this in a number of places. Pin 24 of every ROM socket has 5 volts on it.
- Connect pin 3 (A15) to your speed select switch, middle pin.
- Connect pin 2 (A16) to your game select switch, middle pin.
- Pin 30 is no connect. Leave it alone.
You might have noticed that some of my connection points are different than Kev's instructions. We both used the same node, but I followed it to another place on the board using the schematics. Don't ask me why. Click here to see an OrCAD drawing of the row 6 modification.
- Row 5 mod.
The 27128 is a 28 pin DIP. Bend up pins 1, 2, 20, 22, 23, 26, 27, and 28 on a 28 pin socket. Put the new socket into the pcb socket at 5E or 5F. Again, it doesn't matter which.- Connect pins 22 (OE\) and 20 (CE\) to GND. You can pick up GND at pin 12 of any of the ROM sockets. You can also use pin 14 of the 27128 or pin 16 of the 27010. GND is always the top right pin of the EPROM (if you are facing the component side of the pcb with the edge connector towards the ceiling).
- Connect pin 23 (A11) to 4F pin 1.
- Connect pin 26 (A13) to your game select switch or pin 2 of the 27010.
- Connect pin 2 (A12) to 5L pin 5.
- Connect pins 1 (Vpp), 27 (PGM\), and 28 (Vcc) to +5 volts. I just connected pin 1 to pin 28. I then globbed solder between pins 27 and 28. Then, I soldered another wire from the glob to pin 24 of another ROM position (5H).
- Wire up your switches. Connect one outside terminal of each to +5.
Connect the other outside terminal to GND. Click here to see
an OrCAD drawing of the row 5 modification.
- Row 6 mod.
- Check your work, mount your switches, and fire it up!
I mounted my (small micro) switches right to the pcb between rows five and six using hot melt glue (there's a big empty space there with no components). Note hot melt glue also works nice to attach the new wires to the pcb so they aren't flying in the wind. You can make the whole thing look clean if you group the wires together and tie them down with a dot of hot melt glue.The speed select switch actually works on the fly. This can be used to handicap players or be a turbo-boost. Strange things can happen with the game select switch during play, but nothing catastrophic. You are essentially pulling the rug out from under the program, which usually causes a game reset.
Converting a PacMan board to Ms.Pacman using two EPROM's, and Two Game Pacman Hack.
by Mowerman
Necessary equipment:
- wire wrap wire.
- (2) 28 pin sockets.
- (1) 27256 EPROM (or a 27512 EPROM for the 2 game conversion).
- Row 5 Ms.PacMan stock 2532 EPROM's. Or (1) 2764 EPROM (or (1) 27128 EPROM for the 2 game conversion between Pacman and Ms.Pac).
- EPROM images.
MSROW6.256 contains the row 6 27256 ROM file. This contains all the row 6 Ms.PacMan ROM images, normal speed.
MSROW6S.256 contains the row 6 27256 speedup ROM file. This contains all the row 6 Ms.PacMan ROM images, 4 times speed.
MSROW5.764 contains the row 5 2764 ROM file. This contains all the row 5 Ms. Pacman ROM images.If doing the 2 game conversion:
2PACROW5.128 contains the row 5 27128 ROM file. This contains both the PacMan and Ms.Pacman row 5 ROM images. This is only needed if you are doing the 2 game conversion between Pacman and Ms.Pac.
PACMSR6.512 contains the row 6 Pacman and Ms.Pacman games for the 2 game conversion.
PACMSR6S.512 contains the row 6 Pacman and Ms.Pacman SPEEDUP games for the 2 game conversion.
NOTE: you could also construct a 2 game row 6 ROM version to switch between Ms.Pac and Ms.Pac Speedup. In this case you could use the stock 2532's for row 5, or MSROW5.764 which contains both row 5 ROM files for Ms.Pac. In this case you would not want to use 2PACROW5.128 as you are not switching between Pacman and Ms.Pac characters.
This modification requires a bit of experience in soldering to chips & creating/burning EPROMS it is also currently being debated if there is a timing related error in this design. For me I have performed this hack a dozen times with no problems (other than dumb mistakes not following directions).
- 1) Return your board to the original Pac-Man state. If it plays Ms.
Pac-Man and has a daughterboard plugged into the main pcb at location
6B, remove the daughterboard. Then pull the big chip off of the
daughterboard. This is a Z80, but the labeling may not indicate that.
Put this chip in the socket that the daughterboard used to be in at
location 6B. The Z80 is the only chip on the daughterboard that will fit
in this socket. The others are smaller.
If it plays Ms. Pac-Man but has six 2532's or 2732's on row 6, it's the bootleg 2x32 hack (which follows). You can remove all wires that are soldered between the Row 6 ROMs and other chips, but you don't have to. Since the bootleg hack modifies the 6L and 6K ROMs only, it shouldn't effect this 4-game hack. BUT if there are wires from the 6E, 6F, 6H or 6J ROMs, you should remove those. These wires may be on the backside of the pcb. - 2) Add a 28 pin socket into 6J with pins 1, 2, 27, & 28 exposed. Also bend pins 20, 22, 23 & 26 out horizontally (so you can solder wires to them) and press the socket firmly into the PCB socket at 6J.
- 3) Tie pins 20 (CE\) and 22 (OE\) to 7N pin 12.
- 4) Tie pin 23 (A11) to 7L pin 9.
- 5) Tie pin 26 (A13) to 7N pin 14.
- 6) Tie pin 27 (A14) to 6B pin 5 (test connector 8th "finger" from the bottom component side).
- 7) Tie pin 28 (Vcc) to +5 volts.
- 8) Tie pin 2 (A12) to 7N pin 15.
- *9) Tie pin 1 (Vpp) to GND.
- 9) Tie pin 1 (A15) to 8H pin 2.
- 10) If you want to use the cabinent test switch, cut the trace connecting to 8H pin 3. If you want to use a separate SPDT switch, do not cut the trace. Instead tie the center pole of the switch to the 28 pin socket pin 1. Tie one side of the switch to +5, and the other side to GND.
To use a single EPROM for Row 5:
- 1) Add a 28 pin socket into 5F with pins 1, 2, 27 & 28 exposed. Also bend pins 20, 22, 23, & 26 out.
- 2) Tie pins 1 (Vpp), 27 (PGM\) and 28 (Vcc) to +5.
- 3) Tie pin 20 (CE\) and 22 (OE\) to GND.
- 4) Tie pin 23 (A11) to 4F pin 1.
- 5) Tie pin 2 (A12) to 5L pin 5. If you are running just Pacman or Ms.Pac (and hence a 2764 for Row 5), stop here.
- 6) If using a 27128, tie pin 26 (A13) to the center pole of the SPDT switch, or to 8H pin 2 if using the cabinet switch. Using a 27128 here is only needed if you are toggling between Pac and Ms.Pac. Otherwise you can skip this step if using a 2764 or if you are using the stock 2532's in row 5.
Converting a PacMan board to Ms.Pacman using standard 2532 EPROM's.
Necessary equipment:
- wire wrap wire.
- (2) 24 pin sockets.
- (8) 2532 EPROM's
- EPROM images.
MSPAC6E.532 : Ms.Pacman 2532 EPROM image for position 6E.
MSPAC6F.532 : Ms.Pacman 2532 EPROM image for position 6F.
MSPAC6H.532 : Ms.Pacman 2532 EPROM image for position 6H.
MSPAC6J.532 : Ms.Pacman 2532 EPROM image for position 6J.
MSPAC6K.532 : Ms.Pacman 2532 EPROM image for position 6K (added socket).
MSPAC6L.532 : Ms.Pacman 2532 EPROM image for position 6L (added socket).(MSPAC6FF.532 : Ms.Pacman 2532 EPROM fast image for position 6F.)
(MSPAC6FC.532 : Ms.Pacman 2532 EPROM cheat image for position 6F.)
(MSPA6FFC.532 : Ms.Pacman 2532 EPROM fast cheat image for position 6F.)
MSPAC5E.532 : Ms.Pacman 2532 EPROM image for position 5E.
MSPAC5F.532 : Ms.Pacman 2532 EPROM image for position 5F.
Using this hack means you do not need the special Ms.Pac daughterboard and ribbon cable.
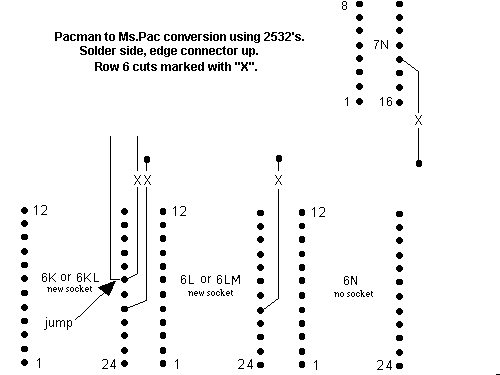
This is by far the hardest of the three hacks listed here, and provides the least utility. It requires adding two 24 pin sockets at row 6 locations 6KL (also known as "6K" or "6KL" because it is right between columns "K" and "L") and 6LM (also known as "6L"). The two new sockets are right next to the existing sockets on row 6.
To add the two new sockets, a de-soldering iron is needed. One can be bought at Radio Shack for $10. It looks like a soldering iron with a red bulb on it. It has a hollow tip that heats the solder, then the compressed bulb is released and the solder is sucked from the hole. It works very well, but buy an extra tip as they wear out quickly (and it doesn't work worth a damn without a good tip).
Also after performing this hack the Ms.Pacman board can go back to regular Pacman easily. Just install the original Pacman ROMs in their respective sockets and the game will work. No need to "un-do" the hack to go back to the original Pacman. So if the user doesn't mind playing musical ROMs, it is easy to change back and forth between Ms.Pacman and Pacman.
All modifications (cuts and jumps) should be performed on the solder side of the pcb.
Modifications steps.
- Add a 24 pin socket to positions 6KL (aka 6K) and 6LM (aka 6L) of the logic board. These go right next to the existing socket in row 6. A solder-suck solder will be needed to remove solder from the existing holes to put the new sockets in place. These two sockets go just to the left (as looking at the componet side, edge connector up) of the existing row 6 sockets.
- Cut the traces going to pin 20 at locations 6KL (which goes to 7N pin 1) and 6LM (which goes to 7N pin 2). These chip positions are where you put the new 24 pin sockets.
- On the solder side of the board, cut the trace going from 7N pin 13 to 6D pin 16.
- On the solder side of the board, cut the trace going from 6K pin 18 to 7L pin 10.
- Tie 6KL pin 18 to 7L pin 9. This is an easy jump as there is a pin to the left of 6KL pin 18 that goes to 7L pin 9. Just loop some solder across these to complete this jump.
- Tie 7N pin 13 to 6B pin 5 (test connector 8th "finger" from the bottom component side).
- Tie 7N pin 5 to 6KL pin 20.
- Tie 7N pin 6 to 6M pin 20.
Pacman/Ms.Pacman PCB Pinout.Power supply: Pacman and Ms.Pacman get their input voltages from a 7 volt AC transformer. Once this power is on the pcb, it is converted to 5 volts DC (essentially the power supply is built-in to the logic board).
BUT you can hook up a standard switching power supply, which supplies 5 volts DC at 7amps (or greater) to the Pacman 7 volt AC input lines. This causes no problems. My only suggestion is that you turn the 5 volt adjuster all the way up on the switching power supply. This will make the output voltage from the switcher close to 6 volts. The Pacman logic board will draw this voltage down to 5 volts.
You can also skip the on-board power supply by connecting +5 from the switching power supply directly to pin 18 of the solder side of the Pacman logic board. I wouldn't recommend this (because it limits you from using a Clone Pacman board, or from installing a Galaxian board in a Pacman cabinet), but you can do it.
                         wire  |                          wire
Pin Componet side        color | Pin Solder Side          color
--- -------------        ----- | --- -----------          -----
 A  GND (center tap 7v)  R-B   |  1  GND (center tap 7v)  R-B
 B  GND (center tap 7v)  R-B   |  2  GND (center tap 7v)  R-B
 C  +7 volt AC           Orange|  3  +7 volt AC           Orange
 D  +7 volt AC           Green |  4  +7 volt AC           Green
 E  (7.5 volt DC out)          |  5  Coin Meter in        BLU-R
 F  speaker              G-B   |  6  reset                W-B
 H  speaker              R-Y   |  7  Coin Meter out
 J  Coin mech switch     O-G   |  8
 K  Test switch          O-W   |  9  Credit switch        R-G
 L  Select one player    BR-B  | 10  Select two player    B-Y
 M  P1 move left         Blu-W | 11  P1 move right        Y-R
 N  P1 move up           W-R   | 12  P2 move up
 P  P2 move left               | 13  P2 move right
 R  to GND for cocktail        | 14  P1 move down         BR-W
 S  RGB GND              G-R   | 15  GND for controls     RED
 T  RGB Red              R-W   | 16  RGB Green            W-BRN
 U  RGB Blue             Y-B   | 17  RGB Neg Sync         O-R
 V  P2 move down               | 18  (+5 volt DC out)
 W  +12 Volt AC          B-W   | 19  +12 volt AC          B-W
 X  +12 Volt AC          Blu-Y | 20  +12 volt AC          Blu-Y
 Y  GND (center tap 12v) Y-G   | 21  GND (center tap 12v) Y-G
 Z  GND (center tap 12v) Y-G   | 22  GND (center tap 12v) Y-G