2a. The Cabinet: Replacing the Bottom Panel
If a game was stored in a web environment, often the bottom plywood panel
in the game has warped, rotted, delaminated, and is in bad condition.
If there is water damage, often this panel can just plain smell bad too.
Since this is the bottom of the cabinet, this panel is not really seen,
and doesn't have any artwork on it. It's an easy thing to replace.
Here are the steps in replacing the bottom panel on a 1960's Gottlieb
"wedgehead" game.
- Remove the coin door, coin entrance panel, and the shooter. Basically
you need to remove all the hardware from the front panel of the game.
- Remove the playfield and the bottom panel (with all the relays
attached) from the cabinet.
- If the game is set up, remove the head from the game, and remove
the legs.
- Lay the cabinet on the ground, with the bottom panel "down".
- Using a hammer, from the inside of the game, knock the back panel
out of the game. It should come right out with just a few mild blows.
- Using a radial hand saw, cut the bottom panel down the middle.
BE CAREFUL: do not let the saw blade go deeper than 1/2" into
the bottom panel!
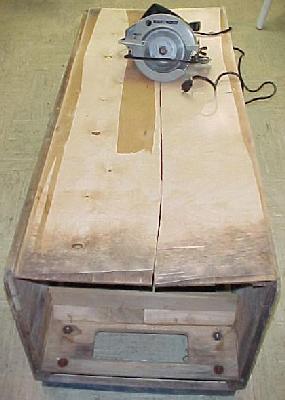
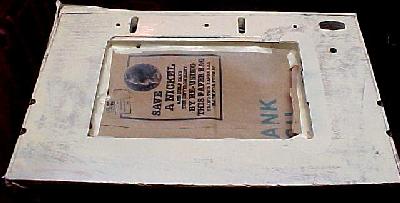
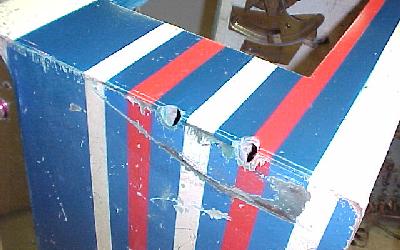
Left: With the back panel removed, use a radial hand saw
to cut the bottom panel right down the middle. BE CAREFUL! Do not
cut too deep or you will cut the lower cross struts in the
cabinet. Notice how the bottom panel has delaminated, and the water
damage at the back panel.
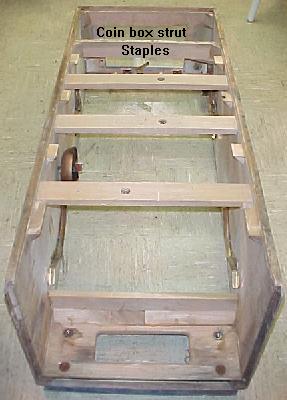
Right: After the bottom panel is cut and
removed. Note there are two staples through the bottom panel
on the cross strut by the coin box.
- After the bottom panel is cut, it can easily be lifted
from the center and removed.
- Get a piece of "Lauan" from the local Home Depot store.
Lauan is a type of inexpensive plywood with smooth sanded bottom and top.
It comes in a 4 x 8 foot sheet, which is enough for two bottom panels,
and cost about $10. Home Depot cut the Lauan for me at no charge.
For a 1960's Gottlieb wedgehead, it required a 1/4" thick by 51 1/4"
long by 21" wide bottom panel.
- Prepare the cabinet for gluing. Sand the coin box area cross strut
and the triangle supports to remove any old glue. Clean the dirt out
of any of the bottom panel channels.
- Test fit the new Lauan bottom panel.
Putting glue in the front and side chanels, and siding the new
Lauan bottom panel in place.
- Using yellow carpenter's glue, put glue on the coin box cross strut
and all the triangle supports. Also put glue in the front and side
bottom panel channels.
- Slide the new Lauan panel into place. Clamp the cabinet from the
sides, if possible.
Using weights and clamps to set the new
bottom panel while the glue dries. This is
done after the back panel has been re-installed.
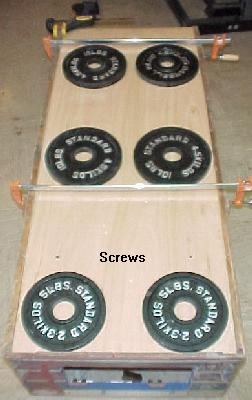
- Put two short dry wall screws through the bottom panel and
into the coin box cross strut. I also added a short dry wall
screw to the two rear-most triangle supports, and two screws
into the center cross support.
- Now immediately set the cabinet up vertically on the front coin door
panel.
- Clean back panel channels and put glue in the channels.
- Replace the back panel. It may require a hammer to gently
get it in place.
- Set the cabinet back down, with the bottom panel up, and
let the glue dry.
2b. The Cabinet: Checking a Re-Painted Cabinet for Original Paint
Often you'll buy a game that has the cabinet repainted. If you are lucky,
the paint will be latex. Latex paint is very easy to remove using
"Goof Off" (available at hardware stores). Lay the cabinet on its side,
and soak an area with Goof Off. Let the Goof Off sit for a minute or
two, then try and scrap the Latex paint off with a plastic paint scraper.
Often you will be rewarded with the original finish beneath the Latex
paint job. Several more coats of Goof Off and a rag will be required to get all
the Latex paint off.
Note Goof Off is also available in a 'generic' form called Xylene. This
is available at any hardware, and is much less expensive than Goof Off.
But Xylene does not work as well as Goof Off. There are some additional
ingredients in Goof Off (Methanol and Ethanol) that make Goof Off much
more affective at removing old paint than straight Xylene.
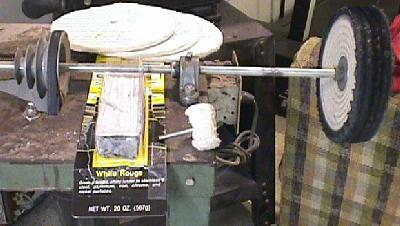
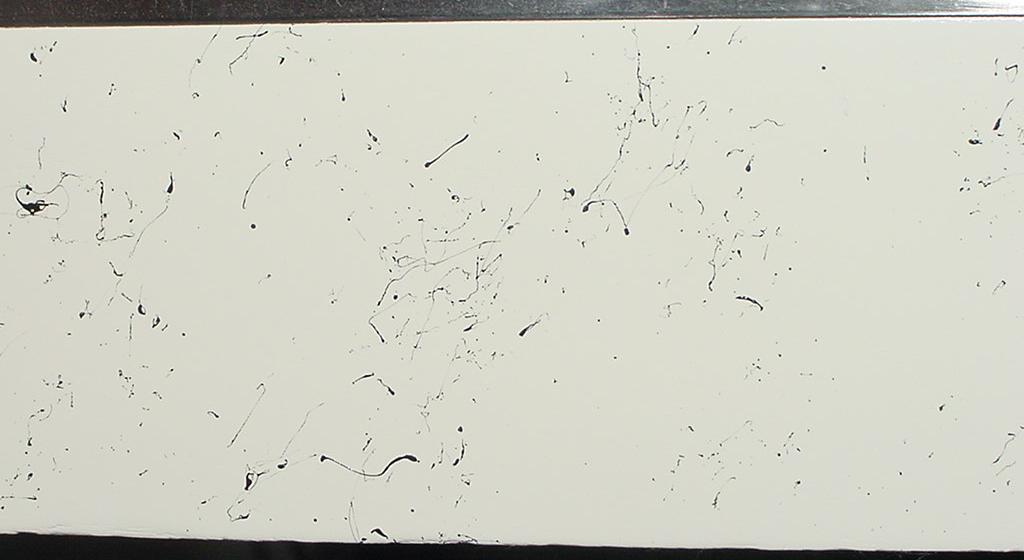
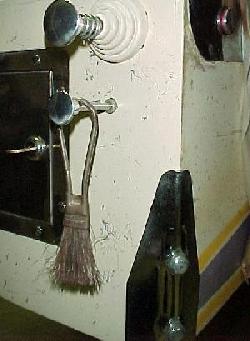
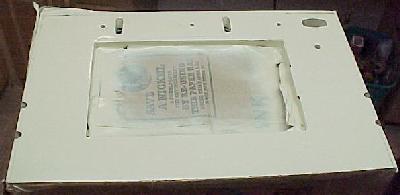
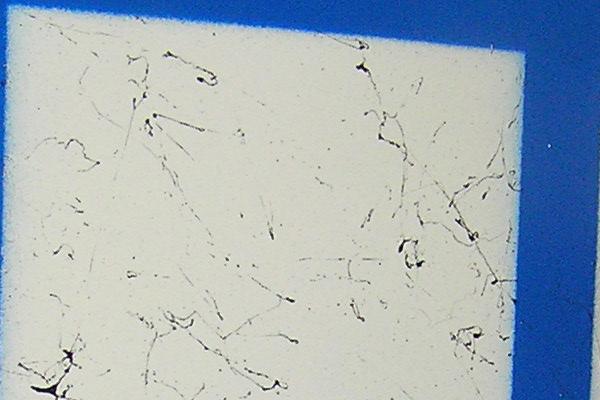
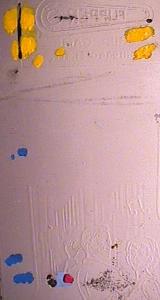
This 1962 Flipper Parade cabinet was painted
in a sick green Latex paint. I got it all off
except for the front panel around the coin door,
which was painted with an Enamel. To repaint the
front area, Kyrlon Antique White was used to match
the original yellowed cabinet paint on the sides.
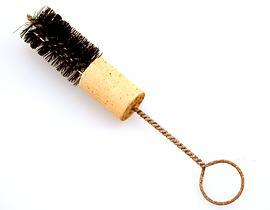
The wire brush hanging from the ball loader was
used to apply the splatter paint. Flipper Parade
has no stencil designs on the front, luckily.
This has happened to me several times. I buy a game that has a repainted cabinet
(and get it for a good price because, well, it's repainted!), and remove the
ugly repainted latex. This has saved me from
having to completely strip and repaint the cabinet. Original cabinet paint
is a must for any "keeper" game for me, regardless of its condition.
If the cabinet was not repainted with Latex paint, the Goof Off won't have
any effect on Enamel or Lacquer paints. Sometimes using a heat gun and a
paint scraper can get these finishes off the cabinet. But often the paint
is just stuck too well to the cabinet, and won't come off without destroying
the original finish beneath it, if it's even there.
I've also had some luck using "whimpy" paint strippers. The more organic
and water-safe paint stripper will sometimes take off a top coat of consumer
applied paint, and leave the original factory finish largely untouched underneath.
It doesn't always works, but often it does enough where you can at least
see the original paint designs, and make tracings of them for a re-paint.
2c. The Cabinet: Repainting a Cabinet.
Last Resort.
Repainting a cabinet is an ugly, big job. But if someone already stripped
all the original paint off the cabinet, there isn't much choice. If there
is any way to save the original finish, I always try. To me, a scratched,
original cabinet is better than a mint, perfectly refinished one. Because
original is original - once originality is gone, the time capsule of
history is gone and there's no going back (a repainted cabinet can always
be repainted again).
A common thing to see is a partial repaint. Often, the front of the cabinet
where the coin door is mounted is the only part repainted. This is good
and bad news; many Gottlieb games don't have any stencil designs here, so
repainting this area alone is pretty easy.
What is the "Webbing" or "Splatter" on Cabinets all about?
When Gottlieb changed from a "woodrail" cabinet design to "metalrails"
in 1960, the cabinet paint design also changed. Gottlieb woodrail cabinets were
painted a base color (often yellow),
with lots and lots of stencil painted geometric designs of up to three different colors.
With the advent of metalrail cabinets, this changed. Now the base cabinet color was white,
and there were far fewer stenciled geometric designs, and just two colors.
Using less stencils and less colors saved money. The stencils were less
complicated to make, and used less colors (saved paint and time).
But this meant the cabinet's base color was much more pronouned.
Because of this, a "webbing" or "splatter" design was added to the cabinet
right after the base color (white) was painted. The webbing broke up the
large white areas, making defects in the paint and wood less noticible.
The job of the webbing/splatter was to basically introduce artifical
defects to the paint, thus making the "natural" defects far less pronouced!
Also large areas of unstenciled white just looked better.
Did my Early 1960s Gottlieb Cabinet use Black Webbing or Silver Splatter?
Most Gottlieb EM metal rail games from 1960 to 1978 use a black
webbing paint over the base cabinet color. There are some exceptions
though, most notabily games from about 1960 to 1963, which sometimes use silver splatter
instead of black webbing. However anything 1963 or
later should have black webbing.
If not sure about the game in question, check for original paint on the inside of the sides of the cabinet
(above where the playfield is mounted and below the metal side rails),
or under the legs, or any other area that
did not get much wear. Gottlieb used more than one company to make cabinets,
and these different companies did not get the webbing/splatter designs consistent
until about 1963.
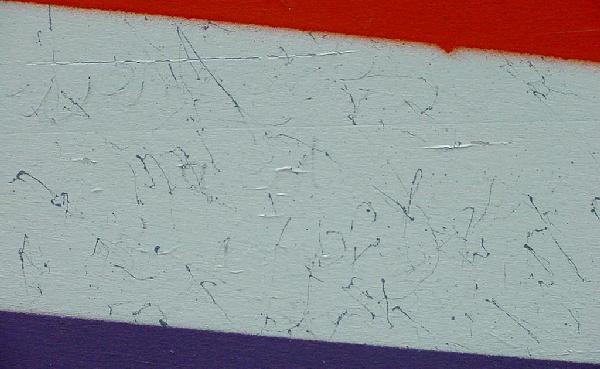
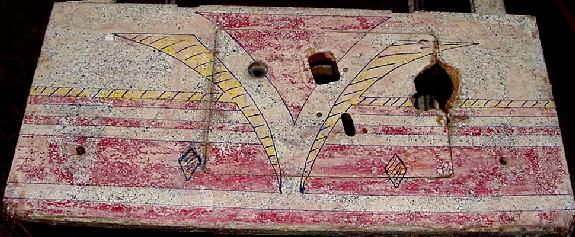
The head on a 1965 Central Park. Note the factory original
black webbing paint, and the blue and orange stencil paint
is OVER the black webbing.
Repaint Steps (partial or full):
- Remove the backbox from the cabinet.
- Remove the coin door and coin entrance slots. Also remove the legs.
- Check for Original Paint! If the original paint is under the current repaint,
try and save it! Or at least try and make tracings of the original stencil design on
the cabinet as you remove the repaint, if possible. Use Goof Off and see if you
can remove the repaint.
- If the entire cabinet was repainted, check other places for the original
paint. For example, lots of novice painter don't remove the legs when
repainting a game! Often the original paint colors can often be seen underneath
the legs, and the colors matched from these areas.
Additionally, check the inside the cabinet too. the area just
below the metal side rails on the inside of the cabinet should have the
original paint (though it will only show the base cabinet
color, and the webbing/splatter color).
- On a full cabinet repaint, if possible, remove the metal side rails (if game is 1960 or later).
Getting metal side rails off without bending them is TOUGH! You will
need a way to remove the "twist nails" that hold the side rails. If you
can't do this without damaging the side rails, STOP. Leave the rails in place.
New twist nails are available from Pinball Resource.
- If the original paint is under the repaint (but you can't get the repaint off
with Goof Off), at least try and make a tracing of the original cabinet stencil designs.
If this is not possible, check reference books or online pictures.
Or have a friend with an original version of the game make a tracing
of the stencil designs.
- Remove the current paint with paint remover or a heat gun, and a pastic paint scrapper.
- Machine or block sand the cabinet level with 100 grit sandpaper.
- Fill any dents or defects in the wood. I like automotive body filler for
this task, as it dries fast and hard. After the body filler is dry,
block sand it flat with 150 grit.
- Minor defects (and I do mean minor!) can be filled with automotive
spot putty. Spot putty is basically thick primer, so it's just for
filling very small imperfections. This takes about 30 minutes to dry,
and should be block sanded smooth with 150 grit.
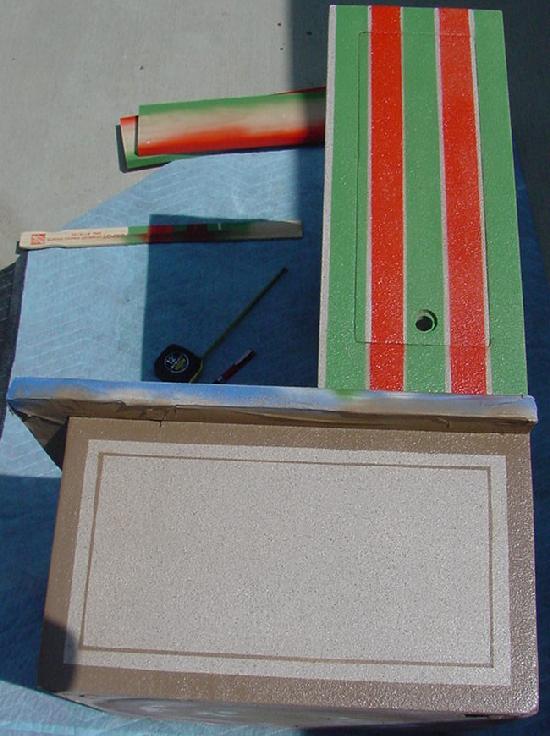
Doing a partial repaint on the coin door area of a Gottlieb wedgehead.
Note the defects have been filled with body filler, and block sanded
smooth. All areas that could get overspray have been masked off. I
put a piece of masking tape over the original finish under the coin
entrance plate. This allows me to compare my new finish to the original
when done.
- Sand the cabinet with 150 grit sandpaper.
- Sand the cabinet with 220 grit sandpaper.
- Sand the cabinet with 320 grit sandpaper.
- Wipe down the cabinet with Naptha to remove any contaminates.
- Tape off any cabinet areas that shouldn't be painted
with a good quality 3M masking tape and
grocery store paper bags to prevent overspray.
- If doing a complete repaint, set the cabinet so it's positioned
like the legs are installed.
After the first coat of Krylon Antique White has been sprayed. The
first coat doesn't cover very well. Don't worry about it, as the second
coat will look much better!
- Use Krylon "Antique White" if you are doing a partial cabinet
repaint (like the front of the cabinet) to match a yellowed cabinet
finish. Works great on Gottlieb wedgeheads. If doing a complete cabinet
repaint, Krylon "Ivory" is probably a better choice (it's less yellow
looking).
- If painting the entire cabinet, pick the colors you like. I like
the Krylon brand of spray paint. Create a color swatch to aid in matching
colors.
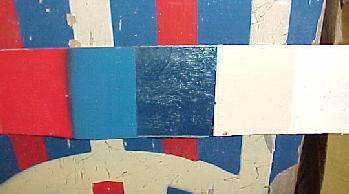
Creating a Krylon color swatch. This is very helpful when trying
to match repaint colors. From right to left: Ivory, Antique White,
Regal Blue, True Blue, Banner Red. These are most of colors
needed for 1960's Gottlieb cabinets.
The cabinet after three coats of Krylon Antique White.
- Spray the base coat (usually white or an off-white). Spray just
enough finish to cover! This is usually two coats, and no more than three coats.
Original cabinets do NOT have a lot paint on them! Generally speaking,
you do not have to sand between coats. But sanding after the second
coat with 400 or 600 grit, and applying the third and last coat, will give a smoother
looking cabinet.
Note if you have done good surface preparation, you do not need to sand
between coats. Also you do not need to use
any primer before the base coat. None of the original pinball maker used primer, and neither
should you!
If repainting the entire cabinet, I personally like to use auto acyrlic lacquer
or enamel paint and a spray system. But often good results can be used just
with good quality (Krylon) spray cans. Light sanding between coats (600 to 1000
grit wet/dry sandpaper) is recommended.
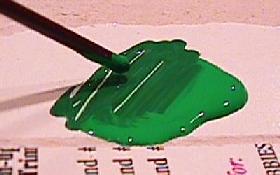
Adding the silver splatter after the Antique White has dried.
My new paint surrounding a taped off original paint
section under the coin entrance plate.
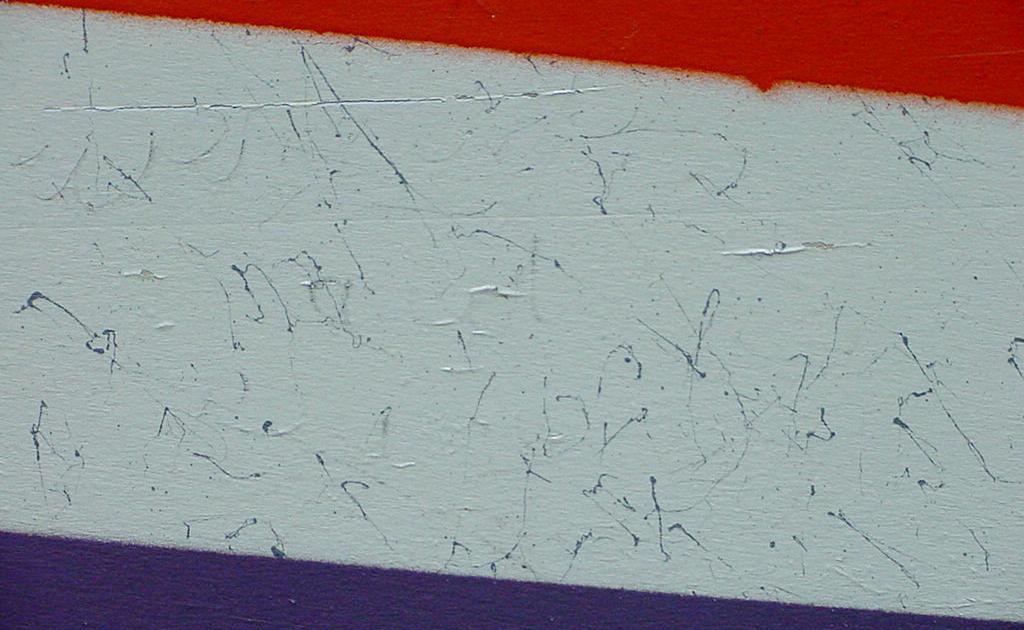
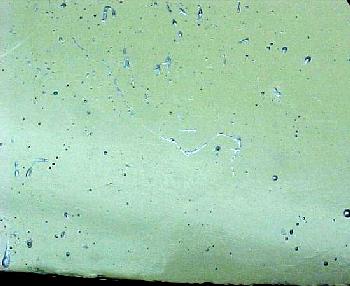
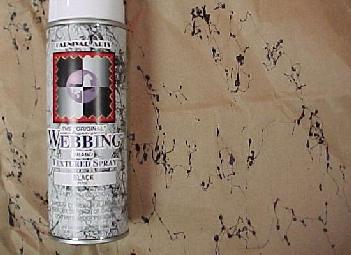
Black webbing paint from a can. I stood three feet from this
paper to get the can webbing to be finer. This product gives
webbing just too thick and heavy for pinball cabinets. I would
avoid using this product.
- After the base coat is dry, add the "webbing" or "splatter" paint. Note some Gottlieb
games from about 1960 to 1963 use silver splatter instead of black webbing. Anything 1962 or
later should have black webbing.
If not sure about the game in question, check for original paint on the inside of
the sides of the cabinet
(above where the playfield is mounted and below the metal side rails),
or under the legs, or any other area that
did not get much wear.
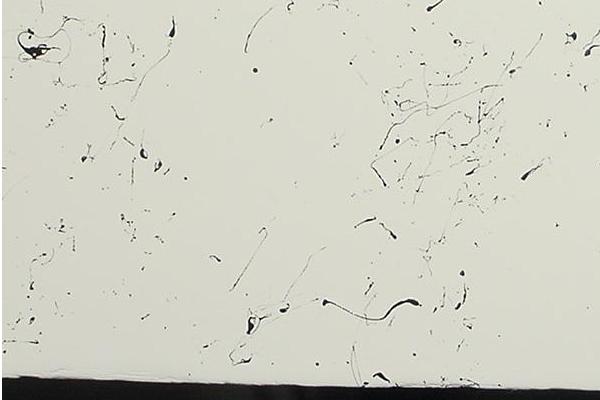
Original webbing used on a 1962 Gottlieb Flipper Clown.
Redone webbing using black lacquer paint and a small Weiler 30918 wire brush.
Redone webbing using black lacquer paint and a compressor/gun.
Webbing with a Wire Brush.
The webbing is always black, but silver splatter was also used on some 1960-1963 cabinets
(note the silver was a splatter design, and not webbing like the black).
Depending on the thickness of your paint,
a small wire brush (I bought mine at Sears) can be dipped in the paint.
I found thicker paint with a wire brush worked best for me.
The paint I like to use for webbing is black lacquer. This can be bought
at furniture stores in one gallon cans (Pratt-Lambert is the brand that
I bought).
The style wire brush I found to work well
is available from a variety of sources, and is called
Weiler Brush 30918. If you do a Goggle web search you can find this
brush. Heck even
Amazon.com
sells them.
The Weiler 30918 wire brush used for webbing.
Dip the end of the wire brush into the unthinned paint, then
flick the wire brush with your thumb to splatter the webbing paint onto the cabinet.
Practice this first on cardboard! Having too much paint on the wire brush
will give webbing that is too thick.
Note thin paint gives more of a splatter pattern, instead of a
webbing pattern. If your paint is too thick, dip the wire brush first into some thinner,
then dip it into the paint. This will thin the paint slightly (though I
don't recommended thinning the paint).
Be conservative when webbing a cabinet. You don't need a ton of
webbing. If you want to go back and add more after you do the
whole cabinet, this is easy to do with the wire brush technique.
Practice is the key to good webbing. This is a simple and easy process. An entire
cabinet can be splattered using a wire brush in about 10 minutes. You can
clean the wire brush in lacquer thinner, or just throw it away and buy
another.
Not adding the webbing/splatter to a cabinet repaint is a sign of a true novice paint job.
So practice and do the webbing.
There is also a commercial splatter brush available that works well, called the
Kemper Splatter brush.
It costs less then $3 so it is worth trying. Note this produced a SPLATTER and *not*
a webbing effect. It also makes a very uniform splatter.
The Kemper splatter brush.
Webbing with a Compressor and Gun.
Gottlieb originally did splatter with a compressor and gun.
If you have the equipment, this works too. Same black lacquer
paint is used (again I like the Pratt-Lambert black lacquer,
but automotive black lacquer will work too, just it's more expensive).
Again you will have to experiment. But here's basically how it works:
Set the compressor to around 40 to 60 PSI.
Open the cup on the sprayer and pour in some unthinned black lacquer.
Get the nozzle on sprayer fairly open. Practice spraying.
That's about it. The unthinned paint should splatter fairly well.
The type of gun does matter, and the cheap production touch-up guns
seem to work well for this. You want an "old school" style gun
designed for higher pressure and lots of overspray.
These small touchup style guns seems to work well, and are
fairly inexpensive. Do not get a HVLP gun.
A Touchup style gun used for webbing.
Which method you use for webbing paint depends on your
situation and availability of equipment. From the pictures
you can see the results from the Weiler 30918 wire brush
and the compressor/gun techniques are nearly identical.
Use whatever works better for you.
The front cabinet repainted and webbed.
Adding Stencil Patterns.
Most games use a stenciled color pattern somewhere on the cabinet.
To do a good re-paint job, you must re-create these patterns.
Some people think the webbing is done after the stencils. From the
above picture of the 1965 Central Park you can clearly see the
stencils go over the webbing, and the stencils are the last step.
After the webbing paint is dry, then do your stencils. Do NOT tape off the
cabinet and paint the designs! That's not how cabinet designs were painted
(remember the designs are called "stencils", and not "tape offs").
The idea is to recreate the original process and look of the cabinet,
and taping off designs was not have the cabinet was originally painted.
Making Stencils.
Hopefully an original cabinet is available to recreate the stencils.
Or if you were able to strip-off the over-paint revealing the original
cabinet designs to some extent, so this can be used to make stencils.
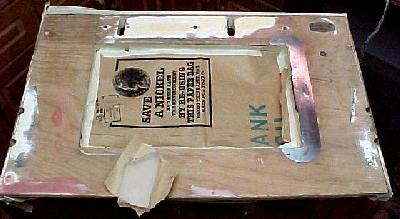
This cabinet was repainted *twice*, yet I was able to use thin coats of paint
stripper to remove the overpaint, thus revealing the original cabinet designs.
Then I took a Sharpie pen and a straight edge, and re-drew the stencil patterns.
From this I could easily create a tracing of the cabinet designs. After the
tracings were made, the cabinet was further stripped and prep'ed for painting.
Note the nasty animal chew hole in the coin door! This obviously was filled
before repainting. I used automotive body filler and wood.
|
|
Large sheets of tracing paper are best when tracing an original cabinet.
These are available from blue print and engineering supply stores. If
the original cabinet to be repainted has dubious stencil designs, they
can be quickly redrawn with a Sharpie pen and a straight edge. Then the
process of tracing the designs is much easier. You will be painting the
cabinet anyway, so drawing on it is no big deal. Note one tracing is needed
for each color.
If want to do a quick repaint,
use posterboard for the actual stencils, one piece of poster board
for each color. Or use .050" thick picture frame
matte (available from picture framing shops) for stencils. You can usually
get this matte large enough for the entire side of a cabinet.
The thicker .050" matte means the stencil won't curl when painted. Originally
original manufacturers used thin brass stencils. Using posterboard or framing matte is
much less expensive, and easier to cut. The downside to using posterboard
is it warps after a single use, making it much harder to use a second time.
This happens because as the oversprayed paint
dries on the posterboard, it changes the surface tension. Keep this in mind
if multiple cabinets are to be sprayed, and use the thicker .050" thick
matte to prevent it.
Using the Bren Ultra-Cut II stencil material. This stuff is really nice,
doesn't curl too badly, has a tacky back side, and is reusable.
|

|
If you really want to make good stencils, it's a nice idea to use
material designed just for that. I have been using with
stencil material from Bren Instruments, Franklin TN (800-826-3991)
http://www.bren.org/stencil.htm.
Their 8.5 mil thick Ultra-Cut II seems to be a good choice, as it is a
reusable general purpose stencil material with a light tack adhesive to
hold it in place while painting. This 8.5 mil, semi-rigid plastic conforms
easily to curved or irregular surfaces, lightly holds itself in place and
is impervious to inks, paints or stains. It comes in 30" wide, 100 foot rolls
(enough for about five pinball cabinets, depending on how many colors it has).
It's not cheap, a roll will cost $100, but it is well worth it.
They also make the SSB-Cut stencil material, which is basically the same
as the Ultra Cut II but is thicker (10 mils). It also has the low-tack
sticky back (I don't really see any advantage to the thicker stencil material).
And lastly I have also tried the Clear-Cut B, which is
7 mils thick and of course clear. This material saves the step of using
tracing paper! But the downside is it does not have the sticky low-tack
back. For my money the best is the Ultra-Cut II and the Clear-Cut B.
Which I use depends on my mood and if I have some Krylon spray Easy-Tack
spray adhesive handy to use with the Clear-Cut B.
After removing the Bren stencil material.
|

|
The Bren stencil material will also curl after paint is applied. But it's
not nearly as bad as posterboard or matte. Also the tacky back side is
very helpful in positioning the stencil. I do also add some weight to the
stencil too, because after a few applications the tacky side is, well,
less tacky. But it is still way easy to use than posterboard, and much
more reusable.
The stenciling complete. The lower designs were done with the Bren
stencil material. The upper straight designs were done quickly using
cheap boards as the stencils. This proved to be much easier and quicker
than cutting stencils.
|
|
Some people are using some very thin, one-time use stencil material
like Frisket paper. I find this material extremely hard to work with,
and it's good for one time. What if you have to use the same design
on another part of the cabinet? Well you have to make/buy another stencil
and deal with the thin material again. Not worth it in my book!
I find the Frisket paper to be very amateur like a kid's toy, not a real stencil.
Before starting to cut the stencils, note the order of the colors.
On many cabinets, it does matter which color stencil pattern is sprayed first.
And this can affect how the second and third template should be drawn.
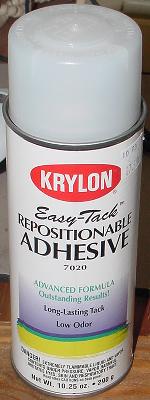
Krylon spray Easy-Tack
#7020 repositionable adhesive.
To create a stencil, put the tracing paper over the posterboard
or matte. Use an Exacto knife to cut through the tracing paper and into
the poster board. A straight edge can be used to make clean straight cuts.
Make sure to clean up the corners of your cuts with an Exacto knife
so they are clean and crisp.
Spraying the Stencil Colors.
After cutting the stencil with an Exacto, set the stencil against
the cabinet and check for alignment. To hold the stencil down
against the cabinet, small weights can be used. For thin areas of
stencil, use inexpensive kid's double sided tape to hold the stencil
down. Or an even better idea is to use a "light tack" spray adhesive.
Spray the light tack onto the stencil (not the cabinet!), and position
it as needed. This works really well, but experiment with the spray
tack first, to make sure it does not mess up your paint.
After the stencil is secured to the cabinet,
LIGHTLY spray the designs with some sort of spray paint. Spray just enough paint to
cover, and no more. A common problem is
spraying too much paint, and the paint pools at the edge of the stencil.
Then when you pull the stencil off, the edge line is distorted from
the pooled paint. Also several light coats is better than one heavy coat.
When pulling the stencil off the cabinet, be careful not to smear
the freshly sprayed paint. I personally like to remove the stencil
when the stencil paint is still wet, otherwise the stencil can get
stuck to the cabinet by the drying stencil paint.
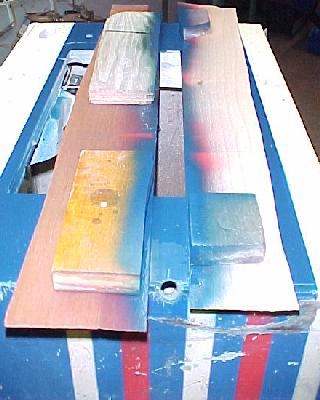
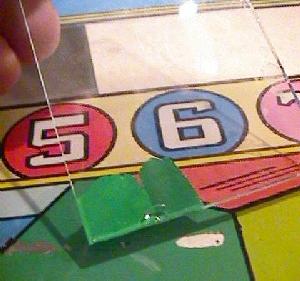
Repainting the front of a Gottlieb Cross Town. Since the
front stencil patterns are straight, I used thin and straight
wood laminates as stencils (instead of cutting out stencils).
The laminates are put in place, and weighted with some blocks.
Then the paint is lightly sprayed, and the stencils immediately
(and carefully!) removed. After this stencil paint dries, the
next stencil area is painted.
The Cross Town cabinet with the new repainted front. Note the Krylon
colors matched very well to the original cabinet side art.
2d. The Cabinet: Legs and Coin Door (rust removal)
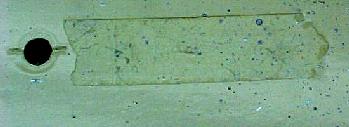
Untreated raw rusted leg on left, treated shiny leg on right.
Most likely your game will have some rust on the legs, coin door,
and coin entry panel. If not too extreme, you can get the rust
off. If excessively rusted, you'll have to replace these parts.
Luckily, they are available from Pinball Resource,
but are a bit expensive.
For the legs first remove the old leg levelers and throw them
away.
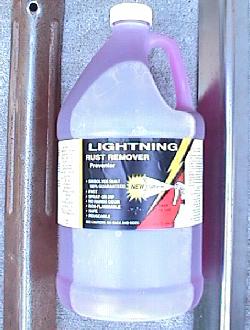
To remove the rust, I recommend Lightning Rust Remover. It's
available from Real Products, Ney Ohio, 800-659-2459, at $25 per gallon.
Shipping is an extra $5. This stuff works great. I use a combo sponge
with green pad on the back of the sponge to apply the remover. Just
keep the surface wet for about 5 minutes, and ocassionally scrub
with the green pad side of the sponge. Or just scrub with a
regular Scotchbrite green pad. Wash off with water and dry.
Once all the rust is removed, you can polish the legs further
with your buffer. That will make they really shine.
After the legs and coin door are clean and shiny, wax them.
This will protect them from any new rust. Install new leg levelers.
If the coin door or legs are excessively rusty and Lightning didn't
get all the rust off, you can also
sand off the rust 340 grit wet/dry sandpaper (using it "wet" with water).
Then follow this by buffing the parts on a buffing wheel.
2e. The Cabinet: Put the Legs On (stripped threads)
Before you install the legs, examine the original leg bolts. Are
the threads stripped? If so, you can bet the threads inside the cabinet
(on at least one leg) are stripped too. If the leg bolts are in
bad condition, buy new ones. Pinball Resource sells new leg bolts
for 50 cents each.
A 3/8"-16 tap and die. Note the tap handle (above
the tap). Not necessary, but it does work a lot better
than a small adjustable wrench!

Before I install the legs, I always recondition the threads inside
the cabinet using a 3/8"-16 Tap. This is available from any decent
hardware store for about $3.
If you want to recondition the original leg bolts too, you can also
buy a 3/8"-16 Die for another $3. Put the die in a vice, and thread the old
legs bolts into the die. This will clean up any stripped threads.
Note you can also buy new leg plates too. In many cases, re-tapping
the leg plates just will not work. They often need to be replaced.
These are available from Pinball Resource for about $1 each.
If you do keep your original leg bolts, polish each bolt head
on the buffer. Makes them look a lot better.
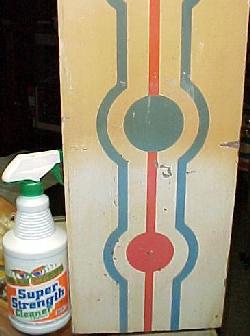
2f. The Cabinet: Clean the Outside
Using a cleaner called "Mean Green" and a
paper towel or even a worn Scotchbrite pad.
See how much whiter the finish is?
After the legs are on and the game is set up, clean the outside
of the cabinet. WARNING: before using
any cleaning product on the cabinet, try it in a small unnoticed area first (like
the cabinet paint under where the legs bolt.
I personally like Mean Green for most cabinet cleaning chores (Mean Green is
not the same as Simple Green by the way). Mean Green is available from most
dollar stores, Meijers, and other grocery stores (my local grocery
sells it). The stuff works great on old EM cabinets to new 1990s game cabinets.
On EM games, the cabinet
is often yellowed (look at the cabinet paint under the legs
and compare). My general approach is to spray the Mean Green onto
the cabinet, wait ten seconds, and then wipe it off with a paper towel.
Right after doing this, examine the paper towel. Make sure there's
no cabinet paint on the towel! Usually the paper towel will have a
sick brown sludge. This is good. I usually apply one or two more
applications of Mean Green, until the paper towel no longer shows
any yellowish/brown crude. At this point STOP. If Mean Green is over
applied, cabinet paint could start to soften and come off on to
the paper towel. Mean Green works great, but it can
remove cabinet paint on some older games. This does not seem to
be a problem with newer games.
2g. The Cabinet: Save the Backglass (Krylon Triple Thick)
Note: If your backglass is perfect with no flaking or crazing,
skip this section.
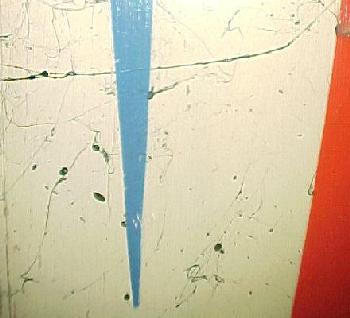
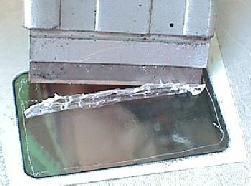
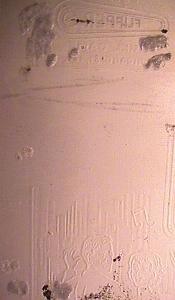
The start of backglass delamination. Arrest this
before it becomes fatal.
This picture shows the beginning of backglass delamination. This needs
to be arrested before the backglass is wasted. The cause of
the paint delaminating from the glass is largely environmental. Changes
in temperature is the biggest offender. The ink/paint and the glass have
different expansion/contraction rates. When the temperature changes,
the paint will react sooner than the glass. Since the glass can't give,
the paint will instead. This causes cracks in the ink/paint. Cracks allow
humidity to get between the paint and the glass. Delamination is certain.
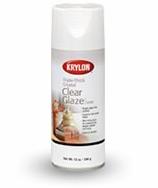
The backglass and the clear used to save it.
Left: Krylon's Triple Thick Crystal Clear.
Right: Krylon's Acrylic Crystal Clear,
a thinner version of Triple Thick.

The History of Backglass Preservation.
The first commercial product used to save delaminating backglasses
was "Cover Your Glass" (CYG).
Cover Your Glass was applied by actually pouring it on the backside
of a backglass while it was lying flat,
and allowing it to dry in a very thick entombing layer. This worked well for
glasses that were really delaminating and partically beyond saving,
since the paint chips would
not blow off since CYG was not sprayed.
Steve Young's Pinball Resource owned the formula
to CYG, so he was actively pushing that product (though Tim
Arnold and others had warned him of CYG's problems).
CYG has been around for a long time and came in two formulas,
"regular" and "light". The light version was better, but overall
Cover Your Glass sucked. It is a polyester product and
cracks, especially if there is any sudden
temperature changes (much like the original backglass paint
you're trying to save). The cracking was so bad in some cases it made
the CYG'ed backglass useless. For this reason most people abondoned it.
Also CYG goes on so thick, it really made any backglass touch up
impossible after it was applied.
The other product often used is
Krylon's "Crystal Clear". Though Crystal Clear is a good acyrlic lacquer
type product, it's film thickness is just way too thin for
backglass preservation. For it to
be used affectively, at least five (or more) good coats need to
be applied. But be careful, don't apply it too wet or it can
bleed the backglass inks. For this reason it's just not a practical product
to use in backglass restoration (though I do use it for other
purposes in pinball repair, like putting a thin coating on
sanded/polished metal to prevent rust). But many people used
Crystal Clear because it really was the only "decent" product
available (other than CYG) for a long time.
Mylar and Shipping Tape.
Another technique tried probably even before Cover Your Glass came
along was the shipping tape/mylar technique. This involved putting
clear shipping tape or mylar over the areas of the backglass that
are delaminating. The delaminating ink/paint sticks to the tape/mylar
as it is applied, and the tape sticks to the glass surface, holding
it in place. At first this sounds incredibly stupid, but it
actually works quite well. The down side is that it's a short term
fix. With age shipping tape will delaminate and yellow, falling off
and taking the loose ink/paint with it. Add the heat
from the backglass lightbulbs, and the problem is worse. Mylar is much
better in this regard, but still has this potential problem.
Using either product does
not allow any future touchup of the backglass, which is a big downside.
And once either tape/mylar
is applied, there's no going back, because it can not be removed
without removing the backglass ink with it.
I use the shipping tape/mylar technique when I go buy a game from someone
where the backglass ink/paint is falling off as I move the game
(at this point I *know* I'll be looking for a new glass anyway,
so there's not much to lose). It allows me to save at least some of the
backglass graphics before I move the game (and all the ink/paint falls off!)
I would not suggest using mylar (which is much better than shipping tape)
unless the backglass is in really bad condition. If the flakes are very
loose, spraying a coating without blowing the flakes off is difficult.
Therefore mylar is really the only option. Mylar does work quite well,
and is very permanent. I really don't suggest shipping tape because it
will eventually delaminate (as it's not designed for long-term hold).
Introducing Krylon's Triple Thick Cyrstal Clear.
In about 1997 I started using Illinois Bronze/Krylon's
"Triple Thick Coating" to save backglasses.
This is a spray product, much like
Krylon's Acrylic Crystal Clear,
but it produces a much thicker film with far less coats. Krylon calls Triple Thick
it a "glazing product", but only because of the film thickness produced.
Triple Thick Cyrstal Clear
is essentially a thick filmed acrylic lacquer.
This makes it ideal for backglass preservation. Most backglasses
are silkscreened using inks. But after the ink is applied,
the manufacturer's usually put a lacquer type coating over
the inks to "lock them down". Because Triple Thick (and Krylon's
Crystal Clear for that matter) are a similar product, Triple
Thick works very well to lock down delaminating backglasses,
and does not have the bleeding ink problem that Crystal Clear has.
As a test of Triple Thick, in 1997 I applied two wet coats to
a 1978 Bally "Strikes and Spares" backglass and to a
1973 Williams "Upper Deck" backglass. These backglasses
were starting to delaminate, and had about 10% to 20% ink/paint loss. After
I sprayed the backglasses, I left them in my garage year round. I live in
Michigan, and there is plenty of temperature change between the
seasons (it gets pretty cold here in the winter!)
To date (over five years later), the backglasses are in the same condition
as the day I sealed them in 1997 with Triple Thick. No additional ink/paint
delamination has occurred, and the Triple Thick has not cracked
(like Cover Your Glass).
To my knowledge, I was the first to use Triple Thick for pinball
backglasses, and I attempted to introduced it to the pinball world.
The first people I told about the product was Tim Arnold and Steve Young.
Tim was looking to find a product to save delaminating backglasses
(at the time he was using Krylon Crystal Clear, and was somewhat
happy with the results). Steve Young was
using/selling "Cover Your Glass". Since Steve had a financial
interest in CYG, he was not overly thrilled with my Triple Thick discovery.
It took Tim Arnold and some others a while to accept the new
Triple Thick product. But after one use, I don't know anyone
that doesn't like it. The establishment of Triple Thick as
the "pinball backglass standard" forced the sales of CYG to
nearly nothing, and Pinball Resource no longer sells it to my knowledge.
Triple Thick is available at Kmart, Walmart, Sherwin Williams
paint stores, or any decent crafts store like Micheals Crafts.
Both the Kyron and Illinois Bronze products are the same,
just marketed differently in different areas. They also have a web site at
www.krylon.com/product/op_craft.asp
where you can click on "Triple Thick" for more information.
I find Triple Thick locally at Kmart/Walmart, Michael's Crafts, or
even some Ace Hardware stores.
Home Depot and most other hardware store do not seem to sell it.
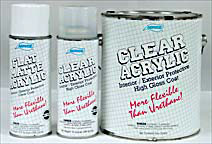
Alternatives to Triple Thick.
Really there is only one alternative to Krylon's Triple Thick, and that's
Aervoe's Clear Acrylic.
Only available through Aervoe.com (that I am aware of), this is a product
very similar to Krylon's Triple Thick. Unfortunately you can only buy
a case of twelve spray cans for about $45, so it may not be the best alternative
for most people. Also the advantages of Aervoe Clear Acrylic over Krylon's Triple Thick
are minimal, if any. But if you don't like Triple Thick for some reason,
there is an alternative! I don't know of anyone that has tried Aervoe's Clear Acrylic
other than myself and one other person. It's a good product, but not really
worth the hassle of buying an entire case mail order.
Aervoe's Clear Acrylic.
If You Can't Spray Paint, Please Do Not Attempt to "Triple Thick"!
I do have to explain this, but some people just
don't know how to spray paint. They just suck at it. If this is you,
then please DO NOT spray Krylon Triple Thick on a backglass! I thought
"rattle cans" were pretty much idiot-proof, but they are not.
I'm not trying to sound arrogant, but really some people just don't know
how to get a good smooth glossy finish using spray cans.
I have probably Triple Thick'ed 100 backglasses, and have never
had a problem. But I get emails from people that just can not do this even once
without having issues. They either put the Triple Thick on too heavy or too thin,
and just make a mess out of an other good condition backglass. If you can't put
a good professional looking finish on a piece of flat metal using a rattle can,
then you have no business applying Triple Thick to a pinball backglass.
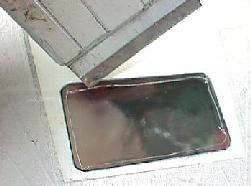
After applying Triple Thick, the coating on the back of a score glass should be
shiny, glossy, and smooth. There should be no overspray misting or separation of
the backglass film. It should look good! Practice on a junk backglass first
if you have any doubts.
Preparing the Backglass for Triple Thick.
Before spraying the backglass, clean it if possible. If there is any or
significant ink/paint flaking, skip this step! If the ink/paint is mostly intact
and just starting to delaminate, I would suggest this. Often a backglass
can have a thin film of oil, grease or other crud on it from the stepper units
and score reels. If this is not removed, the Triple Thick may not
"stick", resulting in "fish eyes". Because of this, I personally find
it is best to try and clean the painted side of the backglass if possible.
Again, if the backglass ink/paint is starting to delaminate, skip this step!
To clean the painted side of the backglass,
take a paper towel and spray the paper towel with Windex (don't soak it!)
Never spray Windex directly on the backglass. Spray the Windex on the paper
towel. Now gently wipe the score windows and credit window.
After doing those, *gently* wipe any other "solid" (not delaminating) sections
of the backglass. Remember, don't go nuts and cause more problems.
"The enemy of good is better" is something that should be repeated while
doing this chore. Examine the paper towel for crud or potential paint
loss. See all the dirt on the paper towel? Removal of this crud really
helps the Triple Thick "stick" to the backglass ink/paint.
On backglasses with score reel windows, a business card can be cut and
layed over the clear score reel windows. Use a penny or a nickle
to hold the card down. This is optional (often I just spray over the score
windows completely).
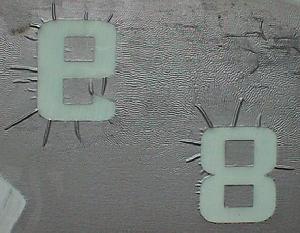
Left: Score the score windows with a razor blade.
Right: Scraping/peeling the clear off the score window.
Applying the Triple Thick.
After the glass is dry from cleaning, it is time to spray the Triple Thick.
Put the backglass flat on a solid surface.
If the backglass ink/paint is really delaminating, I spray the first coat of
Triple Thick about 18 inches from the glass, and move the can very quickly.
This will provide a "misting" coat to get the delaminating paint to stay in place.
Then let this coat dry a minimum of 30 minutes. A repeat of this quick and distant
application may be required. If the backglass is not delaminating,
my first coat is about 12 inches from the glass, and I move more slowly, applying
more clear in a "wet" overlapping coat.
If the backglass is heavily peeling, please skip down to the secition below,
Saving a Severely Peeling & Flaking Backglass.
After the first coat(s) of Triple Thick is down and dry for at least
30 minutes, I spray one or two more
"wet" coats. The first coat of Triple Thick should have all the backglass
paint solid and in place. So the "wet" coats can be applied with the
spray can much closer to the glass, laying down much more Triple Thick
again in a "wet" coat. Spray the coats in
perpendicular directions if possible. That is, spray left to right on the first coat,
and then up and down on the second. I find that at least 30 minutes of dry
time between coats is needed.
A common question is, "how much Triple Thick do I need to apply?" Generally
speaking, two wet coats is all that is needed. Do not go wild and apply
more than that. Too much Triple Thick can be a bad thing (but also too little
Triple Thick does not really protect the backglass).
On backglasses with score reel windows,
if they were not masked before spraying, they can be
razor bladed to remove the Triple Thick. Note if the proper amount
of Triple Thick was applied (not too much!) and the windows were
clean, I often leave the score windows with the Triple Thick on them.
If you did a nice job spraying, usually the Triple Thick can not be seen.
If this is not the case,
after 30 minutes of drying time on the last coat,
use a razor blade or exacto knife and score the outside edges of the
score reel windows. Do this about 1/8" on the inside edge of the paint. This
allows the new finish to overlap the backglass paint. If you allow the
paint to fully dry before scoring it (not recommended!), heat your razor blade or exacto
blade so it is hot, then score the paint. The heated blade will
cut the clear coat much better.
After scoring the new finish, scrap/peel the clear from the windows.
Use the razor blade for this job (or a razor blade broken in half).
I usually do *not* razor the credit window. When complete, let the glass
dry overnight. Then use Novus#2 on the score windows to remove the
"edge" from razor blade scraping.
Saving a Severely Peeling & Flaking Backglass.
Mark got me going on this, and here's my take on it.
If the backglass has a lot of curled, flaking, peeling ink/paint,
but most of the "ink pieces" are present, there is a way to save it.
This technique will also minimize the amount of touch up required
to fix the peeling ink/paint.
The problem with flaking backglass ink/paint is the loose paint chips
tend to curl up. Spraying Triple Thick usually will not make the
paint chips 'lay down'. So we need some techinque to get them flat,
so they will re-attach to the backglass.
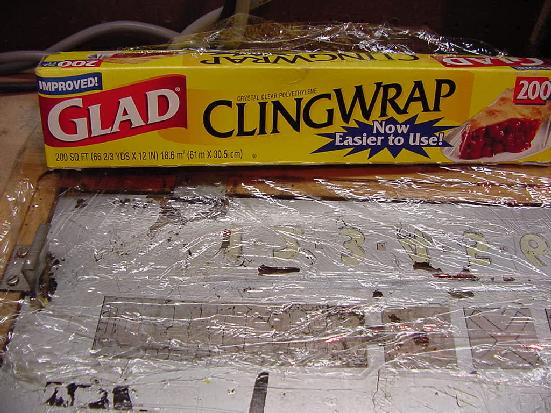
The trick here is to use "plastic wrap" (I have
found the Glad brand "ClingWrap" to work best). The plastic wrap
will act as a barrier between you and the wet Triple Thick.
The trick is to spray a "wet" coat of Triple Thick on the backglass. Then right
after the Triple Thick has been sprayed onto the backglass,
put a layer of ClingWrap over the wet Triple Thick in the
areas where the backglass ink/paint is peeling.
The ClingWrap doesn't have to be stretched tight,
and it only needs to be applied in the areas of peeling paint.
Try and apply the clear wrap with no creases if possible.
The reason for this is simple: if Triple Thick gets inside a
crease, the clear wrap will have a harder time coming off the
backglass after the Triple Thick dries.
Applying the Cling Wrap over the wet Triple Thick on a heavily peeling backglass.
After the Cling Wrap is on top of the wet Triple Thick, press the
clear wrap down with your fingers in any area where the backglass
ink/paint is peeling. Actually push down the peeling paint. Paint chips
can even be shifted and moved slightly if you are careful. The
ClingWrap will keep your fingers separated from the wet Triple Thick.
After all the paint is pushed down and into place, leave the glass
alone (do *not* try and remove the ClingWrap!)
Removing the Cling Wrap from the backglass after the Triple Thick has dried.
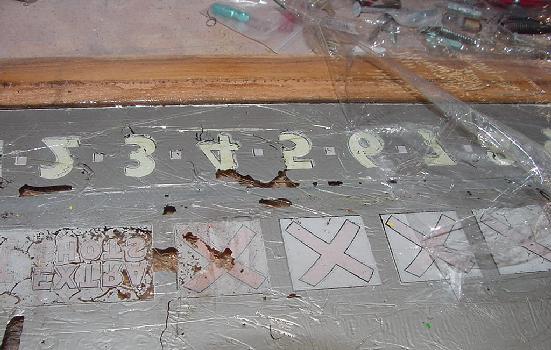
Now let the Triple Thick dry overnight. This is very important!
The Triple Thick must fully dry before proceeding. After drying,
the ClingWrap should peel off the backglass very easily, without
bringing any paint with it! It should come off so easy, the ClingWrap
should almost fall off. If it doesn't, the Triple Thick is either
not dry, or there are creases in the Cling Wrap, which have trapped
the Triple Thick, making it difficult to remove.
Leave it alone let it dry longer.
If the ClingWrap still won't let go from the backglass, sometimes
a quick spray of 'cold freeze' (spray cold in a can, often used to remove mylar
and to test electronic components) will release it.
But be careful, as you don't want to get the backglass so cold
that it delaminates the ink! (That would kind of defeat the whole
purpose of this exercise.) If the ClingWrap still won't come up (rare,
but I have heard of it happening),
don't force it. Just trim off what you can with a razor blade and
leave it alone. Note I have tried other products, but ClingWrap seems
to work the best. And no, wax paper should not be used. The solvent
in Triple Thick reacts with the wax, and makes a big mess (the Triple
Thick doesn't dry well because of the wax).
Note there is some "texture" to the Triple Thick where the ClingWrap was removed.
Don't worry about it, that is to be expected.
After the Cling Wrap is removed, apply a second "wet" layer of
Triple Thick to the backglass. Spray this second coat perpendicular
to the first coat. The "texture" will go down a bit with this
step, and the second coat locks the peeling ink/paint down
even better. After the second coat is dry, the backglass is ready
for touchup!
2h. The Cabinet: Touch-up the Backglass
Note: If your backglass is perfect with no flaking or crazing,
skip this section.
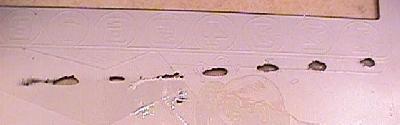
Rack-A-Ball (front): this backglass was worn by the backboard.
Too bad, because otherwise this was a very nice backglass.
Rack-A-Ball (back): the same section as seen from the back. Fortunately,
this area is in an unlit (opaque) part of the backglass.
Often an otherwise perfect backglass will need to be "touched-up".
I don't suggest doing this unless the wear or flaking is severe enough
that you just can't live with it. Also, before you try this, make
sure you have done the previous step. Clear-coating the back of
the backglass with "triple thick" is mandatory before you try this
procedure.
Warnings:
This is an experimental procedure. This is certainly not
the only way to touch-up a backglass. This is just one approach that
I find to be very forgiving, and easy for a beginner. Practice
is the only way to get good at backglass touch-ups. So start with
some junk backglasses and practice. We've all seen the results of
bad backglass touch-ups. In many cases, the outcome was worse than
the initial problem.
How it was originally done.
Originally, the "paint" used on backglasses is actually an ink.
The ink is applied one color at a time by pressing it through a silk
"screen" and onto the glass (the black lines are applied first, then the
lightest to darkest colors follow). The silk is coated, but the coating is cut away in
the areas where a particular color is to be applied, and squeezed through the
screen. There is a separate screen for each color. The inks that are applied
are translucent (allow light to pass through). After all the colors are
applied, the areas that stay transparent are screened over with a translucent
white which dufuses the light evenly. The colors that are opaque
are screened over with a black mask (in the 1940's and
1950's) or silver mask (in the 1960's and later) and does not allow light to pass
through the color.
Ideally, it would be great to use the original style inks to
touch up a backglass. But in reality, this is impractical.
The original Pantone Matching System (PMS) inks are very
expensive, can only be bought in large quanities, and are
hard to work with. Also once applied, there is no going back.
They are not forgiving.
Opaque and Translucent areas: What's the difference?
After all the ink colors are applied to the glass, there is
a final coat of opaque silver or silver mask (depending on the era of
the glass), or translucent white screened over the colors.
Areas that light up on the backglass are coated
with a thin layer of translucent white. This white diffuses the
light from the backbox light bulbs. Areas that are not lit are coated
with a layer of opaque silver or black mask that
prevents light from passing through the color(s). It's
important to understand these different areas (you'll see
why in a moment).
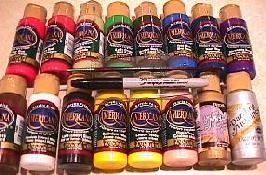
All the tools you'll need: water-based acrylic craft paints,
a small paint brush, a black Sharpie marker, and some
small pieces of glass.
An alternative approach.
Instead of using inks to repair a backglass, I suggest you
use craft supply acrylic paint. The advantages to using this
material are:
- Inexpensive. Usually about $1 per bottle.
- Easy to find. I get these at my local discounter (Kmart, Walmart, Meijers).
- Lots of colors available.
- Water based.
The biggest advantage to these craft acrylics is the last point;
they are water-based. This means if you apply them, and don't like
the results, you can just wipe them off with a damp cloth.
Since the backglass is coated with Triple-thick, you can do this
many times without any damage. Triple-thick seals
out the water.
What determines a "good" outcome?
How well this procedure works depends on two things: how good a
job you did with the Triple-thick sealing process, and how good
you can match colors. If the areas where there was no backglass
paint were clean and flat before you used your Triple-thick, your outcome
will be MUCH better. Also your ability to see color, and determine
the make-up of a color, will also help greatly. Often it's helpful
to have a (female) friend help with this last point.
Prelimary Analysis: Should you attempt fixing the Translucent areas?
For the most part, I would say "no" to this question. The non-silvered (or non-black)
areas of a blackglass are the hardest (by far) to touch up. These are
the areas that allow light to pass through them. If you can
help it, leave these alone! Since these areas allow light to pass through,
if the repair paint you apply isn't the same translucency, the
repair area will stick out like a sore thumb (even if the color match is perfect).
It doesn't matter how well
you match the color, you also have to match the translucency too.
This is extremely difficult! For this reason, do not touch up the
translucent areas of a backglass. To minimize any obvious ink/paint
delamination from these backglass areas, remove some of the backglass #47 light
bulbs from the backbox that light these areas.
Using Paint Retarder to Match Translucent Areas.
A way to touch up translucent areas is to use acyrlic paint retarder
(you may have to buy this at an art supply store). This liquid slows the
drying time of the acyrlic paint. But that's not what we're using it
for. You can also add paint retarder to your mixed color to thin
the color, and make it translucent. This works very well and allows
you to match the translucency of the original surrounding paint.
But applying the color in a consistent thickness is very difficult.
I don't really recommend this technique.
Using Cellephane Mask in Translucent Areas.
Another approach to fixing translucent areas is to use a colored cellephane mask.
To do this, you'll need to score the offending translucent area of the backglass
with a hot exacto blade (which cuts paint without chipping it).
Then all the defective translucent color can be cut out and removed. But instead of
re-painting this area, apply the colored cellephane, overlaping the area
if possible. Stick the cellephane down with some tape on the edges.
The colored cellephane will give the desired translucent effect.
Not an ideal repair, but it works.
Making Touched-up Translucent areas Opaque.
I like this alternative the best. It makes a translucent area opaque, allowing
for easy touch up. For example, if a transparent area has crazed and chipped,
go ahead and touch up that area, but don't worry about matching the translucency.
This allows you to touch-up the area
without having to worry about how translucent your colors are.
After the area is color matched and touched up, you can opaque the touched up
area using silver or black paint.
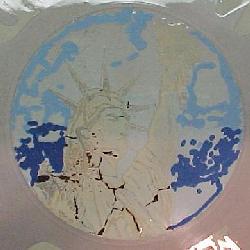
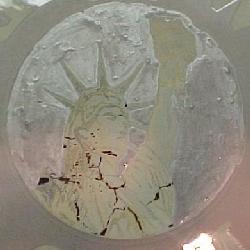
Left: The area inside the circle is originally masked with translucent white paint that
has cracked and peeled. This area is touched up with acyrlic paint.
Right: After the touch up, the entire translucent area that is touched up is
back painted with opaque silver paint. This allows the touched up areas to match in
color and translucency (which is now not transparent!). The Liberty statue in the center
of the circle is not touched up, and is left translucent.
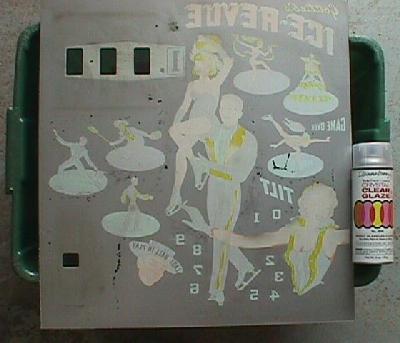
Last Resort: Repainting an Entire Translucent Area.
As a last resort, you can remove ALL the paint from a transparent
area, and touch up the entire area. This allows you to touch-up the area
without having to worry about how translucent your colors are. In order
to do this, you'll have to chip-out ALL the current color in that area.
Use a hot exacto blade and score the outside edges. Then scrape out all the
color from this area with a razor blade. When you re-apply the color, it will be very easy.
Color matching will be far less of an issue. When done, make sure you remove the
back box light bulbs from this area as they are no longer needed.
Though this situation is not ideal it does work.
For example,
on one game I had, the white translucent areas in the words "Game Over"
was completely delaminated. Using an Exacto knife, I chipped out any of the remaining
white translucent paint from the "Game Over" letters, so they
were completely clear (the black masked, non-translucent area around "Game Over" was fine).
Then I Triple Thicked the backglass. After the Triple Thick was dry,
I masked off the area around "Game Over", and sprayed a light coat of
white Krylon spray paint over the clear "Game Over" letters. This worked amazingly
well, and looked great even with the backlit #47 light bulbs on.
But the catch was the letters were translucent white only with no color.
Doing the Touch up.
Step 1: Buying the Right Paint Colors.
There are probably 100 different colors of craft acrylic paint available.
Obviously, you won't buy them all. But it's always nice to have colors
out-of-the-bottle that match as close as possible the colors you need.
So here's some tips on buying colors:
- Buy the brightest colors available, and some soft pastels. For example, it's easy to make red lighter
by just adding white or by adding a softer red pastel. But you can't
really make red more red, short of adding more red pigment.
- Buy at least two of each of these colors (a deep and pastel version): red, yellow, blue,
green, purple, orange and brown. I also bought
a flesh tone color too.
- Buy bright and off white.
- Buy black. You'll need it to darken colors.
- Buy silver metallic. You'll need this as a final color step.
- Buy acrylic paint retarder.
But in reality, the more colors you buy, the better you'll be.
In the end, I bought nearly ever color my local store had to offer.
Heck they had a sale on the acrylic paints, so it really was not
that expensive. And it makes backglass touchup a lot easier.
Taking color out of a bottle is a lot easier than making your
own colors.
The Pantone Solid-to-Process color guide. I find this very useful for
matching backglass and playfield colors.

Another tip I can offer is to buy a Pantone color matching set
(get the solid-to-process version, as it can be used for doing
computer color matches too).
These are available on Ebay in the $30 to $60 range. It's a lot of
money, but I find it very useful. If I don't have the right color
for a backglass, I match the color on the Pantone color samples.
Then I take the Pantone color swatch to the store and get the right
color. This saves me from having to haul a backglass into the
local store to get a color match! I also use the Pantone system for
doing computer color matches when recreating artwork on the computer
with Adobe Photoshop.
Step 2: the Black Key Lines.
Before you start applying any paint, you need to re-create the
black lines that separate the colors (known as key lines.) Not all areas will use
these, but in the areas that do, this is your first step. I suggest
using a NEW black "Sharpie" pen and a ruler for this. Draw the
lines on the back of the backglass. Usually you'll have to go over
the same line two or three times to get it really dark. If you make
a mistake, use some alcohol and a paper towel to remove the Sharpie's
ink and start over.
Using a Sharpie and a ruler to re-create the black separation
lines the run between many colors.

There is a reason you don't use black acrylic paint for the lines.
First, it's very hard to paint a straight, consistent line. Second, if
you make a mistake applying color near the line, you'll end up removing the
color mistake and the black line. Then you'll have to repeat painting
the black line. The Sharpie's ink will not be removed with water when
you have to re-do a color area.
Using the end of a paint brush to mix a bit of black
into some green to darken it. This is done on a scrap
of cardboard, on the shiney side to minimize water absorbtion.
Step 2b: If large sections of paint are gone...
If you are attempting a major re-paint of a glass that is REALLY
gone, here's a tip. Use your Sharpie pen, and draw in the backglass
design's outlines on the FRONT of the glass! When done, flip the
glass over, and fill in the missing areas with colored paint.
It's kinda like painting-by-numbers now.
After that dries, remove the black Sharpie lines from the front
of the glass with some Windex.
Step 3: Mixing the paint.
Now that the black lines are in place, you'll need to mix some paint
to match colors on the backglass. This is the most difficult part of
the entire procedure! Your ability to match colors will give the best
outcome. I would highly suggest you have someone help you with this.
A second pair of eyes and perception always helps. No sexist comment
intended here, but females seem to be able to help the best. They
perceive color differently than males, and can often help you match
color better.
Mix the paint on a piece of scrap cardboard or plastic. Note if you use
porous cardboard, the paint may dry quicker on the pallet, as
the cardboard absorbs the water from the paint. You can
also use the top of an old margarine tub or mix the paint
in a 35mm film container. Then just put the lid on, and
the paint won't dry as quick.
Just squeeze out the colors
from the bottles, and mix it with the end of your paint brush. Also have
a glass of water and some paper towels nearby. When done mixing, wipe off
the end of the brush on a paper towel.
I usually start with a darker color than I need. Then I add a touch
of white or the same color pastel to lighten it. Alternatively, you can start with the
light pastel color and add a dap of the deeper color or black to darken it. But be careful trying to
darken a color with black. For example, adding a touch of black to green will make it darker,
but it also makes the green "blacker" in the process, and not really "greener".
It's much easier to darken a pastel with a deeper version of the
same color. It's a lot easier to lighten a color doing the reverse.
Add other colors as needed to change the overall shade of the color.
Appling some test paint to your sample test glass.
The color on the left is the green straight from the bottle.
The color on the right is the same green with a touch of
black added to darken it.
Step 4: Paint your sample glass and let it dry.
When you think you have a color matched, apply some to your
small test piece of glass. If you don't have a test glass,
just apply the mixed color to the FRONT of the backglass.
Using the front of the backglass or a test glass is the
best way to match the color.
Let your sample glass dry (a hair dryer can be used
to make the paint dry faster). The
biggest problem with these craft acyrlic paints is they dry darker.
So let the sample dry, and then compare it to the backglass color.
Don't worry if your paint dries on the cardboard mixing pallet
while you're waiting for your sample test glass to dry.
Just dip your brush into some water, and put the brush on the
dry paint. It will become liquid again as long as the paint
has not dried for more than about 30 minutes.
To clean your sample test glass or the front of the backglass
(for the next color), just use a paper towel dipped in some water.
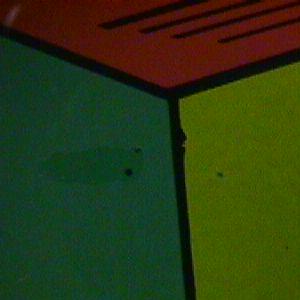
Dark green applied to the backglass. Can you see the
touched up area? The two black dots give it away. They are
from not properly cleaning the damaged glass areas
before applying the Triple Thick. I probably should have
chipped them out with an exacto blade before applying the
green touch-up paint.
Step 5: Apply the color to the backglass.
So you think you have the color matched correctly? Now is the
time to apply it to the backglass itself. If you are unsure
about where to paint the new color on the back of the backglass,
use a black Sharpie on the *front* of the backglass to outline
the area to touch up. Brush the new color on fairly
thick, but try NOT to overlap the paint past the area it needs to
go. Don't make a big mess here. Let the area dry and flip
the glass over and check your color match.
Not Happy with your Work?
If you're not happy with your color match, just wipe off the
applied paint with a wet paper towel. Now re-mix the paint
and try again. This is the beauty to using the water-based
acyrlic paints. You can change your mind, and start over.
Left: the backglass after touch-up. You can see the color
touch-ups and the black Sharpie line.
Right: the backglass after silver has been applied to the
touched-up areas. This makes the touch-ups less apparent
from the back, and makes the area less translucent.
Step 6: Re-silver your Opaque Touched-up Areas (optional).
This step is optional, but I recommend it if you are
happy with your touch-up work. Nothing looks worse than inspecting
the back of a backglass, and seeing all the touched-up
areas. They stick out. Putting silver acyrlic over these opaque areas makes the touch-ups
far less apparent from the back of the glass. Remember the original silver
is the light mask, to keep light out of certain areas of the glass. It has some
effect on the front of the glass, in colors that are hard
to apply opaque (like yellows). Adding the silver can stop additional
light pass through. Just dap some silver over the touched-up areas.
Don't apply too much, and don't move the brush heavily while
doing this. You don't want the silver to leach through the
color applied before. Note older 1950s backglasses use black
instead of silver for the light mask, and on these you should obviously
use black paint instead of silver.
All Done?
Note that after the water-based acyrlic dries for about an hour,
you can NOT wipe it off! Once the acrylic sets and drys, it is
more or less permanent. It will stay somewhat rubbery though, which
allows it to be pealed up if needed. So if you made a mistake in
the touch up process, don't let the acyrlic paint dry too long
before removing it. Goof Off can be used to remove dried acrylic paint
though.
An Alternative BG "Touchup" Method for Translucent Areas.
A lot of people will see the above paint mixing and matching,
and just do a head-bang. Yea it's a lot of work, and frankly
the results can be poor if you're inexperience or color blind
(or both!) And also especially if you want to touchup the translucent
areas of the backglass (which is very difficult).
But there is another less volatile way to do translucent backglass touchup.
And it take a lot less time, is cheaper, and far less invassive.
That's the good news. The bad news is it only works in the translucent
areas of the backglass. For the non-translucent (opaque) areas, you will need
to follow the steps outlined above using acrylic paints.
First step is to clearcoat the backglass with Krylon Triple Thick (if you
have not done that already). This is *required*. The second thing is you
much run #47 bulbs in the backglass (the #44 bulbs are too hot).
The next step is to go to Micheals and by some translucent colored cellophane.
This comes in a 24" wide roll 1mill thickness, and in a variety of colors.
Red and yellow are the most commonly used colors. Cost is about $6 per roll.
Another alternative to Micheals is to get some Rosco Gels (Roscolux.) These are basically
the same as the Micheals stuff, but come is WAY more colors. You can buy a swatch
of them for $7.50 to make color matching easier. They are available from
http://www.rosco.com/sbreqs/index.cfm.
Also available is a kit with all most of the colors offered for about $35 from
here.
Next turn the backglass over (screened side up), and cut a length of the
transparent cellophane. On the red you will need to 'double up' the cellophane,
folding it in half (for less transparency). With yellow cellophane you have
to go even further, using at least 4 layers if not 8 layers (the yellow is
far more transparent than the red).
After the cellophane is cut to the approximate size you want, covering the
area desired, just Scotch tape it in place. I use a quality 3m tape as it's
more durable, but anything will work.
Now install the glass in the game and turn it on. If the lights are "too bright",
I often remove a couple bulbs to decrease the amount the light. This often really
helps. This is not a perfect solution, but it's easy and non-invassive. And if you
want to reverse it just peel back the cellophane.
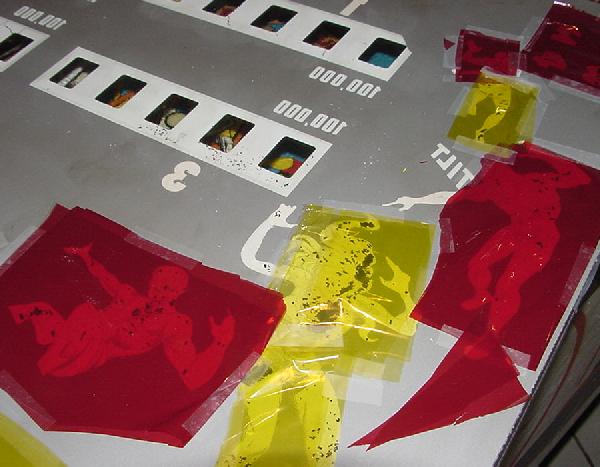
Here's the red and yellow cellophane taped to the chipped areas of
the translucent parts of the backglass. Note the backglass has been clearcoated
with Krylon Triple Thick. Pretty ugly, but it works well.
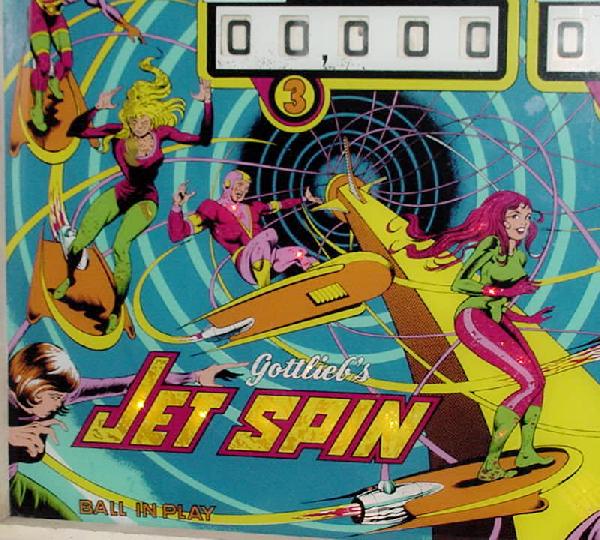
Here's the same backglass installed and with the game turned on.
A few #47 light bulbs removed to lessen the light, but the overall effect
is much better (especially in the yellow "Jet Spin" lettering).
Backglass Decal Touchup.
There is another technique that can be used to use water slide
decals to touch up a backglass. This involves Triple thicking the
backglass, cutting the area with a hot exacto knife,
and then scraping the areas clean where the touchups need to occur.
Then using a good scan of the effected area, waterslide decals are
made and applied to the back of the glass. After dry, additional
touchups can be made directly to the back side of the decals with
acrylic paints (as needed.) Then the area can be sealed again with
Triple Thick, and a silver mask added as needed.
Reproduction Backglasses.
There are a few people that still do silk screened backglass
reproductions. These are expensive and like the originals, easy
to damage. But if they are available, I highly suggest going this
route (providing you can afford them.) Another alternative are
digital reproductions. "Direct Ink" and laminated vinyl are popular
now and look quite good. Their only drawback is their translucency
isn't the same as the original silkscreened glass. But the advantage
is "one off" reproductions and their significantly lower cost.
Check out BGresto.com for examples
of these types of glass restorations.
* Go to Pinball Restoration Guide,
Part Two
* Go to Pinball Restoration Guide,
Part Three
* Return to the Pin Fix-It Index
|